
Are you looking to create a Nuxt i18n example in a simple and straightforward way? Well, you’re in the right place!
In this article, I will share my insights from working as a Vue.js software developer for over 5 years. We’ll walk you through the steps to set up Nuxt i18n, a powerful internationalization module for your Nuxt.js applications.
By the end of this tutorial, you’ll have a solid understanding of how to implement i18n in Nuxt and be able to create multilingual websites with ease. So, let’s get started!
No products found.
If you want to learn more you can read my longer article about How To Implement Nuxt Js Auth Next? Nuxtjs Examples.
Nuxt i18n Example
In this guide, we’ll walk you through the steps to set up Nuxt i18n example, a powerful internationalization module for your Nuxt.js applications.
Nuxt i18n Example
Nuxt i18n Example: To get started, make sure you have a Nuxt.js project set up. If you don’t, you can create a new project by running the following command in your terminal:


Once you have your project ready, navigate to the root directory of your project in the terminal and install the necessary dependencies by running:


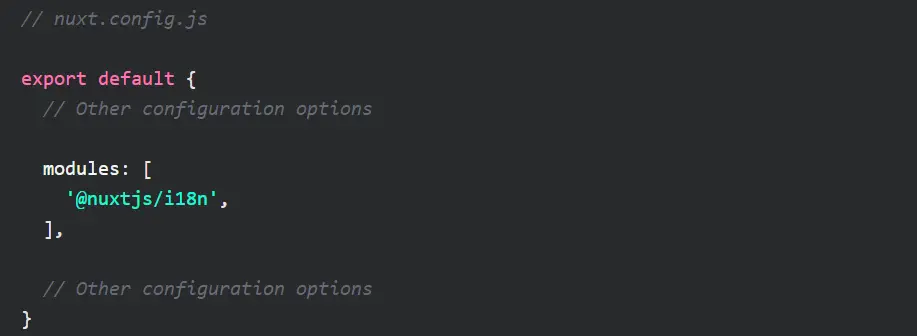
After the installation is complete, open the nuxt.config.js file in your project’s root directory.
This file contains the configuration for your Nuxt.js application. Locate the modules section and add ‘@nuxtjs/i18n’ to the array of modules:
Next, you need to configure the i18n module with the supported languages and their respective translations. Add the following i18n configuration to your nuxt.config.js file:


In the above configuration, we have defined two supported locales: English (en) and French (fr).
We specify the language code, ISO code, name, and the file containing translations for each locale. You should create the translation files in the lang/ directory of your project.
Check out my article about How To Add In Nuxt Bootstrap 5 – Bootstrap Example
Mastering Localization with Nuxt.js and the i18n Module
Localization can be a significant hurdle in web development, but with the Nuxt i18n module, it’s a breeze.
Designed to integrate seamlessly into your Nuxt.js projects, the Nuxt i18n module offers a comprehensive solution for adding multiple languages to your website.
Let’s dive into how you can harness the power of this module.
Enhance User Experience with a Multilingual Nuxt.js Application: Nuxt i18n Examples
Creating a multilingual website is an essential step towards expanding your global reach. Here’s a detailed guide packed with Nuxt i18n examples to help you add internationalization to your Nuxt.js app.
Setting Up Nuxt i18n
To start, you’ll need to install the module via npm or yarn and then configure it in your nuxt.config.js. Here’s a simple example:
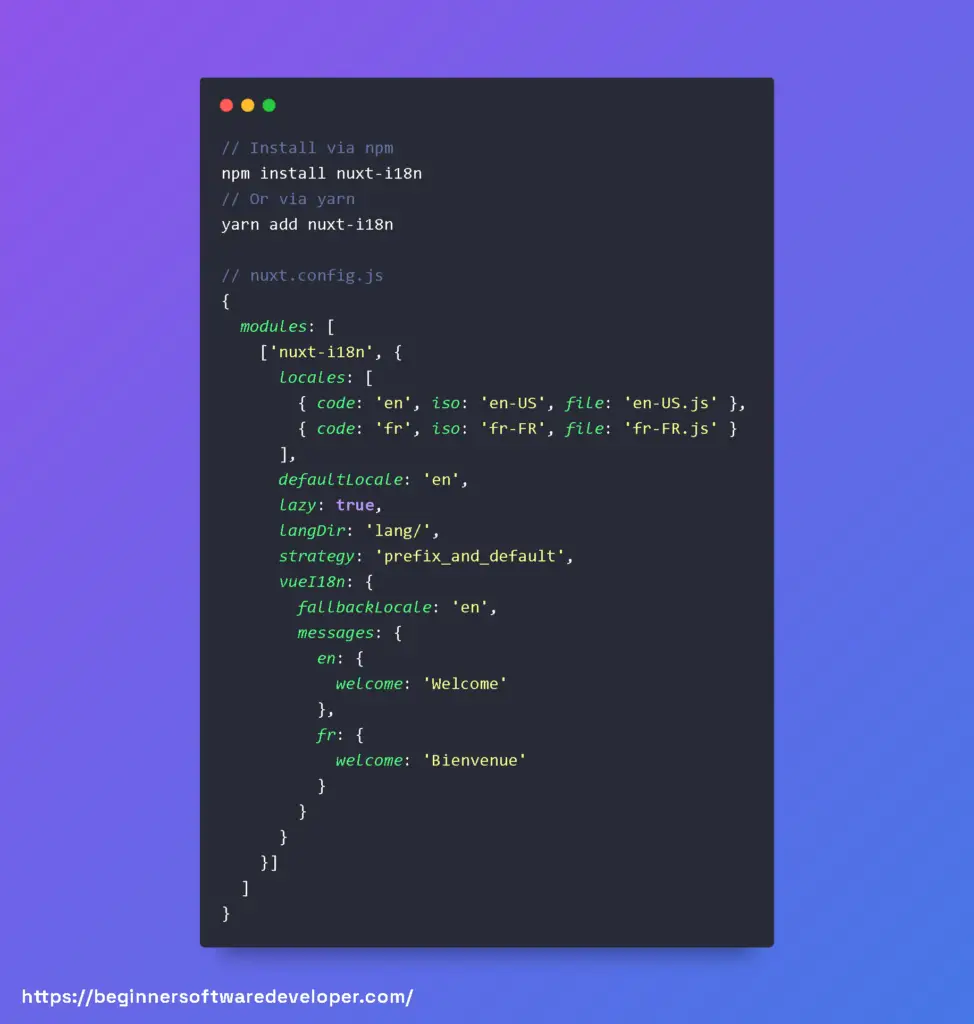

This snippet sets English as the default language while also supporting French. It uses a lazy-loaded approach for loading language files, a strategy that prefixes the default language, and defines fallback language settings.
Using Localization in Templates
With Nuxt i18n, localizing your templates is straightforward. You can access the current locale’s messages using the following syntax:

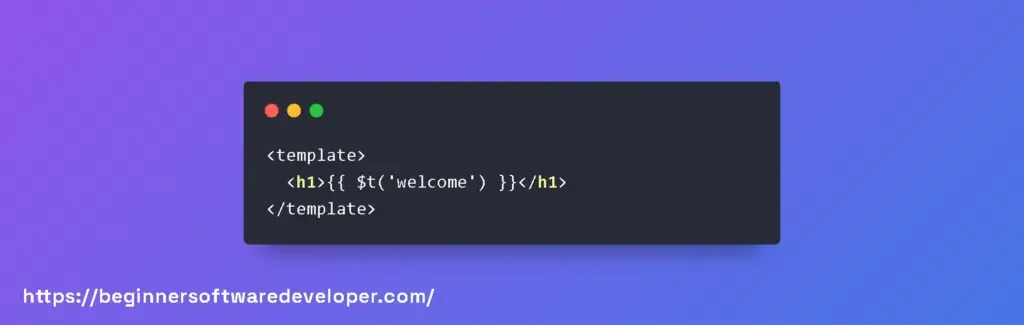
Here, $t is a Vue instance method provided by vue-i18n that looks up the ‘welcome’ message in the current locale’s messages object.
Tips for Effective Localization
- Keep your localization files organized by creating a separate file for each language in the ‘lang’ directory.
- Utilize the ‘nuxt-link’ for language switching to ensure client-side navigation without full page reloads. You can bind the ‘locale’ property to dynamically set the language.
- Consider SEO implications when selecting a URL strategy, and configure it accordingly in your ‘nuxt.config.js’.
When done correctly, utilizing the Nuxt i18n module allows for the seamless addition of multiple languages to your project, providing a richer user experience and potentially a broader audience for your app.
Making Your Nuxt App Multilingual with nuxt-i18n
Why Localization Matters for Your Nuxt Project
For Nuxt.js applications, implementing internationalization can be straightforward with the help of the nuxt-i18n module. In this section, we’ll discover how to set up language detection, route localization, and language switching, so your Nuxt app speaks your user’s language!
Seamless Language Detection and Route Localization with Nuxt i18n
Start by installing the nuxt-i18n package if you haven’t done so yet. Open your terminal and run npm install nuxt-i18n. Once installed, you can configure it in your nuxt.config.js as follows:


This configuration sets up two languages, English and French, loads the translation files lazily from the lang/ directory, and uses browser language detection to redirect users to their preferred language route. Make sure to create the corresponding language files within the lang/ directory.
Implementing User-Initiated Language Switching
Language switching allows users to select their preferred language. Here’s a simple Vue component to switch languages in your Nuxt app:

You can place this component anywhere in your application to provide an effortless language switching experience.
Best Practices for a Multilingual Nuxt App
- Always test your app’s behavior with and without JavaScript enabled, as some users may have it disabled.
- Keep translation files organized and manageable by splitting them according to the features or components they belong to.
- Ensure your application remains SEO-friendly by using the hreflang attribute and proper meta tags for each locale.
- Keep in mind the right-to-left (RTL) text direction in languages like Arabic or Hebrew, and plan your CSS accordingly.
Nuxt-i18n
nuxt-i18n npm
nuxt-i18n npm: To start using nuxt-i18n in your Nuxt.js project, you need to install the module via npm.
Open your terminal or command prompt and navigate to your project’s directory. Then, run the following command:


This command will install the nuxt-i18n module and its dependencies, making it available for use in your project.
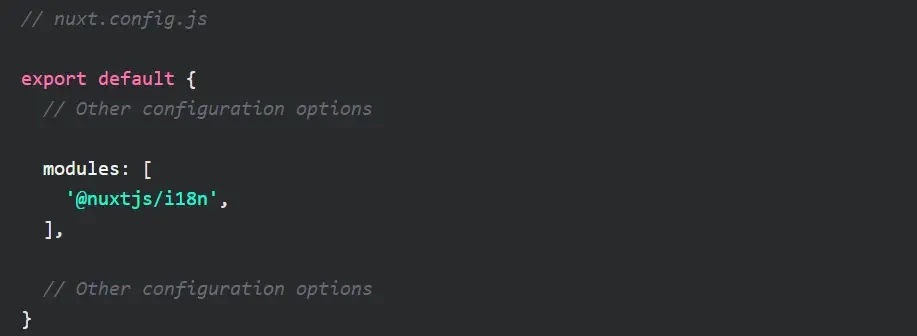
Once the installation is complete, you need to configure the module in your Nuxt.js project. In your nuxt.config.js file, add the following code to the modules section:


This configuration tells Nuxt.js to include the nuxt-i18n module in your project. However, you still need to provide additional configuration options to make it work properly.
You can define the configuration options in the nuxt.config.js file as follows:
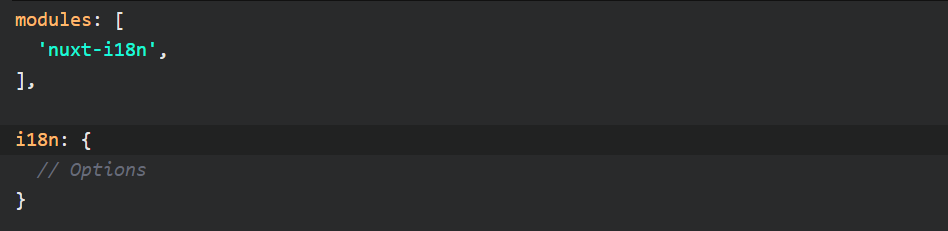

The i18n object is where you define the options for nuxt-i18n.
There are several options available, such as locales to specify the supported languages, defaultLocale to set the default language, and strategy to define the language detection strategy, among others.
For example, to configure nuxt-i18n to support English and French languages, with English as the default language, you can update the i18n object as follows:


With this basic configuration, you have successfully set up nuxt-i18n in your Nuxt.js project using npm.
Nuxt-i18n Typescript
Nuxt-i18n Typescript: First, ensure that you have the required dependencies installed.
Open your terminal or command prompt and navigate to your project’s directory. Then, run the following command:


This command installs the necessary TypeScript dependencies for your project.
Next, update your tsconfig.json file to include the nuxt-i18n module. Open the tsconfig.json file and add the following code to the types section:


By adding “@nuxtjs/i18n” to the types array, you are instructing TypeScript to include the type declarations for nuxt-i18n.
After these steps, TypeScript should recognize the nuxt-i18n module in your Nuxt.js project and provide type checking and autocompletion support.
Check out my article about How To Use Nuxt Watch Route? Nuxt Routes Examples
Nuxt-i18n Change Language
Nuxt-i18n Change Language: To demonstrate this, let’s assume you have a language switcher component with two buttons, one for English and another for French.
When a user clicks on either button, the corresponding language will be activated.
First, make sure you have configured the locales and defaultLocale options in your nuxt.config.js file as described earlier.
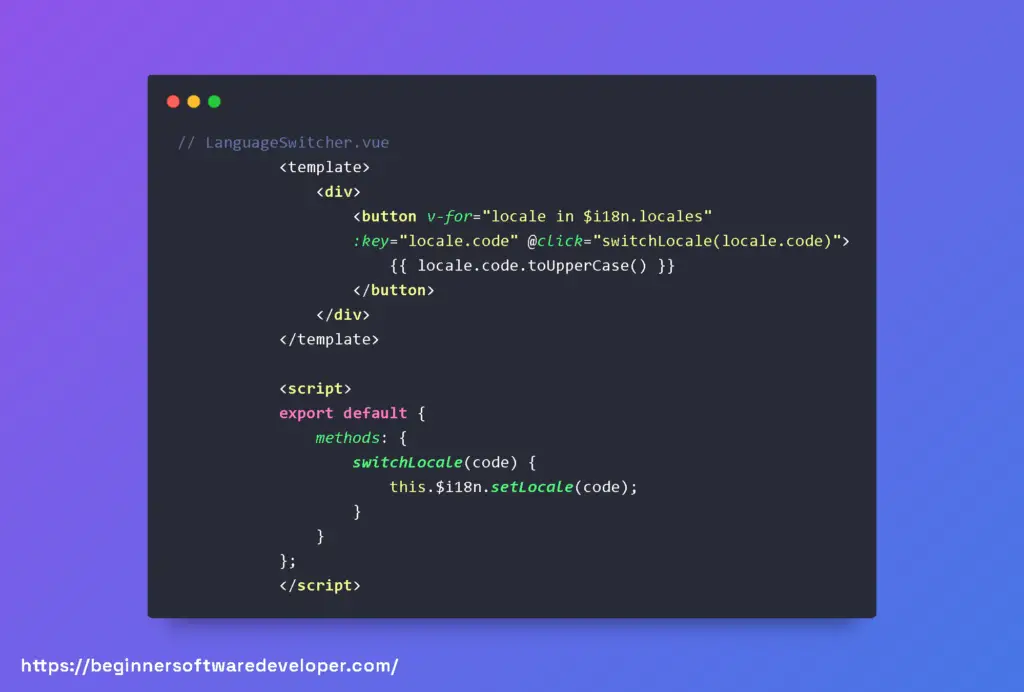
Next, in your language switcher component, you can define the buttons and their associated click handlers. Here’s an example using Vue.js syntax:


In this example, the switchTo method is called when a button is clicked.
It invokes the $i18n.setLocale(locale) method provided by nuxt-i18n to change the language to the specified locale.
Nuxt-i18n Detect Browser Language
Nuxt-i18n Detect Browser Language: To enable browser language detection, update the i18n object in your nuxt.config.js as follows:


The strategy option accepts several values, but in this case, we set it to ‘prefix_except_default’. This strategy tells nuxt-i18n to determine the language based on the subdirectory in the URL.
For example, if a user’s browser language preference is set to French and they visit https://example.com/fr, nuxt-i18n will automatically set the language to French.
If the user visits https://example.com/en, the language will be set to English.
This automatic language detection based on the browser’s preferences provides a seamless experience for your users, eliminating the need for them to manually switch the language.
Nuxt-I18n Composition API
Nuxt-I18n Composition API: With the Composition API introduced in Vue.js 3, nuxt-i18n provides support for using its features in a composition function style.
This allows for more organized and reusable code.
To demonstrate this, let’s assume you have a Vue component that needs to access the i18n module using the Composition API.
First, install the @nuxtjs/composition-api package by running the following command in your terminal or command prompt:


Next, create a composition function and import the necessary functions from the @nuxtjs/composition-api package. Here’s an example:
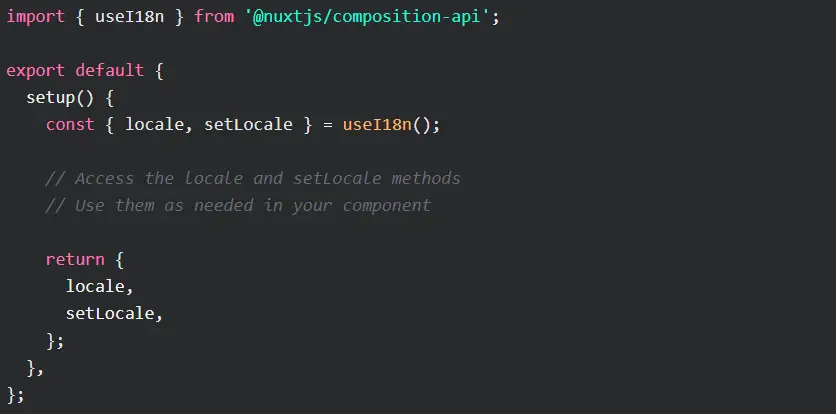

In this example, the useI18n function is imported from @nuxtjs/composition-api and used inside the setup function.
It provides access to the locale and setLocale methods, which can be used to get the current locale or change the language, respectively.
By using the Composition API with nuxt-i18n, you can leverage the benefits of the new Vue.js 3 syntax and structure your code in a more modular and reusable way.
Enhancing Multilingual Experiences in Nuxt with Composition API and i18n
Seamlessly Integrate Multi-Language Support with Nuxt-i18n and Composition API
Nuxt-i18n is an excellent module for managing internationalization in your Nuxt.js projects, and when combined with the powerful Composition API, you get a flexible and efficient way to handle translations and language switching.
Let’s dive into examples and best practices to make your global audience feel right at home!
Setting Up Nuxt-i18n with Composition API
First, ensure that the Nuxt-i18n module is properly installed and configured in your nuxt.config.js. With the module in place, you can access the locale, translations, and various other functionalities directly within the Vue components through the Composition API.
Here’s an example of setting up a basic internationalized component using Nuxt-i18n and Composition API:


In the code above, we import useI18n from nuxt-i18n/composables to access translation function t and current locale. This setup provides an elegant way to handle translations in the template.
Best Practices for Using Nuxt-i18n with Composition API
- Keep translations organized: Store your translations in separate files or use a dedicated service or library for managing them.
- Use lazy loading for languages: Load only the necessary languages to optimize your app’s performance.
- Be consistent with naming conventions: Stick to a naming strategy for your translation keys to make it easier to find and manage them.
To demonstrate lazy-loading of languages, here’s how you can modify your Nuxt-i18n configuration:


This configuration ensures that language files are loaded on demand, boosting performance and creating a more efficient application.
The combination of the Composition API and Nuxt-i18n offers a powerful toolkit for crafting sophisticated multilingual applications.
Through careful structuring and adherence to best practices, developers can ensure seamless language transitions and an enhanced user experience.
Nuxt-i18n Get Current Locale
Nuxt-i18n Get Current Locale: To retrieve the current locale in your Nuxt.js project that utilizes nuxt-i18n, you can use the $i18n.locale property. This property holds the currently active locale.
You can access the current locale in your Vue components using the this.$i18n.locale syntax. For example, you can display the current locale in your template like this:


In this example, {{ $i18n.locale }} will be replaced with the actual value of the current locale.
You can also access the current locale outside of Vue components by importing the i18n instance directly. Here’s an example:


In this example, i18n.locale will log the current locale to the console.
Related Articles
- Learn How To Use Nuxt Router Middleware
- Learn How To Build A Nuxt Single Page App (Nuxt SPA)
- How To Create A Nuxt Js Dockerfile – Nuxtjs Docker Example
- What Is The Best Headless CMS For Nuxt js?
- Learn How To Setup And Create Nuxt App
Hopefully, you now have a better understanding of how to use Nuxt i18n Example.
Understanding how to use Nuxt i18n Example is gonna help to use a powerful internationalization module for your Nuxt.js applications.