
As technology evolves day by day, so does the need for developers to stay up to date with the latest frameworks and dynamic tools.
Vue.js, one of the most popular JavaScript frameworks for building user interfaces, recently released its major update which is Vue 3.
With significant changes and comprehensive improvements under the hood, migrating Vue 2 to Vue 3 may seem daunting at first.
However, understanding the benefits and learning the migration procedure is crucial for software developers to leverage the full potential of Vue.js.
In this blog post, we will explore the method of migrating from Vue 2 to Vue 3 with the providence of theoretical content and practical examples of Vue migration.
We will delve into the major fundamental differences between the two versions of Vue, highlighting the latest features and enhancements introduced in Vue 3.
By understanding the core transformations, software developers will be equipped to make informed decisions and tackle the migration process in an efficient way.
The blog will teach you about essential aspects such as the Composition API, the new reactivity system, component changes, and the revamped virtual DOM.
Moreover, you will learn how these updates bring improved performance, better reusability, and enhanced developer experience to Vue.js projects.
You will see in our provided examples code snippets demonstrating the step-by-step migration process, which ensures that developers have a clear roadmap for successfully upgrading their Vue 2 projects to Vue 3.
Whether you are a seasoned Vue.js developer or new to the Vue framework, this blog post will serve as a valuable resource to navigate the migration process seamlessly and unlock the full potential of Vue 3.
By embracing the latest features and optimizations, developers can future-proof their web applications, stay ahead of the curve, and continue to build robust and performant user interfaces using Vue.js.
Are you a Vue.js developer planning to migrate from Vue 2 to Vue 3?
This article is gonna provide a comprehensive guide, including theoretical content and practical examples of Vue migration.
Explore the major differences, new features, and enhancements introduced in Vue 3, along with step-by-step instructions and code snippets to help you successfully upgrade your upcoming projects.
Future-proof your web applications, improve your project performance, and add an element to elevate your development experience with Vue 3.
Stay ahead of the curve and unlock the full potential of Vue.js. Read the blog now!
No products found.
If you want to learn more about How To Use Vue Props With Vue Prop Examples
Migrating Vue 2 To Vue 3
Migrating Vue 2 To Vue 3 is require you to update dependencies, update composition API, Vue Router and Vuex.
Migration Vue 2 to Vue 3 may seem like a daunting procedure at first, but the rewards are well worth the effort and struggle.
One of the key enhancements in Vue 3 is the Composition API. In the composition API, a more flexible and modular approach to writing Vue components is available.
It helps developers to structure their respective code in a more organized and reusable manner so, it will be easier to understand and maintain.
By adopting the Composition API, developers can take immense advantage of robust features like reactive data, lifecycle hooks, and provide/inject mechanisms, which enable them to write cleaner and more scalable code.
Another significant upgradation in Vue 3 is the enhanced reactivity system.
The reactivity model has been completely revamped to provide excellent performance and more fine-grained control over the reactivity of Vue components.
Vue 3 utilizes a proxy-based reactivity system, which offers enhanced reactivity tracking and eliminates the need for deep object property watching.
This element results in faster and more efficient rendering, which enhances the overall performance of your Vue web applications.
Additionally, Vue 3 introduces a new virtual DOM (VDOM) implementation called Fragments. With the help of Fragments, you can perform more efficient rendering and reduce the amount of generated HTML, resulting in enhanced performance.
You can easily move components across the DOM tree, opening up new possibilities for building complex user interfaces with the help of a new teleport component.
While migrating from Vue 2 to Vue 3 does require some struggle, the Vue team has provided a comprehensive migration guide to assist developers in the whole procedure.
The user guide outlines the necessary steps to update your existing Vue 2 codebase and provides detailed instructions for handling specific breaking changes that might occur.
By migrating to Vue 3, you not only benefit from improved performance and new robust features, but you also ensure the longevity and maintainability of your codebase.
Vue 3 is designed to be backward compatible with Vue 2, enabling a smooth transition and allowing you to take advantage of the latest advancements in the Vue ecosystem.
Is Vue 2 compatible With Vue 3?
Is Vue 2 compatible With Vue 3? Vue 3 introduces many essential improvements and optimizations that enhance performance and developer experience in the Vue framework.
It adopts a new virtual DOM implementation, which significantly boosts rendering speed. In addition, the Composition API replaces the Options API, which offers a more flexible and scalable way to write component logic.
The Vue team developed the Vue 2 Composition API plugin to facilitate the transition.
This composition API plugin enables developers to use the Composition API in Vue 2 projects. This thing makes it easier to migrate code from Vue 2 to Vue 3.
While Vue 2 components cannot be used directly in Vue 3, the Vue team developed the “Vue 2 Compatibility Mode” to address this issue.
When you enable this mode, you can run Vue 2 code within a Vue 3 application without any additional modifications.
This element will allow for a gradual migration strategy, where Vue 2 components can coexist with Vue 3 components in the same project.
However, it is important to note that the compatibility mode comes with some limitations.
It does not provide access to the full range of Vue 3 features, and certain Vue 2 features that have been deprecated or removed may not work as expected.
To bridge the gap, a development of the “@vue/composition-api” plugin took place by the Vue team that enable Vue 2 developers to leverage the Composition API within their Vue 2 projects.
This robust plugin emulates Vue 3’s Composition API behavior, eventually making it easier to transition gradually.
Here is an example showcasing the Composition API in Vue 2:
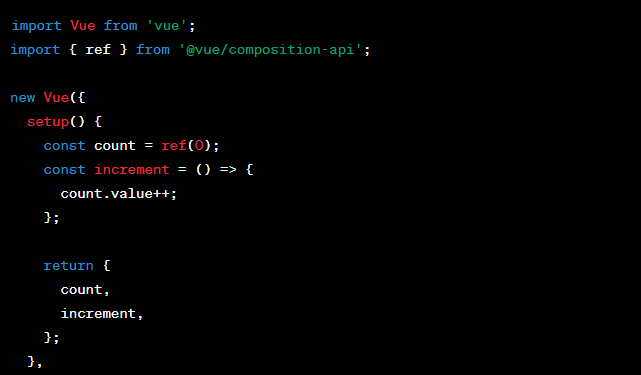
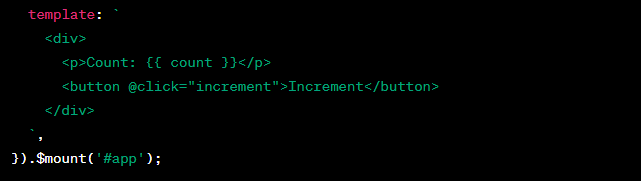
You can use the Composition API in a Vue 2 component by importing ref from the @vue/composition-api package and using the setup() function.
The use of Composition API enables Vue 2 developers to gradually opt for the improved syntax and structure of Vue 3’s Composition API without having to rewrite their whole codebase.
While Vue 2 and Vue 3 have compatibility measures in place, it is critical to consider the breaking changes and adjust the codebase accordingly during the migration procedure.
The official Vue.js documentation provides detailed guidelines to assist in transitioning smoothly from Vue 2 to Vue 3.
These guidelines ensure that you can leverage the benefits of the latest version while preserving your existing codebase.
Check out my article about What Is modelValue In Vue?
Should I migrate To Vue 3?
Should I migrate To Vue 3? Deciding whether to migrate from Vue 2 to Vue 3 is an important consideration for developers and businesses alike as you know.
While there are several compelling reasons to make the switch, it ultimately depends upon your specific circumstances and project requirements.
Here are some key factors you must know to consider when evaluating whether to migrate to Vue 3.
Enhanced Performance
Vue 3 introduces a revamped reactivity system and a faster virtual DOM, which results in significant performance improvements compared to Vue 2.
If your web application requires high rendering efficiency or handles large data files, then you will see a noticeable performance boost upon migrating to Vue 3.
Up-to-date Developer Experience
Vue 3 introduces the Composition API which offers a more modular and flexible approach to writing component logic.
This can enhance code organization, reusability, and readability of the code as well.
If you value clean, scalable code and want to take complete benefit of the Composition API’s benefits, migrating to Vue 3 is worth considering.
Ecosystem Support
As time passes on, the Vue ecosystem will increasingly focus on Vue 3.
The latest libraries, plugins, and community support are more likely to be developed specifically for Vue 3, hence it will be beneficial to migrate and take advantage of the growing ecosystem.
Long-term Maintenance
Vue 2 will eventually reach the end of its official support cycle.
By migrating to Vue 3, you ensure that your project remains aligned with the latest new updates, bug fixes, and security patches provided by the Vue team.
This thing can also help mitigate technical debt and ensure long-term maintainability.
Existing Project Considerations
Migrating to Vue 3 involves updating and adapting your codebase, which can be a significant undertaking for large or crucial projects.
Evaluate the time, resources, and potential impact on your project before deciding to migrate.
If your Vue 2 project is stable and requires minimal updates, sticking with Vue 2 may be a good choice.
Ultimately, migrating to Vue 3 is a forward-looking decision that offers performance improvements, a better developer experience, and long-term maintenance benefits.
However, the decision should be based on a careful assessment of your project’s specific needs, resources, and timeline.
It’s recommended to consult the official Vue.js migration guide, evaluate the compatibility of your dependencies, and consider the potential impact on your development team before proceeding with a migration.
How Do I Move From Vue 2 To Vue 3?
How Do I Move From Vue 2 To Vue 3? If you’re looking to transition from Vue 2 to Vue 3, you’ll find that while the major concepts of Vue.js remain the same, there are a few significant changes and improvements that you must know.
Here is a brief guide to help you navigate the migration process:
Update dependencies are the first thing. Make sure your project is using the latest up-to-date version of Vue CLI and all the required dependencies to ensure compatibility with Vue 3.
Composition API is another thing. Vue 3 introduces the Composition API as an alternative option to the Options API.
It enables you to organize your component logic in a more modular and reusable manner. You can consider refactoring your existing components to leverage this new API.
Vue Router and Vuex is also important thing you must know.
If your project uses Vue Router and Vuex, update them to their respective Vue 3 versions, as they have undergone changes to support the latest version.
Some minor changes have been made to the template syntax, such as the removal of filters and the introduction of the v-bind directive as a shorthand for “:” . You must update your templates accordingly.
Vue 3 brings visible performance improvements, thanks to the new rendering mechanism called the “reactive system.”
You can take advantage of the optimized reactivity system to enhance your application’s performance.
Vue 3 removes some deprecated features, such as the $listeners and $scopedSlots properties. You can review your codebase and update any usage of these deprecated features.
Vue provides a migration build tool called “vue-migration-helper” to assist with the transition. You can utilize this tool to identify potential issues and automate some of the migration tasks.
Always remember to thoroughly test your web application after the migration to ensure everything works as expected.
The Vue documentation and community resources provide detailed helpful information and examples to help you with the migration process.
Some of the key examples are here in the form of code:
Composition API Vue 2
Vue 3


Template Syntax Changes Vue 2

Template Syntax Changes Vue 3
Vue Router and Vuex
Vue 2 to Vue 3 Migration (Vue Router)

Vue 2 to Vue 3 Migration (Vuex)

The above examples highlight a few aspects of migration from Vue 2 to Vue 3.
You must remember that the migration process may involve more transformation depending on the complexity of your application.
It is recommended to refer to the official Vue documentation and migration guides for a complete understanding of the migration process.
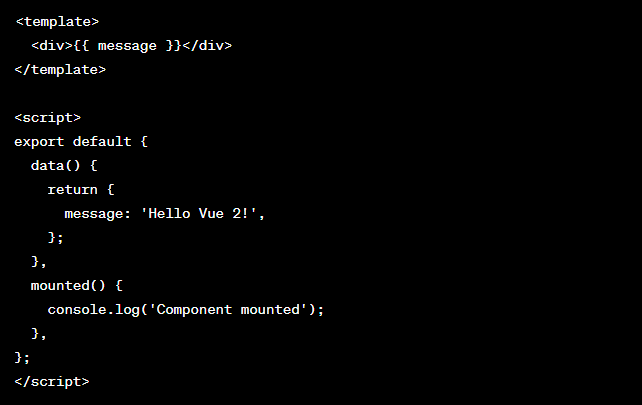
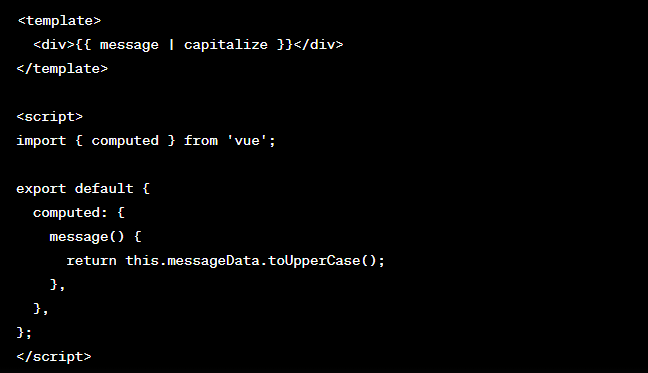
Migrating Vue 2 To Vue 3 Example
Vue 2 Before Migrating


Vue 3 After Migrating


In the above example, the Vue 2 component is updated to use the Composition API in Vue 3. Following are the changes made:
- Import the ‘ref’ function from ‘vue’ instead of using ‘data()’ for reactive data
- Use the ‘setup()’ function instead of the options API
- Define the ‘message’ and ‘count’ it as ‘ref’ variables
- Move the ‘increment’ method inside the ‘setup()’ function
- Return the reactive variables and methods from the ‘setup()’ function
By using the Composition API and the ‘ref’ function, you can migrate your Vue 2 components to Vue 3.
You can also take advantage of the enhanced reactivity system and other features introduced in Vue 3.
Remember to update the Vue packages and follow the official Vue 3 migration guide for a comprehensive migration procedure.
Don´t forget to check out my article about Vue js Multiple Checkbox Filter
Vue 2 To Vue 3 Migration Tool
Vue 2 to Vue 3 migration tool is known as “vue-migration-helper”. This powerful utility assists developers in migrating their Vue 2 projects to Vue 3 seamlessly.
It provides automated code transformations, identifies potential issues that might occur, and offers helpful suggestions to streamline the migration process efficiently.
Following is a closer look at this valuable tool:
Code Transformations
The migration tool analyzes your Vue 2 codebase and performs automatic transformations to update it to Vue 3 syntax.
It handles certain tasks such as updating component options, refactoring template syntax, and converting Vue Router and Vuex code to their Vue 3 equivalents.
Detailed Reports
The migration tool generates detailed reports that highlight specific transformations made during the migration process.
It gives a clear transparent overview of the modifications made to your code, which makes it easier to track and understand the migration procedure.
Interactive Mode
The migration tool offers an interactive mode where it prompts you to review and approve code modifications before applying them.
This robust mode allows you to have more control over the migration process and ensures that you can manually verify and adjust the changes as per requirement.
Configuration Options
The migration tool provides configuration options to make customization in the migration process based on your special project requirements.
You can specify which parts of your codebase should be migrated, exclude certain files or directories, and configure other settings to align with your respective project structure.
Issue Detection and Suggestions
During the migration process, the tool identifies potential issues and provides helpful suggestions to address them.
It helps you to detect deprecated features, highlight breaking changes, and offer recommendations to resolve any compatibility issues encountered during the migration process.
Automated Tests
The migration tool comes with a test suite that automatically executes against your migrated codebase. It helps ensure that the migrated project maintains its functionality. Critical aspects of your application are not affected by the migration process.
The Vue 2 to Vue 3 migration tool significantly reduces the manual effort required to migrate a Vue 2 project to Vue 3.
You will get a reliable and efficient way to upgrade your codebase while minimizing the risk of introducing breaking changes.
By leveraging this migration tool, developers can save time and focus on other essential aspects of their project while seamlessly transitioning to Vue 3’s enhanced latest features and performance improvements.
Vue 2 To Vue 3 Migration Tool Example
Vue 2 To Vue 3 Migration Tool Example: Following is a small example demonstrating the usage of the Vue 2 to Vue 3 migration tool, “vue-migration-helper,” in a command-line interface (CLI) environment:
- Install the migration tool of Vue globally

- In the interactive mode, run the migration tool

- Follow the prompts to provide the required information about your Vue 2 project, such as the project directory and configuration options, etc.
- The migration tool analyzes your codebase, performs automation of transformations, and generates a report with what changes are made.
- Review the report and verify that the code changes align with your expectations.
- Apply the suggested modifications by confirming them within the interactive mode.
- Once the migration process completes, you will have a Vue 3 compatible codebase.
From the above example, you can get a demonstration of a basic workflow of using the Vue 2 to Vue 3 migration tool.
Here it is important to note that the migration process may vary depending on the complexity of your respective project and any custom configurations you might want to add.
The “vue-migration-helper” tool helps in the automation of the majority of the code transformations required for the migration process, which makes the process more efficient and reduces the risk of human error.
It allows you to focus on reviewing and adjusting the changes, which ensures your Vue 2 project smoothly transitions to Vue 3.
You must remember to consult the official documentation of the “vue-migration-helper” tool for more detailed instructions and additional options available to customize the migration process according to your specific project requirements.
Don´t forget to check out my article about A Guide To Vuex Mapstate With Vuex Examples
Vue Migration Build
Vue Migration Build: Vue provides a migration build tool that helps streamline the migration process from Vue 2 to Vue 3.
This migration tool is called “vue-cli-plugin-vue-next” and it facilitates the transition by automating many of the necessary updates.
Also, it facilitates modifications required for Vue 3 compatibility.
Following is an overview of the Vue migration build tool:
Simplified Configuration
The migration build tool integrates smoothly with Vue CLI. This allows you to leverage its powerful configuration capabilities.
It automatically updates your existing Vue 2 project configuration to align with the predefined requirements of Vue 3.
Dependency Updates
The migration build tool makes you ensure that all the necessary dependencies, including Vue Router and Vuex, are updated to their respective Vue 3 versions. It has the ability to handle the package installations and configuration updates required for these dependencies.
Code Transformation
The migration build tool performs code automation transformations to update your Vue 2 codebase to Vue 3 syntax.
It handles various modifications such as updating component options, refactoring template syntax, and transforming deprecated features to their Vue 3 equivalents.
Compatibility Checks
The migration build tool checks your codebase for potential breaking changes and compatibility issues during the migration process.
It displays warnings and suggestions to address these issues, thus, helping you ensure a smooth transition to Vue 3.
Customization Options
The migration build tool offers configuration options to tailor the migration process to your project’s specific needs.
You can choose to skip certain transformations, exclude files or directories from migration, and fine-tune other settings to align with your project structure.
The Vue migration builds tool simplifies and accelerates the migration process, reducing the manual effort required to update your Vue 2 project to Vue 3.
It provides an efficient and reliable mechanism to leverage the enhanced features and performance improvements of Vue 3 while maintaining compatibility with your existing codebase.
Vue 3 Migration Build Vite
Vue 3 Migration Build Vite: When it comes to migrating from Vue 2 to Vue 3, Vite stands out as a powerful build tool that can greatly simplify the process of migration. Vite is a modern, fast, and lightweight build tool specially designed for Vue 3 projects.
Let’s take a closer look at how Vite facilitates the migration process:
Faster Development Server
Vite’s development server leverages native ES module imports, which significantly boosts up the compilation and hot-reloading process.
With Vite, your Vue 3 development server becomes blazingly fast and provides an improved development experience.
Instantaneous HMR (Hot Module Replacement)
Vite takes benefit of Vue 3’s new HMR API to provide instantaneous updates during development.
Transformations to your components or styles are immediately reflected in the browser without a full page reload. This makes the development workflow more efficient.
Dependency Pre-Bundling
Vite adopts a unique approach by only bundling dependencies that are explicitly imported. This drastically drops the bundle size and improves loading speed.
The use of native ES modules also allows for better caching and more efficient browser loading.
Vue 2 Compatibility
Vite includes built-in Vue 2 compatibility through the @vitejs/plugin-vue2 plugin.
This thing enables you to gradually migrate your Vue 2 components to Vue 3 while maintaining compatibility with the existing Vue 2 codebase.
The respective plugin handles the necessary runtime conversion, making the transition smoother.
TypeScript Support
Vite smoothly integrates with TypeScript, providing a seamless development experience for Vue 3 projects.
It offers improved type checking, autocompletion, and better tooling support out of the box.
Optimized Production Build
Vite optimizes the production build by leveraging Rollup under the hood.
It performs tree shaking, code splitting, and other optimizations to generate highly efficient and performant production bundles.
Vue CLI Integration
If you prefer to use Vue CLI for your Vue 3 migration, Vite can be seamlessly integrated into Vue CLI using the @vitejs/plugin-vue-cli plugin.
This allows you to harness the power of Vite while still benefiting from the extensive features and ecosystem provided by Vue CLI.
By using Vite as the build tool for your Vue 3 migration, you can leverage its performance benefits, seamless HMR, and compatibility with Vue 2.
The tooling provided by Vite accelerates development and improves the overall productivity of your Vue 3 projects.
Vue 3 introduces several performance improvements over Vue 2, making it a compelling choice for developers seeking enhanced application performance.
Here’s a summary of the key performance differences between Vue 3 and Vue 2:
Faster Mounting and Updating
Vue 3 utilizes a new rendering mechanism called the “reactive system” that significantly improves component mounting and updating performance.
The reactivity system in Vue 3 is faster and more efficient compared to the Object.defineProperty-based system used in Vue 2.
Smaller Bundle Size
Vue 3 introduces a more efficient compiler that generates smaller and faster production bundles.
The optimized compilation process eliminates unnecessary runtime code and reduces the overall bundle size, leading to shorter loading times for Vue 3 applications.
Improved Tree Shaking
Vue 3’s compiler leverages the ES module format and provides better tree-shaking capabilities.
This means that unused components and code are more effectively removed during the build process, resulting in smaller bundle sizes and improved performance.
Patching Optimization
Vue 3’s diffing algorithm is more optimized, resulting in faster updates to the DOM.
The composition API in Vue 3 allows for more granular control over component updates, resulting in better performance for complex applications with a large number of components.
Fine-Grained Reactivity
Vue 3’s reactivity system offers fine-grained reactivity tracking, resulting in more efficient updates to components.
This helps minimize unnecessary re-rendering and improves overall performance, particularly in applications with heavy reactivity usage.
Overall, Vue 3 delivers notable performance improvements compared to Vue 2.
The combination of a more efficient rendering mechanism, smaller bundle sizes, improved tree shaking, and optimized patching makes Vue 3 a compelling choice for developers seeking to build fast and performant Vue applications.
Don´t forget to check out my article about What Is Vue Key? (Vue Key Examples)
Vue 3 vs Vue 2
Vue 3 vs Vue 2 Performance
Vue 3 vs Vue 2 Performance: Vue 3 introduces several performance improvements over Vue 2, making it a compelling choice for developers seeking enhanced application performance.
Here’s a summary of the key performance differences between Vue 3 and Vue 2:
Faster Mounting and Updating: Vue 3 utilizes a new rendering mechanism called the “reactive system” that significantly improves component mounting and updating performance.
The reactivity system in Vue 3 is faster and more efficient compared to the Object.defineProperty-based system used in Vue 2.
Smaller Bundle Size: Vue 3 introduces a more efficient compiler that generates smaller and faster production bundles.
The optimized compilation process eliminates unnecessary runtime code and reduces the overall bundle size, leading to shorter loading times for Vue 3 applications.
Improved Tree Shaking: Vue 3’s compiler leverages the ES module format and provides better tree-shaking capabilities.
This means that unused components and code are more effectively removed during the build process, resulting in smaller bundle sizes and improved performance.
Patching Optimization: Vue 3’s diffing algorithm is more optimized, resulting in faster updates to the DOM.
The composition API in Vue 3 allows for more granular control over component updates, resulting in better performance for complex applications with a large number of components.
Fine-Grained Reactivity: Vue 3’s reactivity system offers fine-grained reactivity tracking, resulting in more efficient updates to components.
This helps minimize unnecessary re-rendering and improves overall performance, particularly in applications with heavy reactivity usage.
Overall, Vue 3 delivers notable performance improvements compared to Vue 2.
The combination of a more efficient rendering mechanism, smaller bundle sizes, improved tree shaking, and optimized patching makes Vue 3 a compelling choice for developers seeking to build fast and performant Vue applications.
Related Articles
- How To Add A Vue Dynamic Class To CSS Dynamically In Vue.js?
- Vue Import Component Into Another Component
- Vue 3 Tutorial For Beginners With Vue Tutorials
- How To Implement In Vue js Google Login?
- How To Use Google Map Vuejs? Google maps examples
Hopefully, you now have a better understanding of how you can migrating Vue 2 To Vue 3.
Understanding how you can migrating Vue 2 To Vue 3 is gonna help you to keep your Vue.js projects up to date with the newest version.