
If you are looking for a Vue 3 Tutorial For Beginners then you have come to the right place.
In this article, we will go over everything you will need to know about using Vue 3 for beginners with a simple and fast Vue 3 Tutorial.
No products found.
If you want to learn more about How To Use Vue Props With Vue Prop Examples
Vue 3 Tutorial
In this Vue 3 Tutorial, we will go over what Vue js is, and how to install and create your first Vue.js project.
You will also learn how a Vue.js project is working and how components and different features is working.
What Is Vue?
What Is Vue? If you are a front-end developer it’s good to understand what is Vue since it’s a popular framework.
Vue.js works within the javascript framework to create simple web applications but also is perfectly capable of handling larger scaling applications.
It has a reputation for being relatively lightweight and simple to use. So what is Vue.js?
Vue.js is an open-source front-end javascript framework, used for building user interfaces and single-page applications (SPAs).
Vue.js is using a model-view-viewmodel (MVVM) architectural pattern to build applications.
Vue CLI
Vue CLI: Vue CLI is to be able to quickly and easily create your Vue project in NPM, Vue CLI is used which is an official package of Vue NPM.
My recommendation is to install this on your computer so you can easily develop Vue projects on your computer regardless of specific folder issues.
Vue CLI Build
Vue CLI build creates a production-ready bundle that minimises the JS, CSS, HTML, and auto vendor chunk splitting for better caching.
Vue build for development
If you want to create a Vue build for development with the CLI you can use the command “vue-cli-service build”.
If you instead want to create a Vue build for development in a Vue 3 project you can use the command “npm run build” in your terminal.
Install Vue
Install Vue can be done by installing the Vue CLI package via the syntax “npm install -g @vue/cli” in your terminal. Then you have installed the Vue CLI globally on your computer.
Let´s check next on an example of how to install Vue windows with the vue-cli-service:

Start by first opening the terminal window and running the following command “npm install -g @vue/cli” to install globally or you can use the command “npm install vue/cli” to install just in the folder.
After a few seconds, the installation process will be accomplished. If you want to create a Vue 3 project, then you will need a 4.5 or above version of Vue CLI.

If you wonder how you check if vue CLI is installed or not you can do this by checking the vue version with the npm vue –version or npm vue -v.

If you want to upgrade the version of Vue CLI in case the version is below 4.5 then use the following command npm upgrade –next.
Check out my article about Learn Migrating Vue 2 To Vue 3 With Vue Migration Examples.
Create Vue 3 Project
Create Vue 3 Project: How to create Vue 3 project in Vue can be done by installing the Vue CLI package in your terminal with the syntax “vue create myProjectName”.
Let´s next check on how I get started with Vue 3 by installing it:

Let´s start with opening the terminal and going to the desktop by using the command cd /Desktop or a folder of your choice.

Next, we install Vue 3 by using the command “vue create my-project-name”.
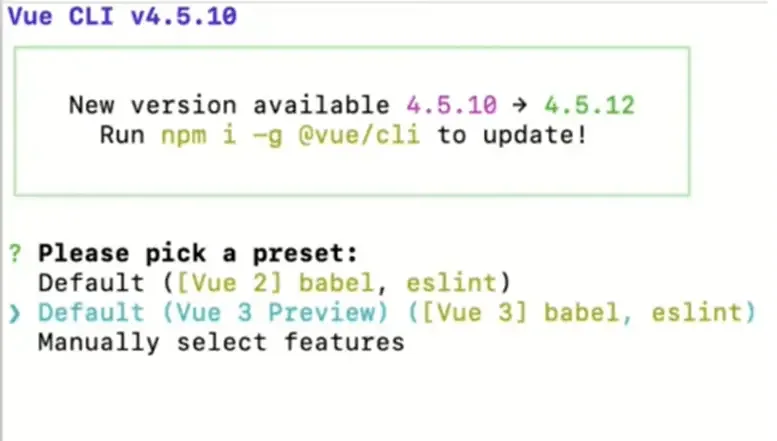
This step will show you which version of Vue you want to utilize and you can choose to install Vue 3 with the help of moving the arrow key up and down. Enter after making a selection.
After pressing enter, the creation of the Vue 3 project will be started with the title of the file or folder.
After a few seconds of the Vue 3 default parameters installation, it will be shown on your desktop with the name of the file.
Vue Component
Vue component it is a modular and reusable unit of code that covers the part of the Vue.js application. It’s handling the logic, presentation, and data in the Vue component.
Vue components are the key features of this framework as they enable the developers to develop critical user interfaces by their breakdown into small pieces that are easier to manage.
The Vue component is a necessary and important feature to create custom elements that are reusable in HTML. These are basically reusable Vue.js instances with a name.
Inside a Vue.js component root, you can use a component as a custom element. Components can also be taken as mini or sub-Vue instances.
There is a hierarchy that is followed by the Vue components.
Data can be passed down to the child from the parent with the help of props and also a child can emit the data back to the parent.
So, this makes it easier for you to build complex apps in an organized way with a structured approach.
What is a component in Vue 3? You can define components in Vue 3 with the use of the “defineComponent()” function.
Vue 2 has a different method which is “Vue.extend()” which is replaced in Vue 3.
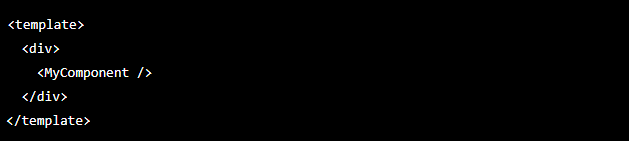
The example code of the basic component in Vue 3 is as follows:

You need to import the “defineComponent()” function first from the package of Vue.
Now you can use it to define the component named “Mycomponent”, a “data” function that is capable to return an object with a “message” property, and a “template” that displays the value of the “message” property inside the element of “h1”.
When it is defined, you can import and use this component in your Vue 3 app.
You can register globally or locally within other “components” options of components. Then, you can use them in your template same as other HTML elements.
The above example will create a component “MyComponent” instance. You will see the message “Hello Vue 3!” inside the “h1” element.
Reactive Data Vue
Reactive Data Vue: The reactive() function in Vue is a core feature of Vue’s reactivity system. It is used to create a reactive object from a plain JavaScript object.
Reactivity in Vue allows you to define dependencies between your data and the UI, so that when the data changes, the UI automatically updates to reflect those changes.
The reactive() function is part of the Vue Composition API, which provides a more flexible and powerful way to manage state in Vue components.
When you pass an object to the reactive() function, it recursively converts all its properties into reactive properties.
This means that any changes made to these properties will trigger updates in any component that is using them.
It achieves this by leveraging JavaScript’s Proxy object, which intercepts property access and modification, allowing Vue to track the dependencies.
Reactive Data Vue example: A reactive object is an object that has been transformed into a reactive data structure using the reactive() function.
Reactive objects enable Vue to track changes to their properties and update the UI accordingly.
To illustrate, let’s consider an example where we have a reactive object called user. The user object has two properties: name and age.
Any modifications made to these properties will trigger updates in the UI.
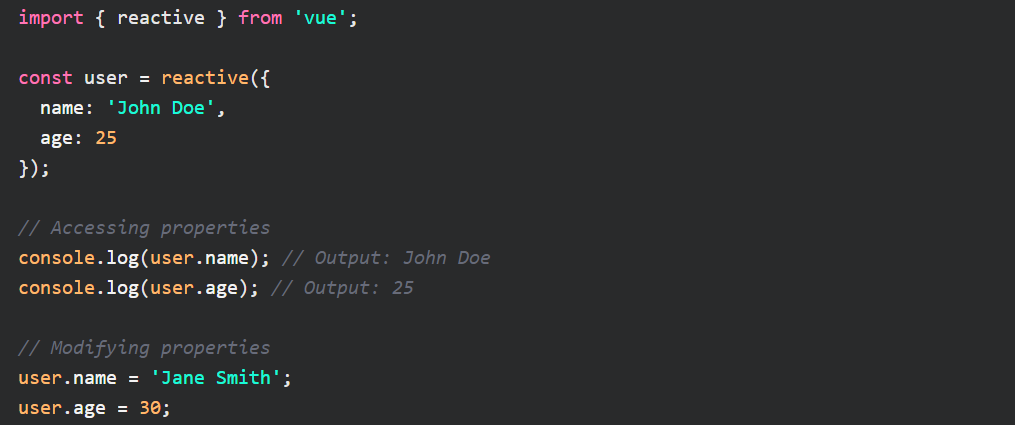
In this example, we create a reactive object user using the reactive() function. We define two properties, name and age, with initial values.
We can access and modify these properties just like any other JavaScript object.
However, the difference is that any modifications made to these properties will trigger updates in the UI if they are used in a component.
For instance, if we bind the name and age properties to a component’s template, any changes made to these properties will be automatically reflected in the UI without explicitly updating the component.
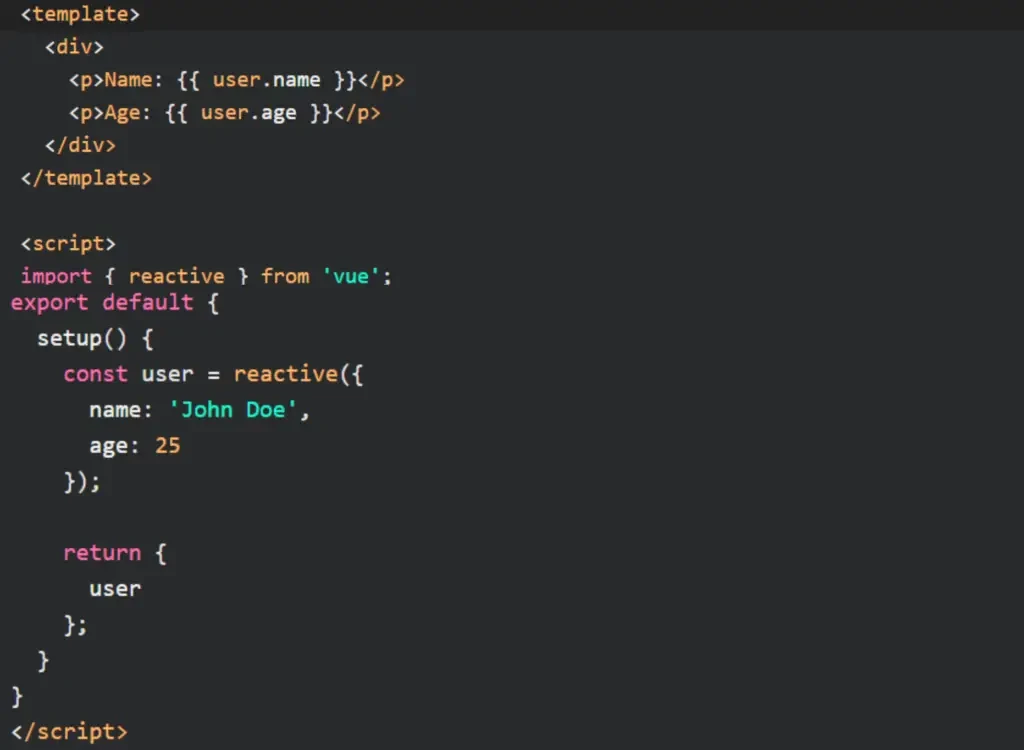
By leveraging reactive objects, Vue enables a declarative and reactive programming model, where changes to the underlying data are automatically propagated to the UI, ensuring consistency between the two.
Don´t forget to check out my article about A Guide To Vue Events With Vue Event Examples
Vue ref Data
Vue ref Data: The Composition API is a new addition to Vue 3 that provides a function-based approach to organizing and reusing logic in Vue components.
It allows you to use reactive data and other reactive features without relying on the traditional options API.
The reactive function is a core part of the Composition API that enables reactivity in Vue 3.
With the reactive function, you can create reactive objects or variables.
These reactive objects will automatically track their dependencies and update any component that uses them whenever their values change.
This makes it easier to manage and synchronize state across different components.
Here’s an example of how to use the reactive Vue 3 Composition API:
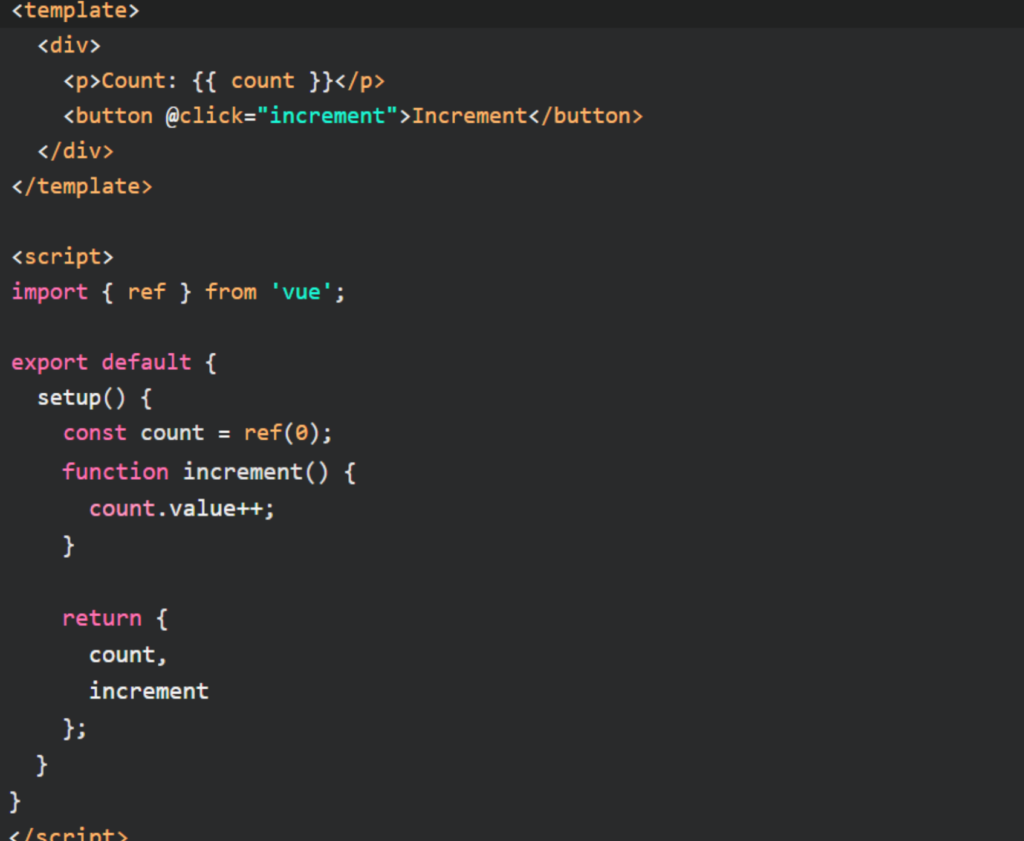

In this example, we create a reactive ref count using the ref() function. The initial value of the ref is set to 0. We can access and modify the value of the reactive ref using the .value property.
By modifying the value, Vue can automatically track the changes and update the UI accordingly.
The count reactive ref is then used in the component’s template to display the current count value.
When the “Increment” button is clicked, the increment function is called, which increments the value of the reactive ref by one. As a result, the UI updates to reflect the updated count.
Vue Methods vs Computed
Using Vue computed vs methods can be a bit tricky but as a general rule you should use Computed Properties when handling reactive data that needs to be cached.
Methods should be used when you need to use arguments, use reusable logic, or connecting functionality to events.
What Is The Difference Between Computed And Methods In Vue?
To get a better understanding to what is the difference between computed and methods in Vue we will check on two different examples comparing where computed and methods shine.
- Computed Properties is better to use when we need to calculate a value based on other properties or using complex logic that includes reactive data since Computed Properties is caching the data and only running if the dependencies are changing.
- Methods are better to use when we need to connect functionality to events or use as reusable logic. Methods are also really good for handling events and reacting to them. Keep in mind you can call a method inside another method this gives you the possibility to break up logic in several methods for clean code.
Let´s check on an example where we use the advantages of Methods.
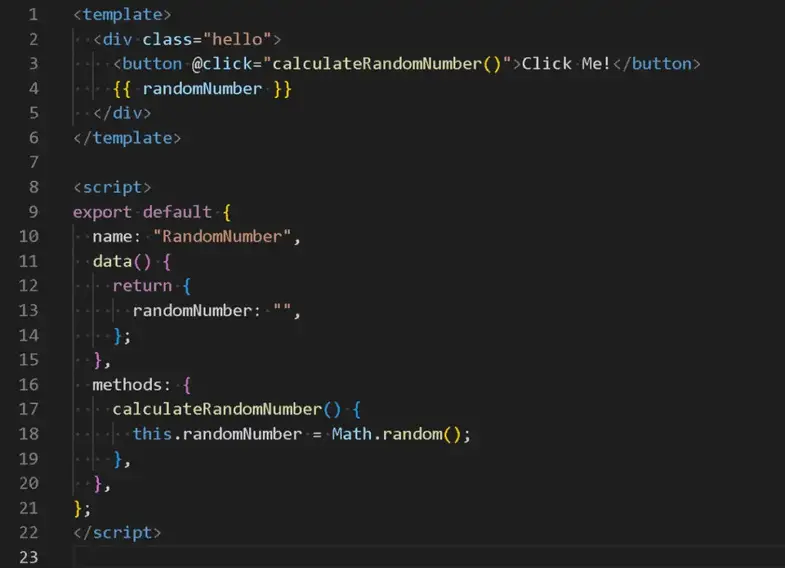
In the example above our Methods function, “calculateRandomNumber” is calculating a random number when the button is clicked and saving it to the data property variable “randomNumber”.
The Methods is perfect to use when you want to handle events and react to them.
Let´s check on an example on how we can use Computed Properties:
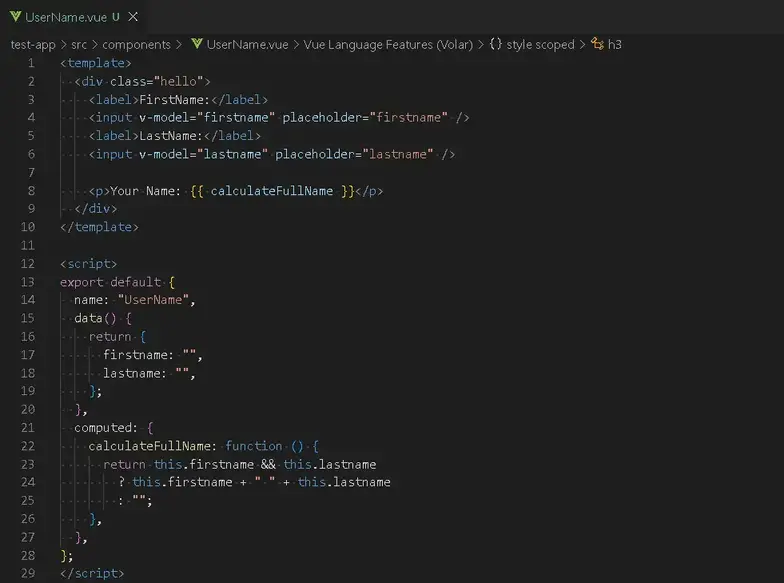
In the above example, we do an easy computed property function that adds the two input fields for firstname and lastname and creates a single string.
- In the data function, we declare two string variables firstname and lastname.
- We then declare a computed function named calculateFullname.
- In the computed function calculateFullname we use the dependency from the data function and call on firstname and lastname by using this.firstname and this.lastname.
- In the computed function calculateFullName we first check if both the input fields this.firstname and this.lastname is containing a string, then we return the concat this.firstname and this.lastname to a string.
- We show the full name by calling the calculateFullName in the template.
Don´t forget to check out my article about Learn To Use Vue CSS Variables With Vue Examples.
Vue Pass Props
Vue Pass Props: In Vue.js, props are a way to pass data from a parent component to its child components.
They allow communication and data flow between components in a structured manner.
Props are used to customize and configure child components based on the needs of the parent component.
When a parent component wants to pass data to its child component, it can bind the data to a prop defined in the child component.
The child component can then access and use the passed data within its template or script section.
Props are essentially properties of a component that are passed down from the parent to the child.
Let’s illustrate an example where we have a parent component called ParentComponent and a child component called ChildComponent in Vue 3.
We’ll pass props from the parent to the child component.
First, let’s define the ChildComponent:
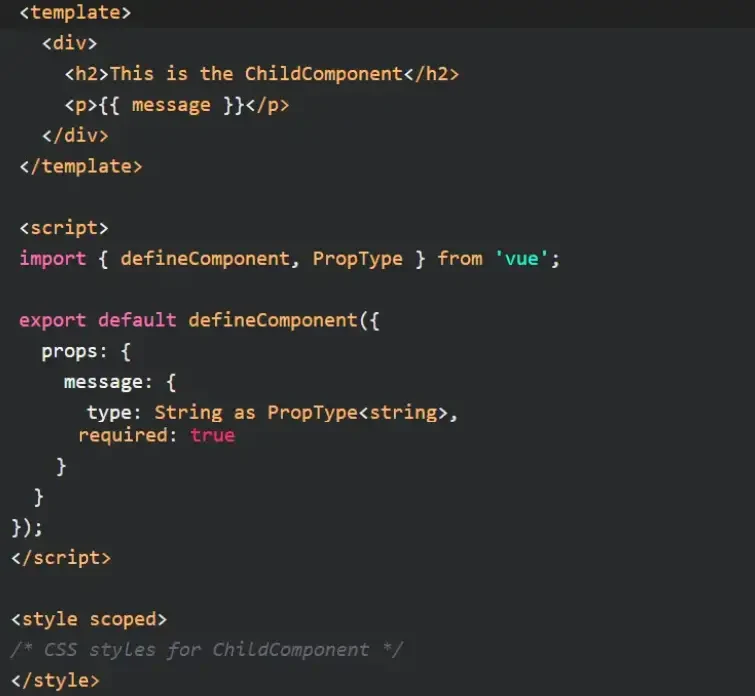
The ChildComponent is defined using the Composition API. It accepts a prop named message of type String and displays it in the template.
Now, let’s define the ParentComponent and pass the props to ChildComponent:
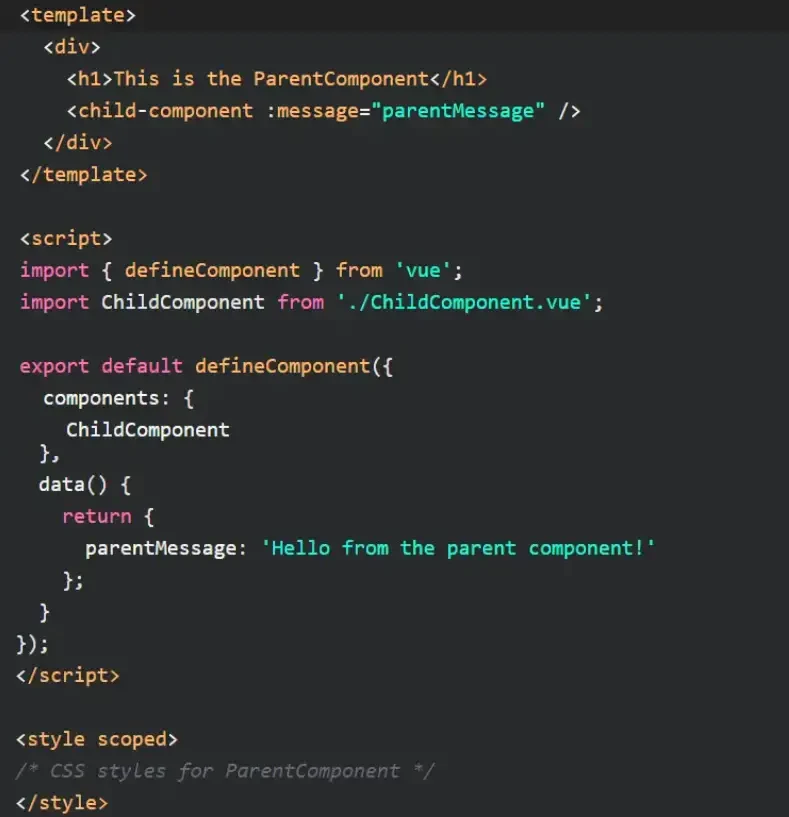
In the ParentComponent, we import the ChildComponent and register it as a component.
We then define a parentMessage data property that holds the message we want to pass to the ChildComponent.
Inside the template, we use the child-component tag to render the ChildComponent and bind the message prop to the parentMessage property.
When the ParentComponent is rendered, the ChildComponent will receive the message prop with the value of parentMessage.
Vue Lifecycle Hooks
Vue 2 Lifecycle Hooks
Vue 2 Lifecycle Hooks: Vue 2 has several lifecycle hooks that allow developers to execute code at different stages of a component’s lifecycle.
These hooks include beforeCreate, created, beforeMount, mounted, beforeUpdate, updated, beforeDestroy, and destroyed.
The beforeCreate hook is the earliest hook that gets called in a Vue component’s lifecycle. It gets executed before data observation and initialization of the component’s methods and events.
The created hook is called after the component has been created, and data has been observed and initialized.
The beforeMount hook is called right before the component is mounted to the DOM, while the mounted hook is called after the component has been mounted to the DOM.
The beforeUpdate hook is called before a component re-renders and the updated hook is called after a component has been re-rendered.
Lastly, the beforeDestroy hook is called right before a component is destroyed, while the destroyed hook is called after a component has been destroyed.
Vue 3 Lifecycle Hooks
Vue 3 Lifecycle Hooks: Vue 3 has similar lifecycle hooks to Vue 2, but with a few differences.
The beforeCreate and created hooks are still present, but the beforeMount and mounted hooks have been replaced with beforeMount and onMounted respectively.
Similarly, beforeUpdate and updated have been replaced with beforeUpdate and onUpdated, and beforeDestroy and destroyed have been replaced with beforeUnmount and onUnmounted.
The new beforeMount hook is similar to the old one but is now async, allowing developers to perform asynchronous tasks before mounting.
The onMounted hook is also similar to mounted, but it has been renamed for consistency.
Similarly, the beforeUpdate hook is now async and can be used for asynchronous tasks before updating, while onUpdated is similar to updated but renamed for consistency.
Finally, the beforeUnmount hook is similar to beforeDestroy, but renamed for consistency, while the onUnmounted hook is similar to destroyed but also renamed.
Is Vue 3 Hard To Learn?
Is Vue 3 Hard To Learn? Vue.js is considered relatively easy to learn. Because of this, it is often the first Javascript application that programmers learn.
Vue.js is a great place to start when branching out in Javascript frameworks. There are a few reasons why this is considered a good place to start your journey:
- Uncomplicated. The syntax, structure, and coding patterns used are all relatively easy to understand.
- Great support. There are plenty of tutorials and videos to guide you through the basics. Plus, there is a helpful introduction guide, which talks you through everything you need to know.
- Real-world application. Some people struggle to get their heads around abstract frameworks. Vue.js has a clear use, building simple applications for web pages.
How Long Does It Take To Learn Vue 3?
Learn Vue js will take a complete beginner one to two weeks. However, a more experienced programmer might be able to learn the basic concepts within a few hours.
It’s recommended that people are fluent in Javascript before attempting to learn Vue js. Learning Javascript will take between six to nine months.
What Impacts How Much Time It Takes To Learn Vue js?
What impacts how much time it takes to learn Vue js? What it will take to learn Vue js will vary from person to person. Here are some things that will affect how long it will take you:
- Amount of time you have to dedicate to studying. If you have enough time, you might be able to dedicate entire days to learning this framework. Most people, though, will be learning part-time, trying to fit study around other life commitments. In this case, you might only be able to dedicate a few hours a day to learning.
- Experience with programming. As we’ll discuss later, it’s a lot easier to learn this framework if you have experience with learning programming languages, particularly Javascript. It can be a huge advantage if you have prior experience with other Javascript frameworks, like React.js or Angular.js.
- Learning method. There are a few ways that you can learn Vue js. The key is to find the right approach for you.
Generally, though, you should be able to pick up the basics of Vue.js after the first project or two. Depending on your learning speed, you might be able to have the basics down within a week.
This is presuming that you have the basics of Javascript under control. If you are a complete beginner, you should leave between six to nine months to learn Javascript.
People who were already experienced with Javascript report being able to learn the basics of Vue.js even faster. Sometimes, they can get the hang of it within a few hours.
If you plan on drilling down into the nitty-gritty details, it might be a few weeks before you master Vue.js.
Related Articles
- Differences Between Vue 2 vs Vue 3 With Vue Examples
- Learn Vue Router Hash With Vue Router Examples
- How To Use Vue3 Image Src? Vue 3 Image Path Examples
- Learn To Use Vue Test Utils With Vue Test Examples
- Learn To Use Vue Watch With Vue.js Examples
Hopefully, you now have a better understanding of how you can use Vue in this Vue 3 Tutorial.
Understanding how you can use Vue in this Vue 3 Tutorial is gonna help you with creating your first Vue.js project and understand how the different features is working.