
Imagine being able to maintain the state of your Vue.js components even when they are temporarily hidden or removed from the DOM. Sounds intriguing, right?
Well, with Vue Keep Alive, you can do just that! In this tutorial, we’ll delve into the world of Vue Keepalive and show you how to utilize its powerful features.
No products found.
If you want to learn more about How To Use Vue Props With Vue Prop Examples
Vue Keep Alive
Vue Keep Alive is a feature in the Vue.js framework that allows you to cache and preserve the state of a component or group of components when they are toggled between being rendered and destroyed.
It is particularly useful in scenarios where you want to retain the state of components that are frequently shown and hidden, such as tabs, modals, or dynamic content.
What Is Vue Keep Alive?
What Is Vue Keep Alive? Vue Keep Alive is a built-in component provided by Vue.js that wraps around other components and keeps them alive in the DOM even when they are not being rendered.
It works by caching the component’s state and preserving it when the component is removed from the DOM.
When the component is re-rendered, the preserved state is restored, allowing the component to resume from where it left off.
The primary purpose of Vue Keep Alive is to optimize performance by avoiding unnecessary re-rendering and re-initialization of components.
By preserving the component’s state, Vue Keep Alive ensures that the component doesn’t lose any data or user interactions when it is temporarily hidden or removed from the DOM.
Vue Keep Alive Include
Vue Keep Alive Include: The keep-alive component in Vue.js can be used to cache and preserve the state of multiple components at once.
By wrapping multiple components within a keep-alive block, you can ensure that all the components retain their state when they are toggled between being rendered and destroyed.
Here’s an example of using keep-alive with multiple components:
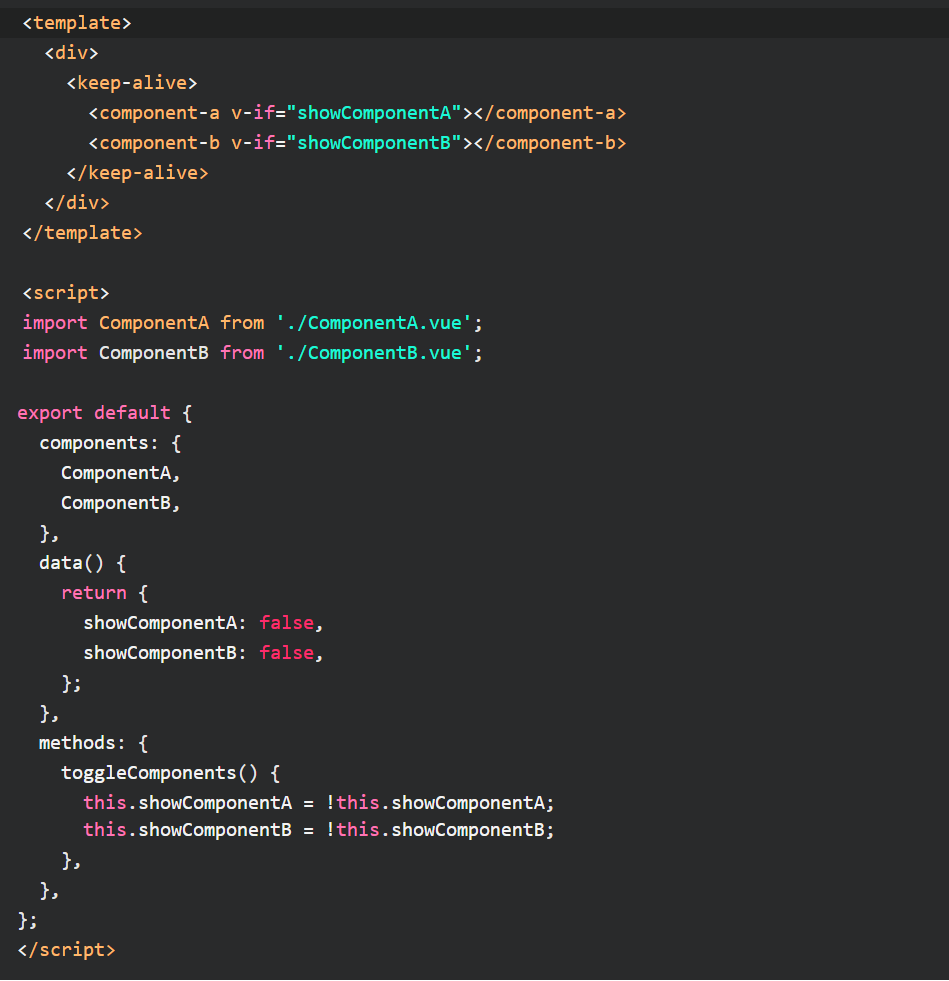
In the example above, we have two components, ComponentA and ComponentB, wrapped inside a keep-alive block.
The components are conditionally rendered based on the showComponentA and showComponentB data properties.
When the components are toggled by calling the toggleComponents method, their state is preserved, thanks to keep-alive, ensuring a seamless transition and preventing unnecessary re-initialization.
Check out my article about Learn Migrating Vue 2 To Vue 3 With Vue Migration Examples.
Vue Keep Alive Component
Vue Keep Alive Component: In addition to using the keep-alive component to cache multiple components, Vue.js also provides a built-in <keep-alive> wrapper element, which can be used to preserve the state of a single component.
Here’s an example of using the <keep-alive> wrapper with a single component:
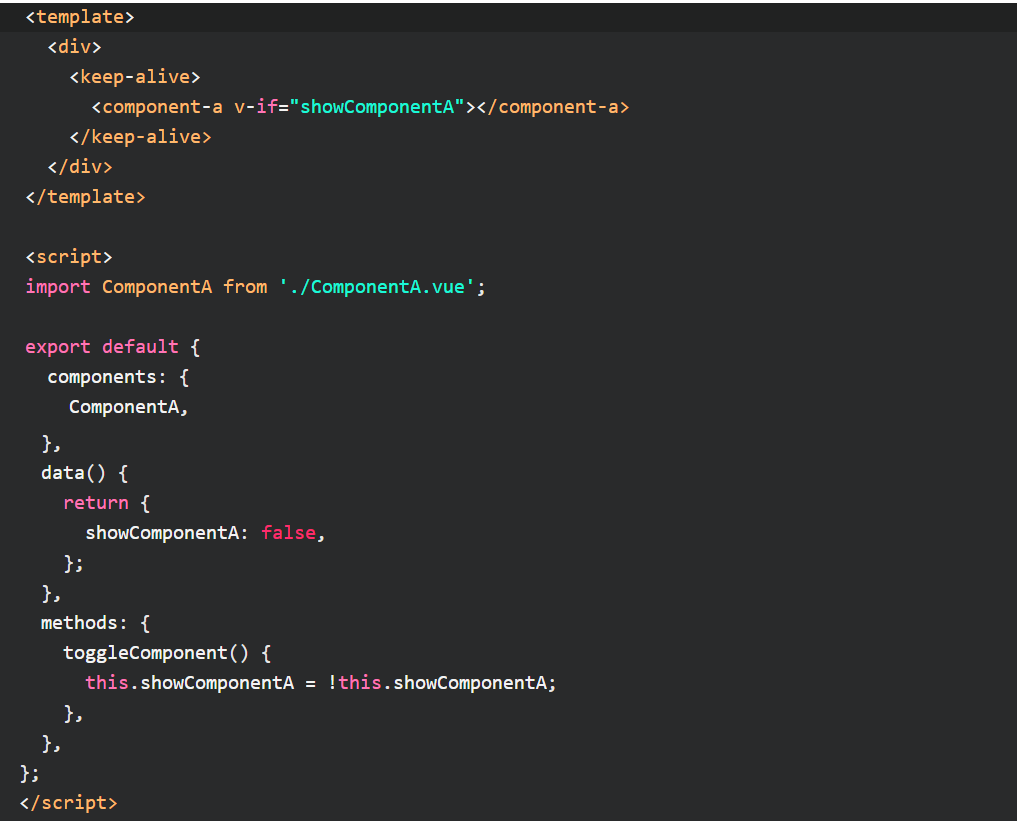
In this example, the ComponentA is wrapped inside a <keep-alive> element.
When the showComponentA data property is toggled, the component’s state is preserved, allowing it to retain its data and state even when it is temporarily hidden or removed from the DOM.
This can be beneficial when you have a component with a complex state that you want to keep intact during toggling.
Vue Keep Alive Router
Vue Keep Alive Router: Vue Keep Alive can also be utilized with Vue Router to cache and preserve the state of components during navigation.
By wrapping the router-view component with the <keep-alive> element, you can ensure that the components rendered by the router retain their state when the user navigates between different routes.
Here’s an example of using <keep-alive> with Vue Router:

In this example, the <router-view> component, which is responsible for rendering the appropriate component based on the current route, is wrapped inside a <keep-alive> element.
This ensures that the components rendered by the router, such as Home and About, retain their state when the user navigates back and forth between the routes.
Vue Keep Alive Navbar: The Vue Keep Alive feature can also be useful for preserving the state of components like a navigation bar.
By using keep-alive, you can retain the state of the navigation bar component even when the user switches between different views or performs actions that would typically cause the component to be re-rendered.
Here’s an example of using keep-alive with a navigation bar component:
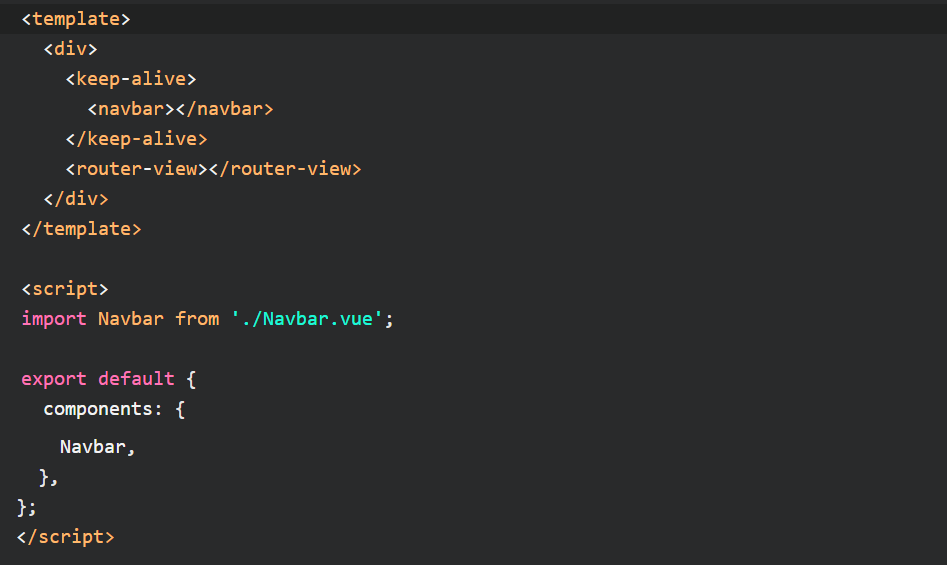
In this example, the <navbar> component is wrapped inside a <keep-alive> element.
This ensures that the navigation bar component retains its state even when the user navigates to different routes using <router-view>.
The preserved state allows the navigation bar to maintain its active states, selected items, or any other relevant data, providing a seamless and consistent user experience.
Don´t forget to check out my article about A Guide To Vue Events With Vue Event Examples
Vue keep-alive
Vue Keep-Alive is a directive in Vue.js that can be used to cache and preserve the state of components.
It works by wrapping components within a <keep-alive> element and providing various configuration options to control the caching behavior.
Vue keep-alive router-view
Vue keep-alive router-view: The <keep-alive> directive can be used in combination with the router-view component in Vue Router to cache and preserve the state of routed components.
By adding the keep-alive directive to the <router-view> element, you can ensure that the rendered components are cached and retain their state during navigation.
Here’s an example of using keep-alive with router-view:
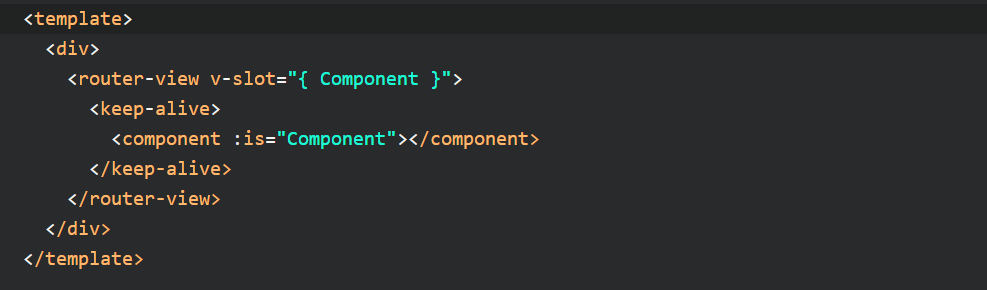
In this example, the <router-view> element is used to render the appropriate component based on the current route.
The v-slot directive allows access to the rendered component, which is then wrapped inside a <keep-alive> element using the :is binding.
This ensures that the components rendered by router-view are cached and preserve their state during navigation.
Vue keep-alive v-if
Vue keep-alive v-if: The v-if directive can be combined with keep-alive to conditionally cache and preserve the state of components.
By using v-if in conjunction with keep-alive, you can control when a component should be cached and when it should be destroyed.
Here’s an example of using keep-alive with v-if:
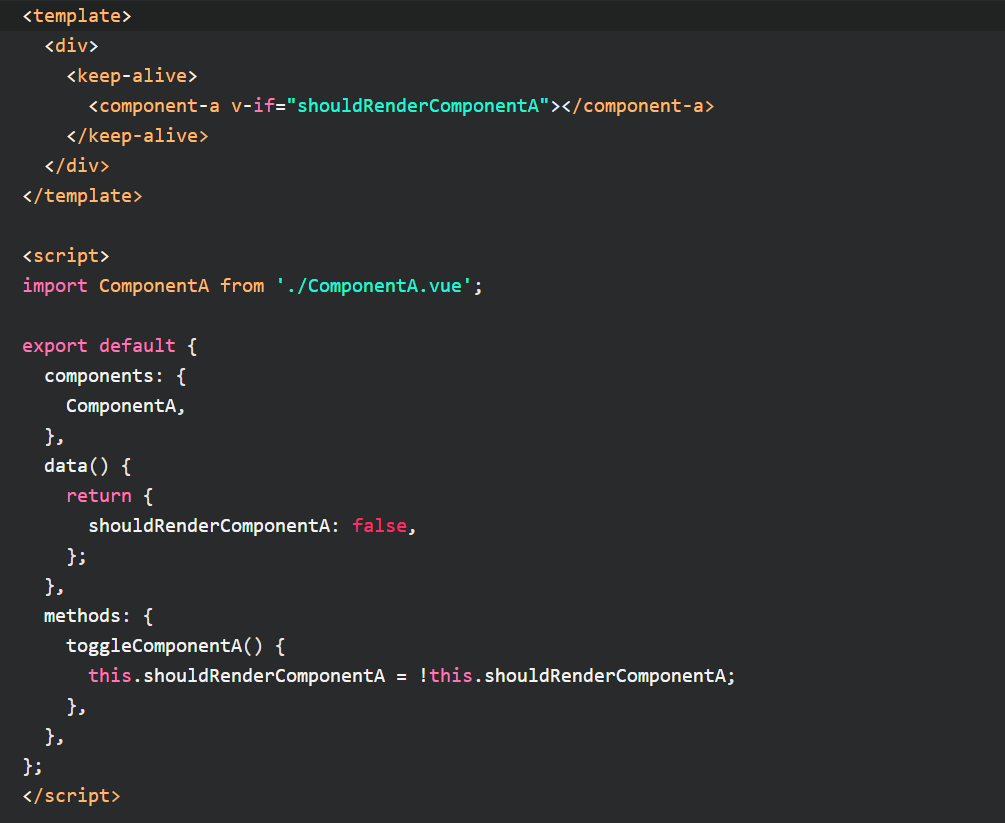
In this example, the rendering of ComponentA is controlled by the shouldRenderComponentA data property.
When shouldRenderComponentA is true, ComponentA is rendered and cached by keep-alive.
When it is set to false, the component is destroyed. This provides control over when a component’s state should be preserved or discarded.
Don´t forget to check out my article about Learn To Use Vue CSS Variables With Vue Examples.
Vue keep-alive Lifecycle
Vue keep-alive Lifecycle: When components are wrapped with the keep-alive directive in Vue.js, they go through specific lifecycle hooks that allow you to react to their caching and activation/deactivation events.
These lifecycle hooks provide you with the ability to perform certain actions or logic when a component is activated (restored from cache) or deactivated (removed from cache).
Let’s explore these lifecycle hooks in more detail:
activated: The activated hook is called when a component is activated and restored from the cache.
It is triggered when the component was previously cached and is now being rendered again.
This hook allows you to perform any necessary operations or updates when a component becomes active again.
For example, you can use the activated hook to fetch fresh data from an API when a component becomes active again.
This ensures that the component always displays up-to-date information to the user.

deactivated: The deactivated hook is called when a component is deactivated and removed from the cache.
It is triggered when the component is no longer rendered and is being cached for future use.
This hook allows you to perform any cleanup tasks or save the current state before the component is cached.
For instance, you can use the deactivated hook to save the current state of a form in a component before it gets cached.
This ensures that the user’s input is not lost when they navigate away from the component and come back to it later.

These lifecycle hooks, activated and deactivated, provide you with the flexibility to handle specific actions when components are being cached or restored.
They are useful when you need to initialize or clean up resources, fetch fresh data, or perform any other tasks specific to the caching and activation/deactivation process.
It’s important to note that these lifecycle hooks are specific to components wrapped with keep-alive and are not the same as the standard Vue.js lifecycle hooks (created, mounted, etc.).
They allow you to target and react to the caching behavior provided by keep-alive, enhancing your control and customization over the component’s behavior when it comes to caching and activation.
Vue keep-alive Include Multiple
Vue keep-alive Include Multiple: The include attribute in keep-alive can be used to specify a list of components that should be cached and preserved.
By providing an array of component names to the include attribute, you can control which components should be cached and which should not.
Here’s an example of using include with keep-alive to cache multiple components:
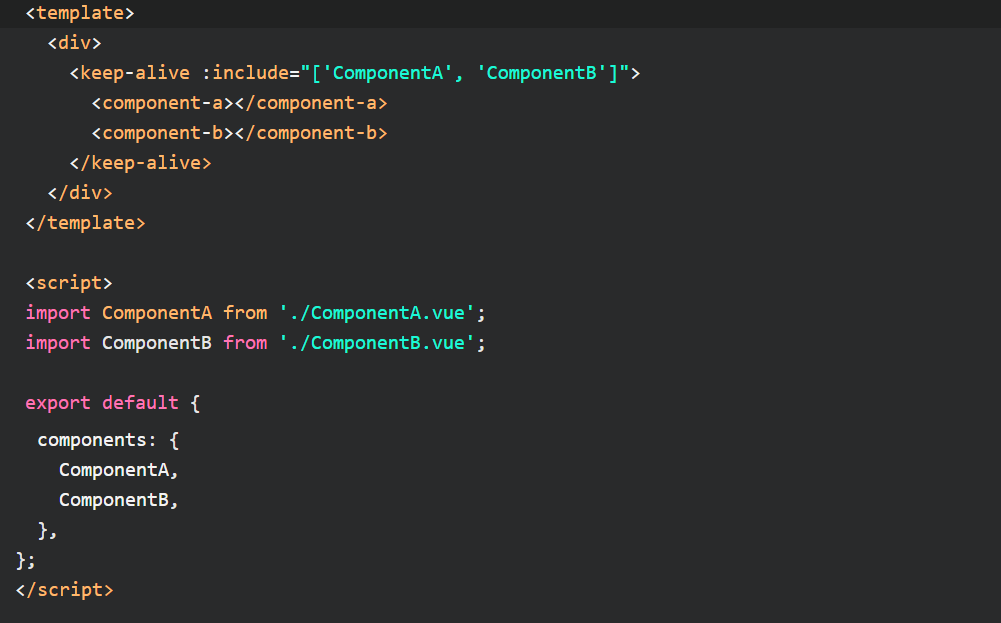
In this example, both ComponentA and ComponentB are wrapped inside keep-alive, and their names are provided to the include attribute as an array.
This ensures that these components are cached and their state is preserved, even if they are toggled between being rendered and destroyed.
Vue keep-alive Key
Vue keep-alive Key: The key attribute can be used with components wrapped in keep-alive to control the caching behavior based on a unique identifier.
By providing a dynamic key value to the key attribute, you can explicitly control when a component should be cached or destroyed.
Here’s an example of using key with keep-alive:
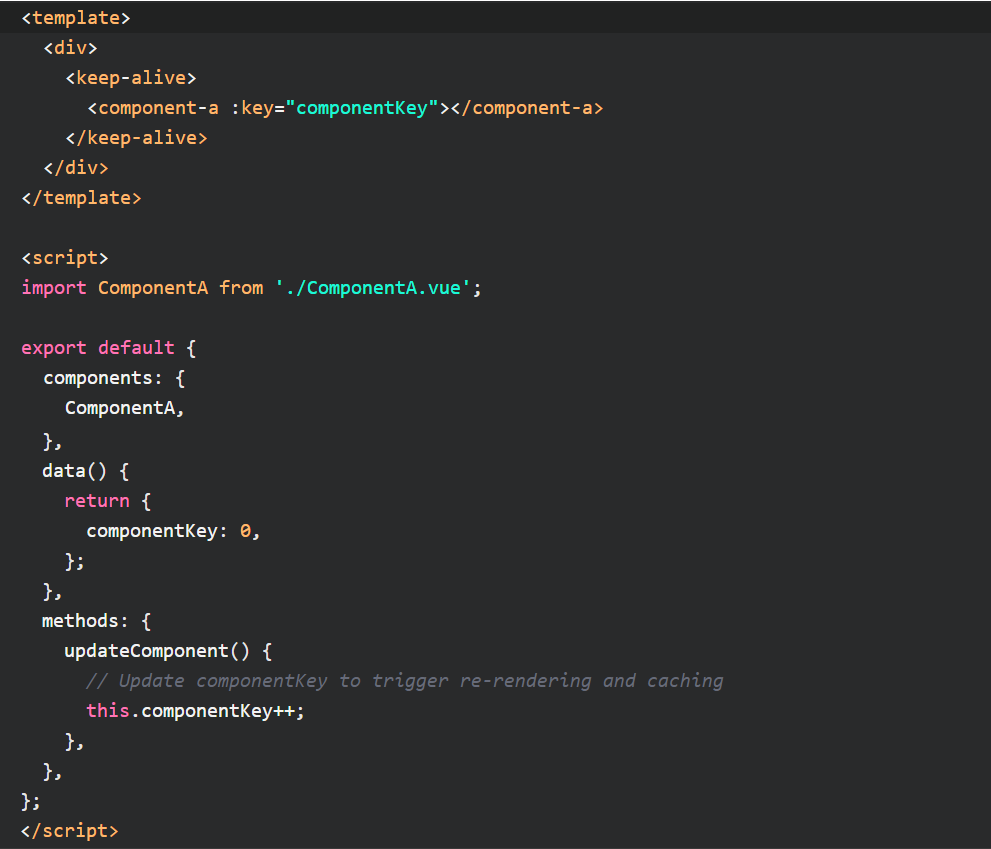
In this example, the componentKey data property is used as the dynamic value for the key attribute of ComponentA.
When componentKey changes, it triggers the re-rendering of ComponentA and the caching behavior of keep-alive.
This allows you to control when a component should be cached or destroyed based on specific conditions or events.
Related Articles
- Implement vue-recaptcha-v3 With Vue Recaptcha Examples
- Vue Import Component Into Another Component
- How To Use Vue3 Image Src? Vue 3 Image Path Examples
- How To Implement In Vue js Google Login?
- How To Use Google Map Vuejs? Google maps examples
Hopefully, you now have a better understanding of how you can use Vue Keep Alive.
Understanding how you can use Vue Keep Alive is gonna help you to allow you to cache and preserve the state of a component or group of components when they are toggled between being rendered and destroyed.