
Are you ready to take your Vue 3 application to the next level by learning Vue 3 Use Router?
Look no further than “Mastering Vue 3 Router,” the ultimate guide to organizing and navigating your Vue 3 app.
With step-by-step instructions, you’ll learn how to create routes, manage navigation, and optimize your app’s performance. But don’t worry, this article isn’t just a technical manual.
It’s also an easy-to-follow guide that will have you mastering Vue 3 Router in no time. So grab your coffee, get cozy, and let’s dive into the world of Vue 3 Router together!
No products found.
If you want to learn more you can read my longer article about Vue router why use it.
Vue 3 Use Router
When setting up Vue 3 Use Router you first need to install the Vue router into your Vue.js application. Next, you need to import the router into your main.js file and set up different paths for your routes in your Vue js application.
Does Vue Router Work With Vue 3?
If you wonder if does Vue Router work with Vue 3 there is no problem using the Vue router with the Vue 3.
You can go to the Vue router official page and see which version is supporting the Vue 3 applications and also the documentation.
What Is Router-View Vue 3?
What is router-view Vue 3? Simply put, the router-view is a component in Vue that helps you display the content of your application based on the URL that your user is currently on.
This makes your application more organized and easier to navigate, and it allows users to view different pages of your application without needing to refresh the page.
Vue Router is the official router for Vue.js and it is fully compatible with Vue 3. So if you’re familiar with using Vue Router in Vue 2, you’ll find it easy to use with Vue 3 as well.
How Do I Use Vue3 Router?
So, how do I use Vue3 router? First, you need to install it by running a command in your terminal or command prompt.
Once installed, you can use the router-view component in your Vue 3 application to display the content of your different pages.
You can also use the router-link component to create links that navigate to different pages in your application.
These components work together to make your application more organized and easy to navigate.
Don´t forget to check out my article about How To Use Vue Router Push In Vue js.
Install Vue Router
To get a more clear idea of how to install Vue Router, you can follow our step-by-step guide below.
Step 1: How To Install Vue3 Router?
How to install Vue3 router? The first step is to install Vue Router in your project. You can do this easily using npm or yarn.
Simply run the command “npm install vue-router” in your terminal or command prompt, and you’re good to go!
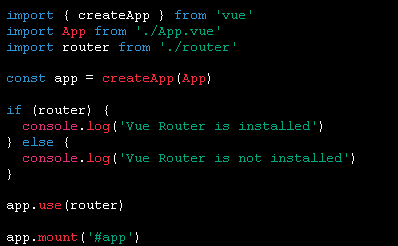
Step 2: How Do You Check If Vue Router Is Installed Or Not?
How do you check if Vue router is installed or not? To check if Vue Router is installed or not, you can look for the VueRouter object in your Vue instance.
If the object is present, it means that the Vue Router is installed. Here’s an example:

By following these simple steps, you can easily install and use Vue 3 Router to create a well-organized and easy-to-navigate application.
And if you ever need to check if Vue Router is installed or not, we’ve got you covered with a handy code snippet to help you out.
Step 3: Creating Routes
Once you’ve installed Vue Router, you need to create routes. A route is a mapping between a URL and a component.
You can create routes in a separate file or in your main Vue instance. It’s super easy, and we’ll show you how with some simple code examples.
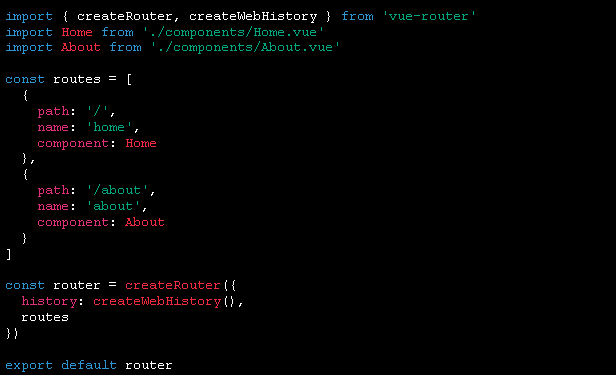

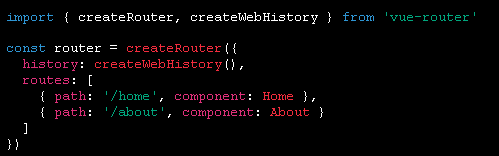
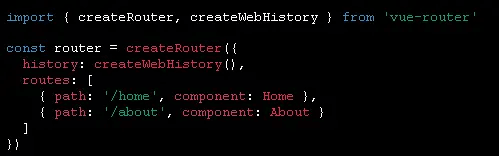
In this example, we are creating two routes. The first route maps the root URL ‘/’ to the Home component, and the second route maps the ‘/about’ URL to the About component.
Step 4: How Do I Setup My Vue Router?
How do I setup my Vue router? After creating your routes, you need to set up the router in your main Vue instance.
This is done by importing the router and passing it to the Vue instance. Then, you can add navigation links to your application using the router-link component provided by Vue Router.
We are importing the router and passing it to the app.use() method. This sets up the router in your Vue instance.
Now that you have created routes and set up the router, you can add navigation links to your application. You can do this by using the router-link component provided by Vue Router.
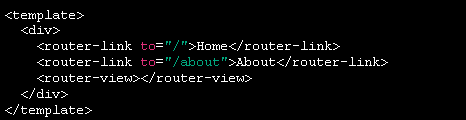
In this example, we are using the router-link component to create links to the Home and About routes. The router-view component is used to render the component associated with the current route.
Step 6: Passing Parameters
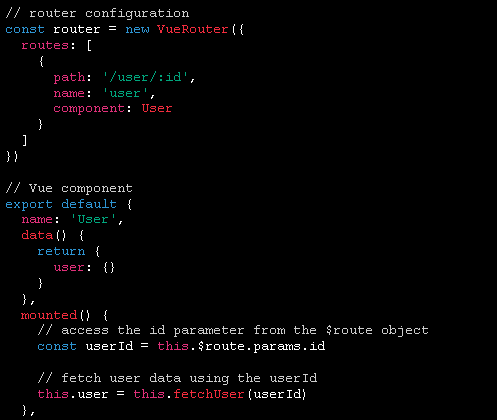
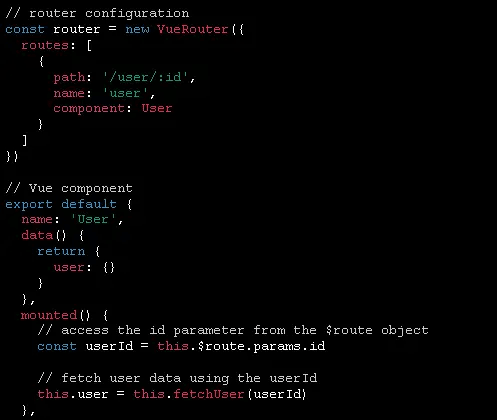
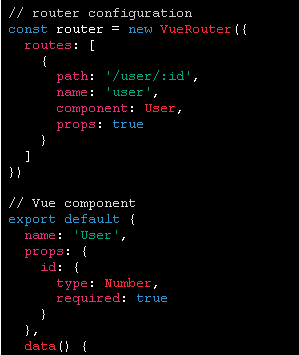
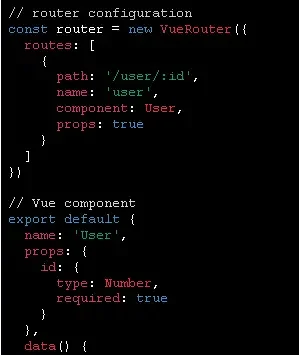
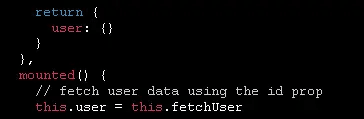
You can also pass parameters to your routes. This allows you to create dynamic routes that can show different content based on the URL.
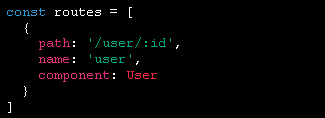

The example above is creating a route that accepts a parameter called id. You can access this parameter in your component using this.$route.params.id.
Finally, you can use programmatic navigation to navigate to a different route in your application.
You can do this by using the $router property provided by Vue Router. Here is an example:

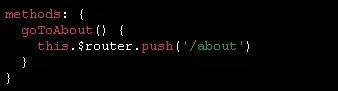
In this example, we are using the $router.push() method to navigate to the About route.
Click to read my article about What Is beforeEnter Vue Router?
How To Use Vue Router?
How To Use Vue Router? To use Vue Router in Vue 3, you’ll first need to install it using a package manager like npm or Yarn.
Once you’ve installed Vue Router, you can import it into your Vue application and create a new router instance.
How Do I Route In Vue 3?
How do I route in Vue 3? To define your routes, you’ll need to map URLs to components.
For example, you might have a route that maps the URL “/home” to a Home component, and a route that maps “/about” to an About component.
You can define your routes using the routes option of the createRouter function:
In this example, we’re using the createWebHistory function to create a browser history object, which allows us to use HTML5 history mode for client-side routing.
How do I navigate my router button on Vue? Once you’ve defined your routes, you can use the <router-link> component to create links between pages.
This component generates an <a> tag that automatically updates the URL and navigates to the appropriate component when clicked. For example:


To navigate to a different route programmatically, you can use the router.push() method. This method takes a string argument that specifies the path you want to navigate to. For example:


When Should I Use Vue Router?
When should I use Vue Router? Finally, it’s important to note that you don’t necessarily need to use Vue Router for every Vue.js application.
If your application is relatively simple and only has a few pages or views, you might be able to get away with using just the built-in v-if directive to conditionally render components.
However, if your application is more complex and has multiple pages with different URLs, Vue Router can be a powerful tool for managing your application’s state and navigation.
Click to read my article about Vue Js Routing With Vue Router Link.
Vue 3 Router Example
Vue 3 Router Example: Vue Router is a powerful tool that allows you to create dynamic and responsive user interfaces.
But does Vue Router work with Vue 3? The answer is yes! Vue Router 3 is fully compatible with Vue 3.
To route in Vue 3, you need to first create a router instance using the createRouter function, as shown in the previous section.
Once you have created the router instance, you can define your routes using the routes option:

In this example, we have defined two routes: the ‘/’ route, which will render the Home component, and the ‘/about’ route, which will render the About component.
Once you have defined your routes, you can add them to your router instance using the routes option:

This code creates a new router instance using the createRouter function and sets the history mode using the createWebHistory function.
The routes are passed to the router instance using the routes option.
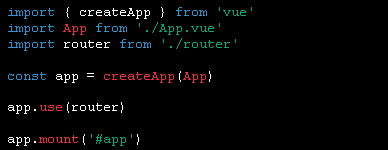
Finally, you need to mount your router to your Vue app using the use() method:

This code creates a new Vue app using the createApp function, mounts the router to the app using the use() method, and then mounts the app to the DOM element with the ID ‘app’.
Vue Router 4
Vue Router 4: Vue Router is a popular routing library for Vue.js applications, allowing you to create powerful and dynamic single-page applications.
With the release of Vue Router 4, there are some changes in how you can use it compared to previous versions.
In this explanation, I’ll walk you through some of the basics of using Vue Router 4.
To use Vue Router 4 in your Vue.js application, you first need to install it using either npm or yarn. Once you have installed it, you can import the router in your main.js file like this:

This creates a new Vue Router instance, with your defined routes. You can define your routes in the routes array, with each route containing a path and a component to render.
To get the current route in Vue Router 4, you can use the $route object.
This object contains information about the current route, including the path, parameters, and query parameters. You can access it in your components like this:

This will display the current path in your component. You can also use the $router object to programmatically navigate to a new route:

This will navigate to the home route when the button is clicked.
Vue Router 4 also introduces a new feature called base URL. The base URL is the root URL for all the routes in your application.
This can be useful if your application is hosted at a subdirectory on your server. To set the base URL, you can add the base property to your router options:
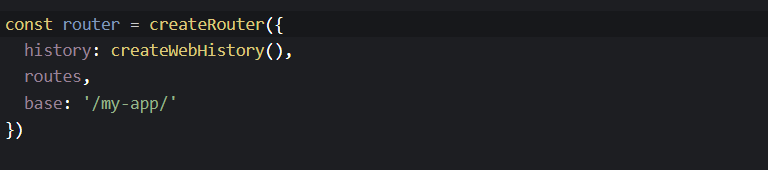
This will set the base URL to ‘/my-app/’, so all your routes will be relative to that URL.
Vue Router Params
When you need to access Vue Router params, you can do so using the $route object.
The $route object is a property of the Vue instance that contains information about the current route, including its parameters.
How Do I Get Router Parameters In Vue?
How do I get router parameters in vue? For example, suppose you have a route defined in your router configuration that includes a parameter called id.
You can access this parameter in your Vue component by using $route.params.id.
Here’s an example:
How Do I Set A Query In Vue Router?
How do I set a query in Vue Router? Queries are a way to pass additional parameters to a route in Vue. They are typically used for filtering, sorting, or pagination.
To set a query in Vue Router, you can use the $router.push method with an object that includes the query parameters. The query parameters should be defined as key-value pairs in the object.
For example, suppose you have a route that displays a list of users and you want to filter the list by a specific role. You can set the role filter using a query parameter called role.
Here’s an example:
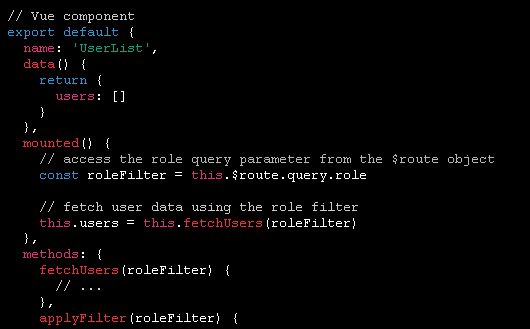
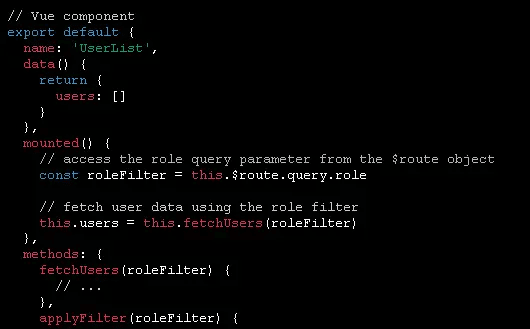


In this example, the applyFilter method is called when the user selects a new role filter. It uses $router.push to update the URL with the new role query parameter.
Learn more with my article about How To Use Vue Router For Vue 2.
How Do I Pass Props In Vue Router Link?
How do I pass props in Vue Router link? You can pass props to a component rendered by a Vue Router link using the props option. The props option can be a boolean, an object, or a function.
To pass props using the props option, you need to define the props in your component and then include them in the props option of the Vue Router link.
Here’s an example:

Vue Router Composition Api
Vue Router Composition Api: In Vue 3, you can use the Composition API to work with the router.
The Composition API is a new way of writing Vue components that allows you to organize your code into reusable functions and share state between them.
To use the Composition API with the router, you need to import the useRouter function from the vue-router package.
This function returns the current router instance, which you can use to navigate to different routes.
Here’s an example of how you can use the Composition API to navigate to a different route:
Vue Router Composition Api Example
To demonstrate the usage of Vue Router Composition Api, let’s consider a scenario where we have a Vue application that displays a list of products.
Each product has its own detail page where users can view additional information about the product.
To navigate to the product detail page, we need to use the router push function.
Here is an example code snippet that shows how to use the router push function with the composition API:
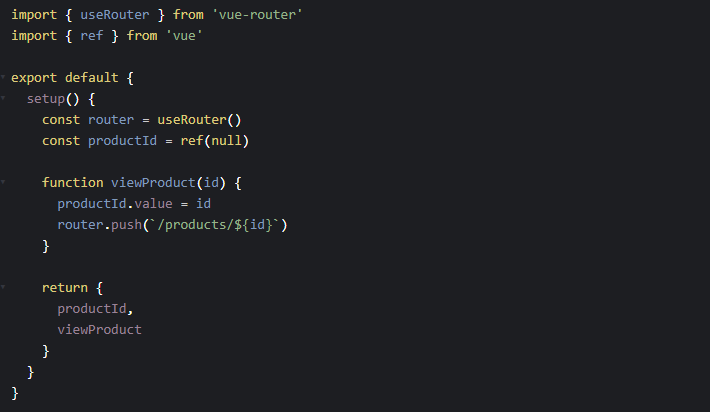
In this code snippet, we import the useRouter function from the Vue router library and the ref function from the Vue library.
We then define a setup function that sets up the router and creates a reactive reference to the productId.
Next, we define a viewProduct function that takes an id parameter.
Inside this function, we set the productId value to the id parameter and then use the router push function to navigate to the product detail page with the appropriate id in the URL.
Finally, we return an object that contains the productId and viewProduct functions, which can be used in our Vue component.
Vue 3 Watch Route Params Change
Vue 3 Watch Route Params Change: When using Vue Router, we can watch for changes to the route’s params object by using the $route object and Vue’s watch function.
The $route object is available in any component that is rendered as part of a route.
Here’s an example of how to watch for changes to the params object:

In this example, we have a component that displays the value of the “id” parameter in the route’s path.
We use Vue’s watch function to watch for changes to the “id” parameter. Whenever the “id” parameter changes, the watch function will be called with the new value and the old value.
In this case, we simply log the old and new values to the console, but we could also use this function to update the component’s data or perform some other action.
Related Articles
- Learn Vue Router Vue 3 With Vue.js 3 Examples
- What Is Vue Portal?
- How To Vue Router Reload Component?
- How Do I Navigate Between Views On My Vue Router?
- Vue Router Sub Routes With Vue js Nested Routes
Hopefully, you now have a better understanding of how you can in Vue 3 Use Router. Understanding how to in Vue 3 Use Router is very important to be able to navigate through your Vue.js application.
[…] Learn more with my article about Vue 3 Use Router 2023. […]
[…] Learn more with my article about how you can Vue 3 Use Router. […]
[…] Learn more with my article about how you can Vue 3 Use Router. […]
[…] Learn more with my article about how you can Vue 3 Use Router. […]