
Vue Transition play a vital role in enhancing the user experience of Vue.js applications by adding smooth and visually appealing animations to various elements.
In this article, I will share my insights from working as a Vue.js software developer for over 5 years. We will explore the power of Vue Transitions and provide you with practical examples to help you understand how to implement transitions in your Vue projects.
No products found.
Learn more by reading my longer article about Learn To Use Vue For Loop With Vue Loops Examples
Vue Transition
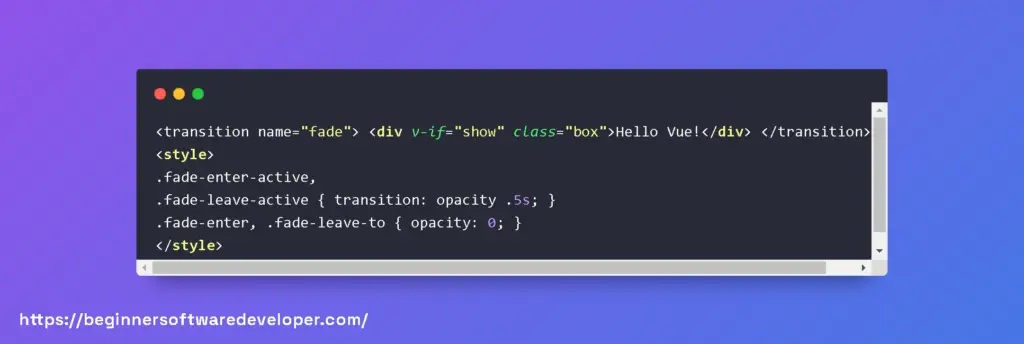
Vue Transition works by using CSS classes to define the transition effects.
How Does Vue Transition Work?
Vue Transition works by using CSS classes to define the transition effects.
When an element enters or leaves the DOM, Vue automatically adds or removes specific CSS classes at different stages of the transition process.
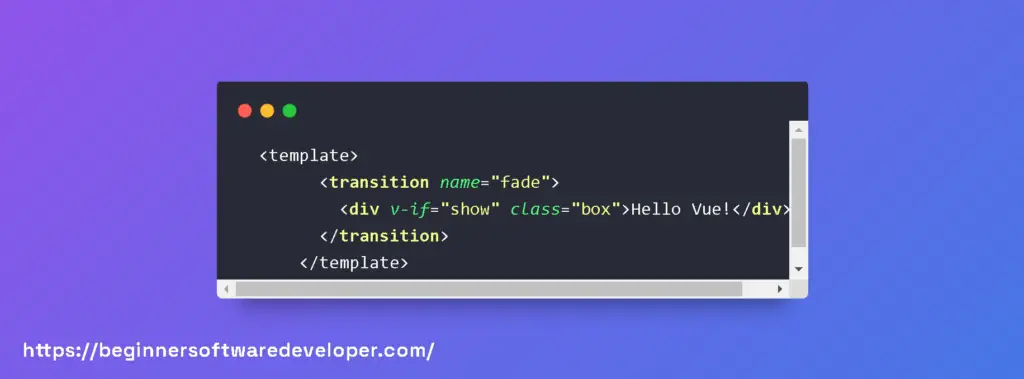
To use Vue Transition, you need to wrap the element you want to apply the transition to with a <transition> or <transition-group> component.
The <transition> component is used for single elements, while the <transition-group> component is used for multiple elements, such as a list.
When an element wrapped in a <transition> or <transition-group> is added, updated, or removed, Vue applies CSS classes to it at specific moments during the transition.
These CSS classes define the transition effects, such as fading, sliding, or scaling.
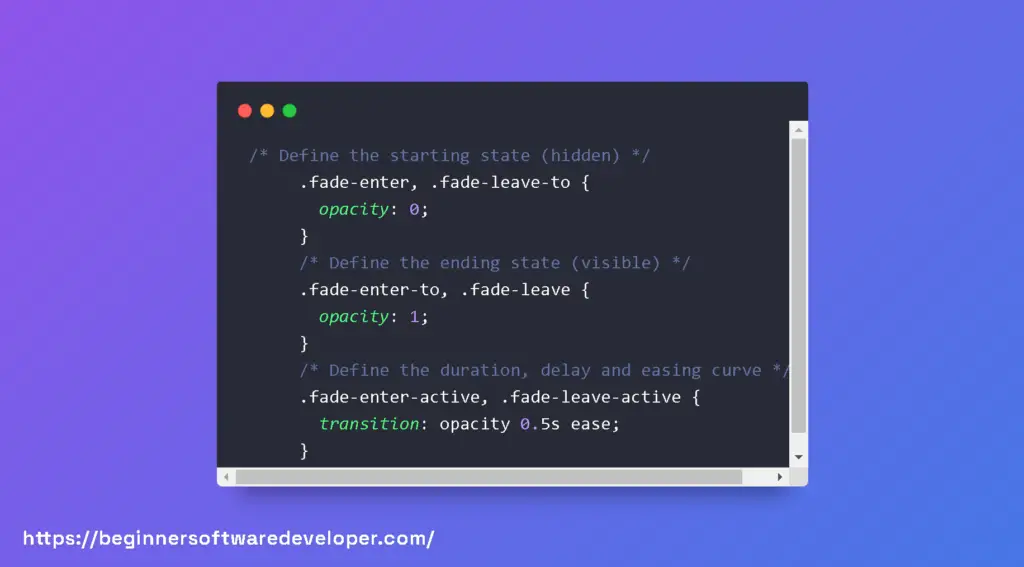
You can define the transition effects by specifying CSS classes in your stylesheets or using CSS frameworks like Bootstrap or Tailwind CSS.
Vue provides predefined CSS classes that you can use, such as v-enter, v-enter-active, v-leave, and v-leave-active, which represent different stages of the transition.
Mastering Vue Transitions: Enhance Your Web App’s User Experience
Vue.js offers a powerful system for animating elements in and out of the DOM with its transition features. By understanding the fundamentals of Vue transitions, developers can create more interactive and visually appealing web applications.
This section will delve into the core aspects of Vue transitions, including CSS-based transitions, JavaScript hooks, transition on appear, and transition modes.
CSS-Based Transitions
CSS-based transitions are the simplest way to animate elements in Vue. You can define the starting and ending states of your animation using CSS classes.
Vue automatically applies these classes at appropriate times during the transition.

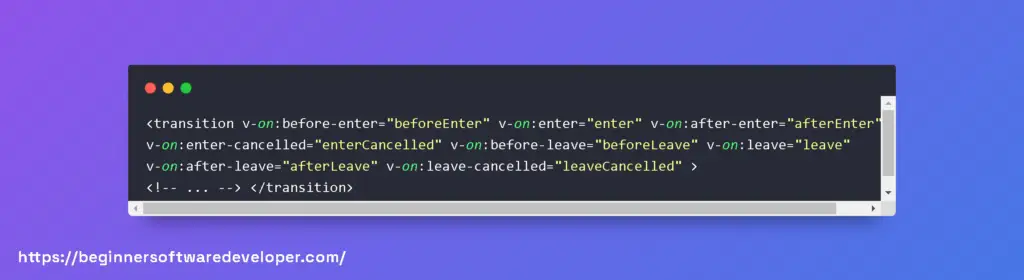
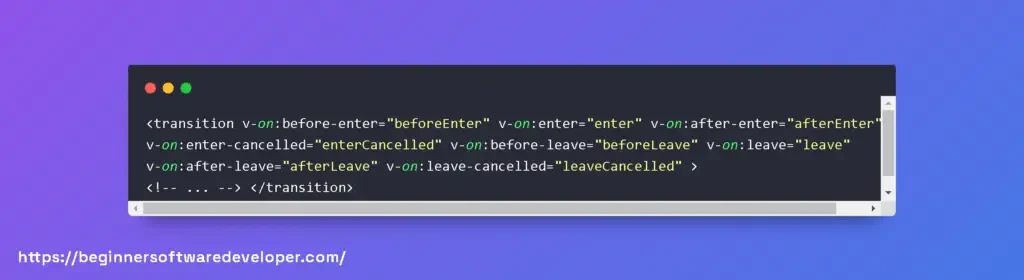
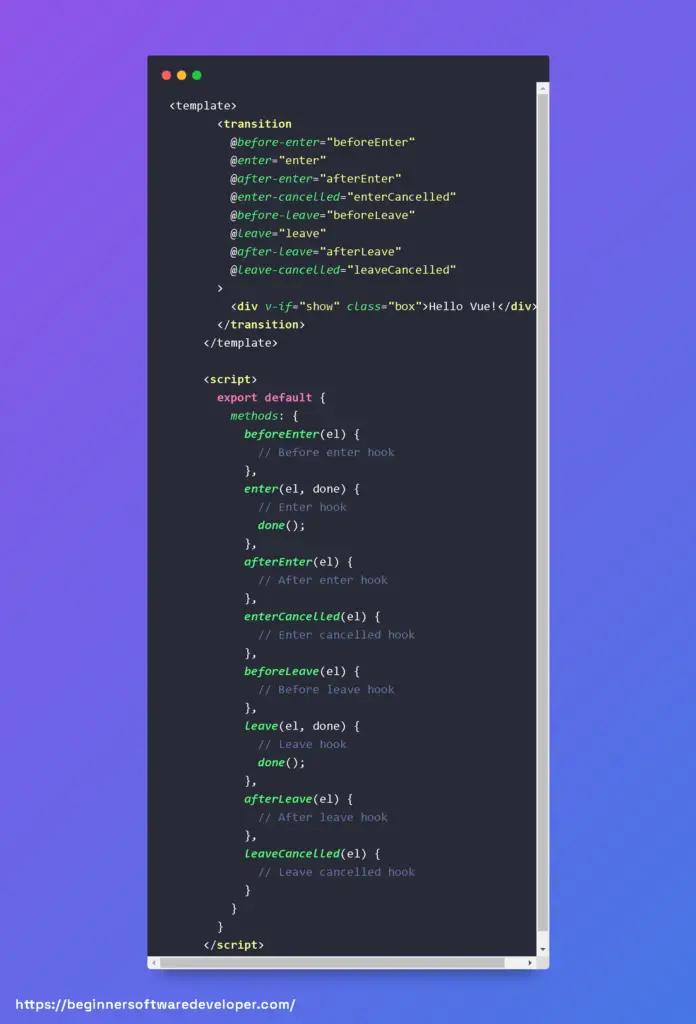
JavaScript Hooks
For more complex animations, Vue provides JavaScript hooks that allow you to execute code at different stages of the transition process. These hooks give you more control over the behavior of your transitions.
Transition on Appear
Vue transitions can also be applied when a component is initially rendered, known as “transition on appear”. This is particularly useful for animating elements as they are added to the DOM for the first time.


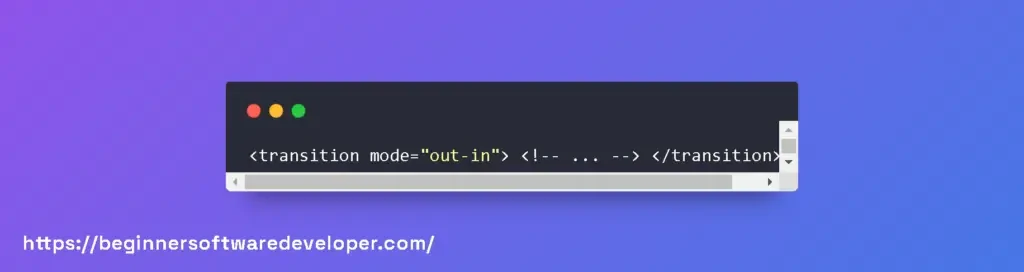
Transition Modes
Transition modes in Vue help manage the sequence in which elements enter and leave the DOM. The two modes available are “out-in” and “in-out”, which determine whether new elements transition in first or old elements transition out first.

Mastering Vue Transitions for Dynamic User Interfaces
Vue.js offers a powerful system for animating elements in and out of the DOM with its transition features. By understanding and utilizing Vue transitions, developers can create engaging and interactive user interfaces.
This section will delve into the intricacies of Vue transitions, covering transition classes, CSS transitions, and JavaScript hooks, providing code examples to illustrate these concepts.
Transition Classes
Vue automatically applies transition classes during the enter/leave and list transitions. There are six classes in total, each corresponding to different stages of the transition process. Here’s a quick overview:
- v-enter: Starting state for enter.
- v-enter-active: Active state for enter.
- v-enter-to: End state for enter.
- v-leave: Starting state for leave.
- v-leave-active: Active state for leave.
- v-leave-to: End state for leave.
Here’s an example of how you might use these classes in your CSS:

CSS Transitions
CSS transitions are the simplest way to animate elements in Vue. You can use the <transition> tag to wrap around the element you want to animate. Here’s a basic example:

JavaScript Hooks
For more complex animations, Vue provides JavaScript hooks that you can use to integrate third-party animation libraries or write custom animations.
The hooks are methods that get called at different stages of the transition. Here’s an example using JavaScript hooks:

Mastering Vue Transitions for Dynamic and Reusable Animations
Vue.js offers a powerful system for adding transitions and animations to your web applications.
By leveraging Vue’s built-in <transition> element, developers can create smooth and visually appealing effects when elements enter, leave, or list updates occur on the page.
In this section, we’ll delve into the intricacies of Vue transitions, providing detailed explanations and code examples for reusable transitions, dynamic transitions, and list transitions.
Reusable Transitions
Reusable transitions allow you to define a set of animations that can be applied to multiple elements or components throughout your application.
To create a reusable transition, you define a named transition in your CSS and reference it within the <transition> element’s name attribute.


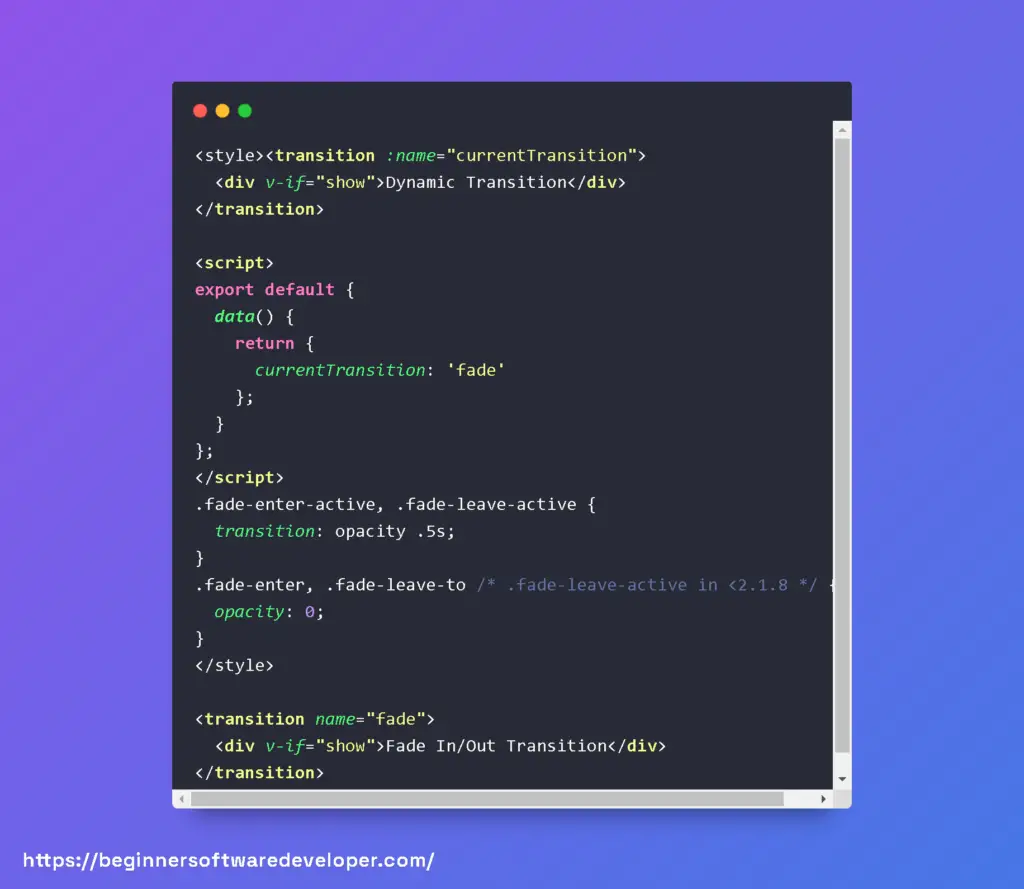
Dynamic Transitions
Dynamic transitions enable you to switch between multiple transitions on the fly. This is particularly useful when you want to apply different animations based on user interaction or other runtime conditions.
You can dynamically bind the name attribute of the <transition> element to a data property or computed property that determines the current transition to use.

List Transitions
List transitions are used to animate items as they enter and leave a list. Vue provides the <transition-group> element for this purpose, which allows for the transition of multiple elements simultaneously.
Each child of a <transition-group> must have a unique key attribute for Vue to manage the transitions correctly.

Vue Transition Height
Vue Transition Height: To achieve height transitions, Vue Transition relies on CSS transitions or animations applied to the height property of the element.
By adding or removing CSS classes at different stages of the transition, Vue animates the height change smoothly.
Here’s an example of how you can use Vue Transition to animate the height of an element:

In this example, the <transition> component wraps a <div> element that will be shown or hidden based on the value of the show variable.
The name attribute specifies the name of the CSS transition or animation that will be used for the height transition.
In your CSS stylesheet, you can define the transition or animation for the height property:
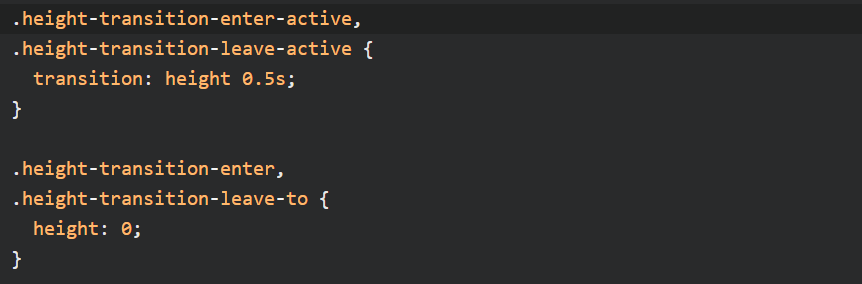
In this CSS code, the height-transition-enter-active and height-transition-leave-active classes define the transition for the height property with a duration of 0.5 seconds.
The height-transition-enter and height-transition-leave-to classes set the initial and final height values.
When the show variable changes, Vue will apply the appropriate CSS classes to the element, resulting in a smooth transition between different heights.
You can customize the transition duration, easing function, and other properties to achieve the desired effect.
By combining Vue Transition with CSS, you can create dynamic and visually appealing height transitions in your Vue.js applications.
Vue Transition Slide In
Vue Transition Slide In: Vue Transition allows you to create slide-in effects when an element is added to the DOM.
This can be useful for displaying notifications, modals, or any other element that should animate into view.
To achieve slide-in transitions, Vue Transition uses CSS animations applied to the transform property of the element.
By manipulating the transform property and adding or removing CSS classes at different stages of the transition, Vue animates the slide-in effect smoothly.
Here’s an example of how you can use Vue Transition to animate the slide-in effect:

In this example, the <transition> component wraps a <div> element that will be shown or hidden based on the value of the show variable.
The name attribute specifies the name of the CSS animation that will be used for the slide-in transition.
In your CSS stylesheet, you can define the animation for the transform property:

In this CSS code, the slide-in-enter class sets the initial position of the element to be outside the viewport on the left side.
The slide-in-enter-active class defines the animation with a duration of 0.5 seconds, using the slide-in-animation keyframes.
When the show variable changes, Vue will apply the appropriate CSS classes to the element, resulting in a smooth slide-in transition.
You can adjust the animation duration, timing function, and other properties to achieve the desired effect.
By combining Vue Transition with CSS animations, you can create engaging slide-in effects in your Vue.js applications.
Check out my article about What Are Vue Lifecycle Hooks?
Vue Transition Slide Left Right
Vue Transition Slide Left Right: Vue Transition can also be used to create slide-in effects from the left or right direction.
This is useful when you want to animate elements entering or leaving the viewport horizontally.
To achieve slide-in transitions from the left or right, Vue Transition utilizes CSS animations and transforms.
By manipulating the transform property and adding or removing CSS classes at different stages of the transition, Vue smoothly animates the slide-in effect.
Here’s an example of how you can use Vue Transition to animate the slide-in effect from the left or right:

In this example, the <transition> component wraps a <div> element that will be shown or hidden based on the value of the show variable.
The name attribute specifies the name of the CSS animation that will be used for the slide-in transition.
In your CSS stylesheet, you can define the animations for the left and right directions:

In this CSS code, the slide-left-right-enter class sets the initial position of the element outside the viewport on the left side.
The slide-left-right-enter-active class defines the animation for entering the viewport from the left with a duration of 0.5 seconds.
The slide-left-right-leave-to class sets the final position of the element outside the viewport on the right side.
The slide-left-right-leave-active class defines the animation for leaving the viewport to the right with a duration of 0.5 seconds, played in reverse.
Vue Transition Delay
Vue Transition Delay: Vue Transition allows you to introduce delays in the transition effects, controlling when they start or finish.
This can be useful when you want to synchronize multiple transitions or add a pause before a transition begins.
To add delays to Vue transitions, you can utilize CSS animations and the transition-delay property.
By applying CSS classes with different delay values, Vue will introduce the specified delays in the transition process.
Here’s an example of how you can use Vue Transition to add delays to transitions:

In this example, the <transition> component wraps a <div> element that will be shown or hidden based on the value of the show variable.
The name attribute specifies the name of the CSS transition that will be used for the delayed transition.
In your CSS stylesheet, you can define the transition with different delays:
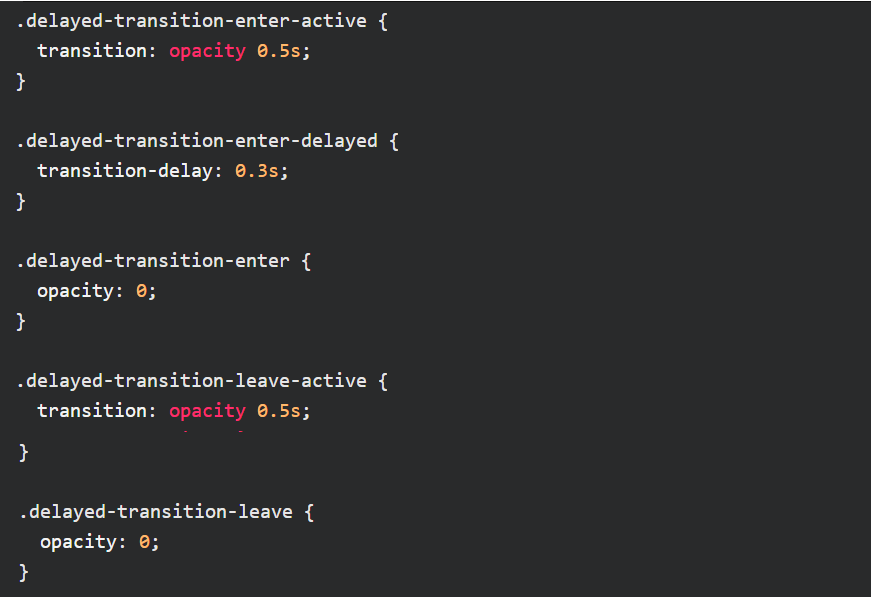
In this CSS code, the delayed-transition-enter-active class defines the transition for the opacity property with a duration of 0.5 seconds.
The delayed-transition-enter-delayed class introduces a delay of 0.3 seconds before the transition starts.
Vue Transition On Hover
Vue Transition On Hover: Vue Transition allows you to apply transitions when hovering over an element.
This can be useful for adding visual effects, such as tooltips or hover animations, to enhance user interactions.
To trigger transitions on hover, you can combine Vue Transition with Vue’s event handling capabilities.
By listening to the mouseenter and mouseleave events, you can control when the transitions should start and end.
Here’s an example of how you can use Vue Transition to apply transitions on hover:

In this example, the <transition> component wraps a <div> element that will have transitions applied when hovered over.
The name attribute specifies the name of the CSS transition that will be used for the hover transition.
The @mouseenter and @mouseleave directives listen to the corresponding events and update the show variable accordingly.
When the element is hovered over, the show variable is set to true, triggering the transition. When the mouse leaves the element, the show variable is set to false, ending the transition.
In your CSS stylesheet, you can define the transition effect:
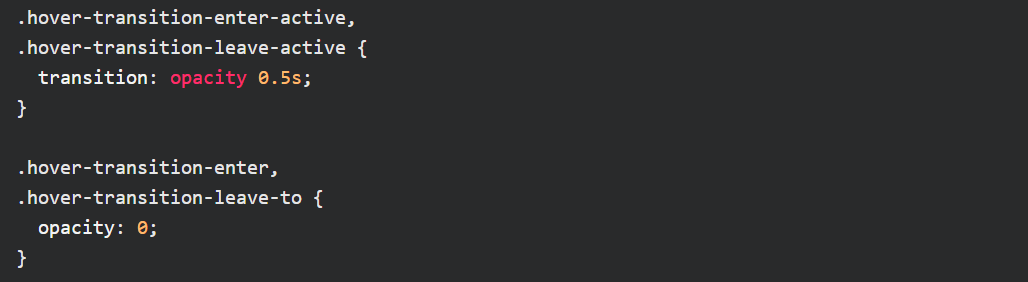
In this CSS code, the hover-transition-enter-active and hover-transition-leave-active classes define the transition for the opacity property with a duration of 0.5 seconds.
The hover-transition-enter and hover-transition-leave-to classes set the initial and final opacity values.
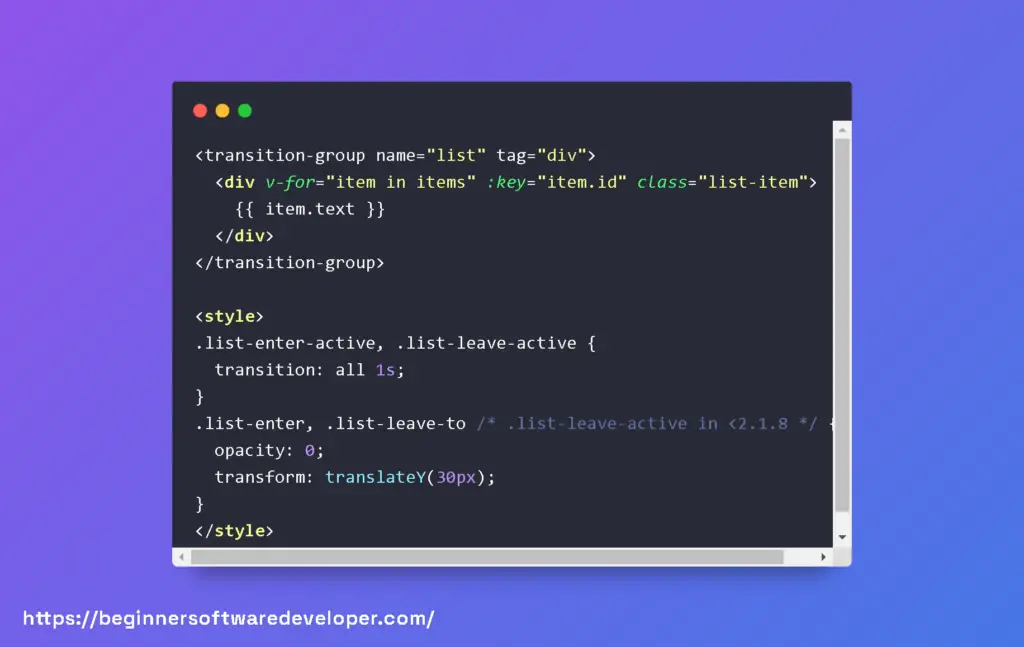
Vue Transition v-for
Vue Transition v-for: Vue Transition can be combined with the v-for directive to create transitions for dynamic lists or repeated elements.
This allows you to animate the insertion, update, and removal of items in a list, giving a fluid and visually appealing user experience.
To use Vue Transition with v-for, you can apply the transition component to the element containing the v-for loop.
This will ensure that each item in the list has its transitions applied when necessary.
Here’s an example of how you can use Vue Transition with v-for:

In this example, the <transition-group> component wraps a <ul> element that will contain the list items.
The name attribute specifies the name of the CSS transition that will be used for the list transition.
The tag attribute determines the HTML tag used for the container element (in this case, <ul>).
Each <li> element represents an item in the items array, which is iterated over using the v-for directive.
The :key attribute ensures that each list item has a unique identifier, enabling Vue to track changes and apply the appropriate transitions.
In your CSS stylesheet, you can define the transition effect:
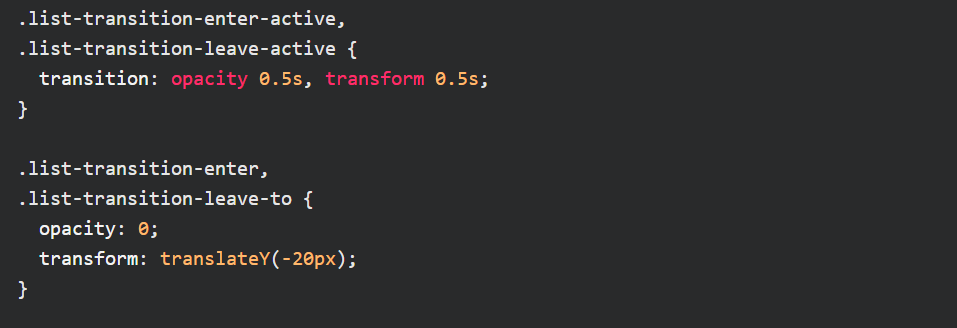
In this CSS code, the list-transition-enter-active and list-transition-leave-active classes define the transitions for the opacity and transform properties with a duration of 0.5 seconds.
The list-transition-enter and list-transition-leave-to classes set the initial and final values for opacity and transformation.
Don´t forget to check out my article about Learn Vue Router Hash With Vue Router Examples
Vue Transition v-show
Vue Transition v-show: Vue Transition can also be used in combination with the v-show directive to apply transitions when toggling the visibility of an element.
This allows you to animate the appearance and disappearance of an element smoothly.
To use Vue Transition with v-show, you can wrap the element with the transition component.
When the v-show condition changes, Vue will apply the appropriate CSS classes to the element, resulting in the desired transition effect.
Here’s an example of how you can use Vue Transition with v-show:

In this example, the <transition> component wraps a <div> element that will be shown or hidden based on the value of the show variable.
The name attribute specifies the name of the CSS transition that will be used for the show transition.
The v-show directive determines the visibility of the element based on the show variable.
When the show variable is true, the element is displayed, and the transition is applied. When the show variable is false, the element is hidden, and the transition effect is triggered again.
In your CSS stylesheet, you can define the transition effect:
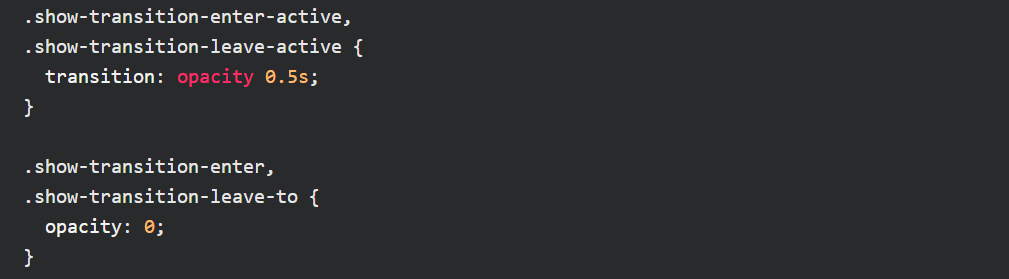
In this CSS code, the show-transition-enter-active and show-transition-leave-active classes define the transition for the opacity property with a duration of 0.5 seconds.
The show-transition-enter and show-transition-leave-to classes set the initial and final opacity values.
Vue Transition Group
What Is Transition Group Vue?
Vue Transition Group is a feature in the Vue.js framework that allows you to apply transitions and animations to groups of elements.
Unlike the regular Vue transitions, which are designed to work on single elements, the transition group provides a way to animate multiple elements together as a group.
When working with lists or dynamically rendered components in Vue, it is common to encounter scenarios where elements are added or removed dynamically.
The transition group component helps in smoothly animating these changes by applying transition effects to the individual elements within the group.
Using the transition group component involves wrapping the elements that need to be transitioned within a <transition-group> tag.
This component acts as a container for the group of elements and provides additional features and directives for handling animations.
Don´t forget to check out my article about How To Use V-Show Vue With Vue Display Examples
Vue Transition Group Stagger
Vue Transition Group Stagger is a specific feature of the transition group component that enables you to stagger the animations of elements within the group.
Staggering animations can create visually appealing effects by introducing delays between the start times of each element’s animation.
Here’s an example of how you can use Vue Transition Group Stagger:

In the example above, each <li> element within the transition group will have a fade animation applied to it. By default, all elements would animate simultaneously.
However, by adding the v-bind:stagger=”30″ attribute to the <transition-group> component, we introduce a 30ms delay between the start of each element’s animation, creating a staggered effect.
Vue Transition Group List
Vue Transition Group List is another feature of the transition group component that helps in animating the reordering of elements within a list.
When elements are added, removed, or reordered within the list, the transition group list feature provides smooth animations to reflect these changes.
Here’s an example of how you can use Vue Transition Group List:

In the example above, the <li> elements within the transition group will have a slide animation applied to them.
When the list changes, Vue will intelligently animate the movements of the elements, providing a seamless transition between different orderings of the list.
Vue Transition Group Slide
Vue Transition Group Slide is a specific animation effect that can be applied to elements within the transition group component.
The slide effect animates the elements by sliding them in or out of view, creating smooth transitions when elements are added or removed from the group.
Here’s an example of how you can use Vue Transition Group Slide:

In this example, the v-for loop iterates through the items array, and each item is assigned a unique key. The slide-fade class defines the CSS transitions or animations for the slide effect.
The mode=”out-in” attribute ensures that the outgoing element is transitioned out first before the incoming element transitions in.
Vue Transition Group Animation
Vue Transition Group Animation: Vue Transition Group provides a powerful way to apply custom animations to groups of elements.
With the ability to define CSS animations or transitions, developers can create unique and visually appealing effects when elements are added or removed.
Here’s an example of how to use Vue Transition Group with custom animations:

In this example, the v-for loop iterates through the items array, and each item is assigned a unique key.
The CSS classes animated bounceIn and animated bounceOut define the custom animations to be applied when elements enter or leave the list.
Developers can leverage various animation libraries, such as Animate.css or create their own CSS animations, to achieve the desired effects when using Vue Transition Group.
Vue Transition-group v-for
Vue Transition-group v-for: Vue Transition Group works seamlessly with the v-for directive, enabling transitions and animations for dynamic lists rendered using the v-for loop.
By combining the two features, developers can create smooth and engaging effects when adding or removing items from the list.
Here’s an example of using Vue Transition Group with v-for:

In this example, the v-for loop iterates through the items array, and each item is assigned a unique key based on its id.
The CSS classes animated fadeIn and animated fadeOut apply the fade-in and fade-out transitions to the elements.
What Is The Difference Between Transition And Transition Group In Vue?
The main difference between the transition and transition group components lies in their purpose and usage.
The transition component is designed to animate a single element, such as when it appears or disappears from the DOM, or when its state changes.
It is commonly used for simple animations, like fading in or out an element, and is not intended for animating groups of elements.
The transition component uses CSS classes to apply and control the animations.
On the other hand, the transition group component is specifically created for animating groups of elements, such as lists or dynamically rendered components.
It provides a way to animate additions, removals, and changes in order within a group of elements.
The transition group component uses the same CSS classes and directives as the transition component, but it introduces additional features and directives specifically designed for animating groups.
Related Articles
- Differences Between Vue 2 vs Vue 3 With Vue Examples
- What Is Vuesax With Vuesax Examples
- Unit Testing Vue Jest With Jest Vue Examples
- Learn To Use Vue Test Utils With Vue Test Examples
- Using v-bind In Vue With Vue Binding Examples
Hopefully, you now have a better understanding of how you can use Vue Transition. Understanding how you can use Vue Transition will help you to define the transition effects.