
Whether you need to perform actions before a component is created, manipulate the DOM before rendering, or clean up resources when a component is unmounted, Vue lifecycle hooks provide the necessary flexibility.
In this article, we will delve into the world of Vue lifecycle hooks, exploring their purpose, order of execution, and practical use cases to enhance your understanding of this essential Vue.js feature.
No products found.
Learn more by reading my longer article about Implement Vue Hover With Mouseover Examples
Vue Lifecycle Hooks
Vue Lifecycle Hooks are callback functions that allow you to execute code at specific stages of a Vue instance’s lifecycle.
What Are Vue Lifecycle Hooks?
Vue lifecycle hooks are an essential aspect of Vue.js, a progressive JavaScript framework used for building user interfaces.
Lifecycle hooks are callback functions that allow you to execute code at specific stages of a Vue instance’s lifecycle.
They provide developers with the ability to interact with and manipulate the component at various key points in its existence, from creation to destruction.
Vue.js components go through various stages during their lifecycle, such as creation, updates, and destruction.
At each of these stages, Vue provides specific hooks that you can use to perform actions or respond to events.
The lifecycle hooks are called automatically by the Vue framework, and you can define them within your Vue component instance.
The main Vue lifecycle hooks are as follows:
- beforeCreate: This hook is called synchronously before the instance is initialized. It is used to set up data and other configurations before the component is created.
- created: The created hook is called once the instance is created and is appropriate for performing asynchronous operations like making API calls or initializing timers.
- beforeMount: Prior to the component being mounted on the DOM, the beforeMount hook is executed. You can use this hook to access the component’s template before rendering.
- mounted: This hook is called after the component has been mounted on the DOM. It is ideal for interacting with the DOM and performing initial setup that requires the presence of the component in the document.
- beforeUpdate: When a component’s reactive data changes, the beforeUpdate hook is called right before the DOM is patched to reflect the new changes. It allows you to access the component’s state before an update.
- updated: After the DOM has been updated following a data change, the updated hook is triggered. It is useful for interacting with the updated DOM elements.
- beforeUnmount (Vue 2) / beforeUnmount (Vue 3): This hook is called before the component is unmounted and destroyed. It is a suitable place for cleaning up resources or canceling timers.
- unmounted (Vue 2) / unmounted (Vue 3): The unmounted hook is called once the component has been unmounted and removed from the DOM. It provides an opportunity for final cleanup.
Vue Lifecycle Hooks Vue 2
Vue Lifecycle Hooks Vue 2: In Vue 2, the lifecycle hooks mentioned above are available for use.
The beforeUnmount and unmounted hooks are used to handle the cleanup and finalization tasks before the component is destroyed.
Vue Lifecycle Hooks Vue 3
Vue Lifecycle Hooks Vue 3: With the introduction of Vue 3, the lifecycle hooks have been updated and renamed to follow a more consistent naming convention.
The beforeUnmount hook has been changed to beforeUnmount, and the unmounted hook has been renamed to unmounted.
Vue Lifecycle Hooks Order
Vue Lifecycle Hooks Order: The order in which Vue lifecycle hooks are called is crucial for understanding the flow of a Vue component’s lifecycle. The typical order is as follows:
- beforeCreate
- created
- beforeMount
- mounted
- beforeUpdate
- updated
- beforeUnmount (Vue 2) / beforeUnmount (Vue 3)
- unmounted (Vue 2) / unmounted (Vue 3)
It’s important to note that the beforeUpdate and updated hooks are called only when there are changes to the reactive data properties that affect the component.
Vue Lifecycle Hooks Composition API
Vue Lifecycle Hooks Composition API: The Composition API is a powerful addition to Vue 3 that provides a more flexible and scalable way to organize component logic.
It allows you to group related reactive data, computed properties, methods, and lifecycle hooks into a single setup() function.
With the Composition API, lifecycle hooks are handled differently.
Instead of using separate lifecycle hook functions like beforeCreate or mounted, you can use the corresponding on functions provided by the Composition API.
Here’s an example of using the Composition API with lifecycle hooks:

In this example, we import the necessary lifecycle hook functions from the vue package.
Within the setup() function, we can use the corresponding on functions to define the desired behavior at each lifecycle stage.
The functions passed to these hooks will be executed when the component reaches the specified lifecycle stage.
Check out my article about Learn Migrating Vue 2 To Vue 3 With Vue Migration Examples.
Vue Lifecycle Hooks Async
Vue Lifecycle Hooks Async: Asynchronous operations are commonly performed in Vue components, such as making API calls or fetching data from a server.
Vue lifecycle hooks provide a convenient way to handle such operations and ensure they are executed at the appropriate lifecycle stage.
For example, you can use the created hook to initiate an asynchronous operation and update the component’s data when the response is received. Here’s an example:
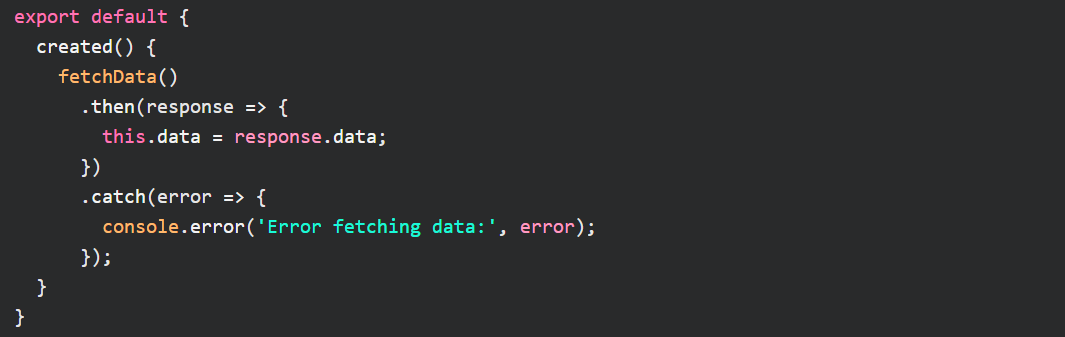
In this example, the created hook is used to fetch data asynchronously using the fetchData() function.
Once the response is received, the component’s data property is updated with the retrieved data. If an error occurs during the data fetching process, it is caught and logged to the console.
By leveraging the appropriate lifecycle hooks, you can ensure that your asynchronous operations are executed at the right time during the component’s lifecycle, avoiding issues with data availability and synchronization.
Vue Lifecycle Hooks Mounted vs Created
Vue Lifecycle Hooks Mounted vs Created: The mounted and created hooks are two important lifecycle hooks in Vue that serve different purposes.
The created hook is called when the component’s instance is created, and it’s suitable for performing initial setup tasks.
This is the stage where you can initialize data, set up event listeners, or perform other configuration actions.
However, the component is not yet mounted in the DOM, so you don’t have access to the component’s rendered elements.
On the other hand, the mounted hook is called after the component has been mounted on the DOM.
It’s the ideal place for interacting with the rendered component, manipulating the DOM, or accessing third-party libraries that require the component to be present in the document.
In this stage, you have full access to the component’s rendered elements and can perform any necessary DOM-related operations.
Here’s an example to illustrate the difference:
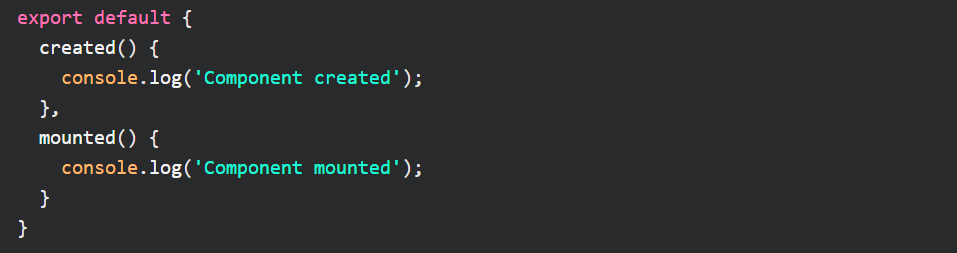
In this example, the message “Component created” will be logged when the component is created, and “Component mounted” will be logged when the component is mounted on the DOM.
This showcases the distinction between the two hooks and their respective stages in the component’s lifecycle.
Vue Lifecycle Hooks Updated
Vue Lifecycle Hooks Updated: The updated hook is called after a component’s reactive data has changed, and the DOM has been patched to reflect those changes.
It provides an opportunity to interact with the updated DOM elements or perform additional actions based on the new data.
Here’s an example of using the updated hook:

In this example, the message “Component updated” will be logged whenever the component’s reactive data changes and triggers an update of the DOM.
You can use the updated hook to respond to the changes, perform calculations, or interact with the updated elements.
It’s important to note that you should exercise caution when modifying the reactive data within the updated hook itself, as it could lead to an infinite update loop if not handled properly.
Don´t forget to check out my article about Learn Vue Router Hash With Vue Router Examples
Vue Lifecycle Hooks Destroy
Vue Lifecycle Hooks Destroy: The beforeUnmount hook (Vue 2) or beforeUnmount hook (Vue 3) is called right before a component is unmounted and destroyed.
It provides an opportunity to clean up resources, cancel timers, or perform any necessary cleanup tasks before the component is removed from the DOM.
Here’s an example:

In this example, the beforeUnmount hook is used to define cleanup actions that should be performed before the component is unmounted.
It is an appropriate place to release event listeners, clear intervals or timeouts, unsubscribe from subscriptions, or perform any other necessary cleanup tasks.
By leveraging the beforeUnmount hook, you can ensure that your component’s resources are properly released and prevent memory leaks or other undesired behavior.
Vue Lifecycle Hooks Props
Vue Lifecycle Hooks Props: Props are a fundamental concept in Vue that allow data to be passed from a parent component to a child component.
Although not technically a lifecycle hook, it’s important to understand how props can be utilized within the component’s lifecycle.
When a component receives props, they are available in the created hook.
You can access and utilize the prop values to set up initial data, perform computations, or customize the component’s behavior based on the provided prop values.
Here’s an example:
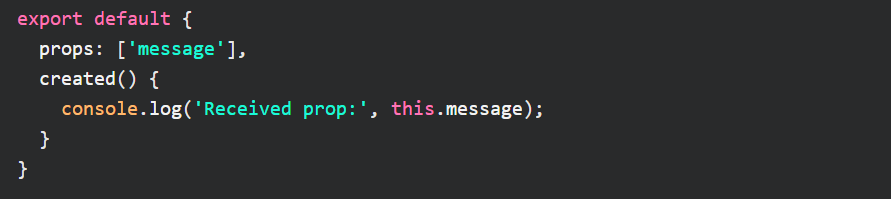
In this example, the component has a prop named message. Within the created hook, the prop value is accessed using this.message and logged to the console.
This allows you to perform actions or set up the component based on the provided prop value.
Using props within the component’s lifecycle hooks provides a way to incorporate external data and customize the behavior of your component based on the values passed from its parent component.
Vue beforedestroy
Vue beforedestroy vs destroyed
Vue beforedestroy vs destroyed: The beforeDestroy hook is distinct from the destroyed hook in Vue.
The beforeDestroy hook is triggered right before the component is destroyed, while the destroyed hook is executed after the component has been destroyed and removed from the DOM.
The beforeDestroy hook provides an opportunity to clean up any resources or subscriptions that the component has established.
It is often used to perform tasks like removing event listeners, clearing timeouts or intervals, or releasing any external resources that were acquired during the component’s lifespan.
On the other hand, the destroyed hook is typically used for performing post-destruction cleanup tasks that may require access to the component’s DOM element or other components.
At this point, the component is no longer present in the DOM, and you should not perform any operations that rely on the component’s existence.
Vue beforedestroy vs beforeunmount
Vue beforedestroy vs beforeunmount: There has been a change in the lifecycle hooks’ names, and the beforeDestroy hook has been replaced with the beforeUnmount hook.
The purpose of the beforeUnmount hook remains the same as the beforeDestroy hook in Vue 2. It is called right before the component is unmounted and destroyed.
The beforeUnmount hook allows you to perform cleanup tasks or release any resources associated with the component before it gets unmounted.
This can include removing event listeners, clearing timeouts or intervals, or releasing external resources.
The change from beforeDestroy to beforeUnmount aligns with the new component model in Vue 3, where components are unmounted rather than destroyed.
This change in terminology reflects the shift in focus towards the composition API and reusability of components.
Vue beforedestroy Example
Vue beforedestroy Example: Here’s an example that demonstrates the usage of the beforeDestroy hook in Vue 2:

In this example, we have a component that starts a timer when the “Start Timer” button is clicked.
The beforeDestroy hook is used to clear the interval created by the timer before the component is destroyed. This ensures that the interval is properly cleaned up, preventing any memory leaks.
Note that this example uses Vue 2 syntax with the beforeDestroy hook. In Vue 3, you would replace beforeDestroy with beforeUnmount, while the rest of the code would remain similar.
Don´t forget to check out my article about How To Use V-Show Vue With Vue Display Examples
How Do You Use Lifecycle Hooks In Vue 3?
To use lifecycle hooks in Vue 3 remains similar to Vue 2 but with slight changes in the hook names.
To use lifecycle hooks in Vue 3, you need to define them as methods within your component’s options object. Here’s an example showcasing the usage of common lifecycle hooks:
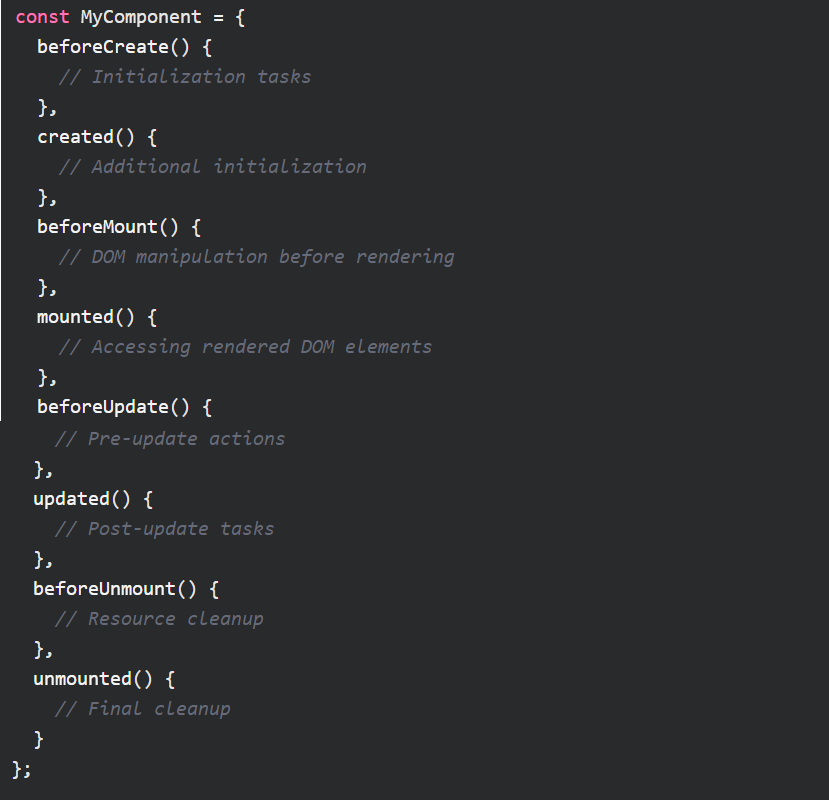
Inside the object following the variable declaration, each lifecycle hook is defined as a method.
For example, beforeCreate(), created(), beforeMount(), mounted(), beforeUpdate(), updated(), beforeUnmount(), and unmounted() are the lifecycle hooks used in this example.
Within each lifecycle hook, you can write custom code to execute specific actions at the corresponding stage of the component’s lifecycle.
For instance, beforeCreate() can be used for initialization tasks, created() for additional initialization, beforeMount() for DOM manipulation before rendering, and so on.
Lifecycle hooks are automatically called by Vue 3 at their respective stages in the component’s lifecycle.
When the component goes through these lifecycle stages, Vue triggers the appropriate hooks, allowing you to interact with the component and control its behavior accordingly.
By leveraging these lifecycle hooks, you can effectively manage the initialization, rendering, updating, and cleanup processes of your Vue 3 components, making your applications more organized, maintainable, and efficient.
Related Articles
- Differences Between Vue 2 vs Vue 3 With Vue Examples
- What Is Vuesax With Vuesax Examples
- Unit Testing Vue Jest With Jest Vue Examples
- Learn To Use Vue Test Utils With Vue Test Examples
- Learn To Use Vue Watch With Vue.js Examples
Hopefully, you now have a better understanding of how you can use Vue lifecycle hooks.
Understanding how you can use Vue lifecycle hooks will help you to execute code at specific stages of a Vue instance’s lifecycle.