
With its intuitive API and extensive range of validation options, Vuelidate simplifies the process of validating your form inputs, ensuring data integrity and a smooth user experience.
In this article, I will share my insights from working as a Vue.js software developer for over 5 years. We will delve into Vuelidate and provide you with clear examples that showcase its various features and functionalities.
No products found.
Learn more by reading my longer article about How To Use Vue Js Header? (Vue Headers Examples)
Vuelidate
Vuelidate allows you to define validation rules for your form fields, such as required fields, minimum and maximum lengths, numeric values, and more.
What Does Vuelidate Do?
Vuelidate simplifies the process of validating form inputs in Vue.js applications.
It allows you to define validation rules for your form fields, such as required fields, minimum and maximum lengths, numeric values, and more.
With Vuelidate, you can validate your data both synchronously and asynchronously.
By using Vuelidate, you can easily incorporate validation into your Vue components.
It provides a set of validation rules that you can apply to your form fields, and it also allows you to create custom validators tailored to your specific requirements.
Vuelidate integrates seamlessly with Vue.js, allowing you to bind validation rules to your form inputs and display error messages when the data is not valid.
It provides an intuitive API that makes it straightforward to define and manage your validation logic.
Mastering Form Validation in Vue.js with Vuelidate
Form validation is a critical aspect of web development, ensuring that user inputs are correct and secure. Vuelidate is a lightweight and flexible validation library for Vue.js that simplifies form validation.
It provides a variety of built-in validators and allows for custom validation rules, making it a go-to choice for Vue developers.
In this section, we’ll guide you through the installation process of Vuelidate, setting you up for success in your Vue.js projects.
Installation and Setup of Vuelidate
To integrate Vuelidate into your Vue.js project, follow the steps below. This guide assumes that you have a Vue.js project already created and are familiar with using npm or yarn for package management.
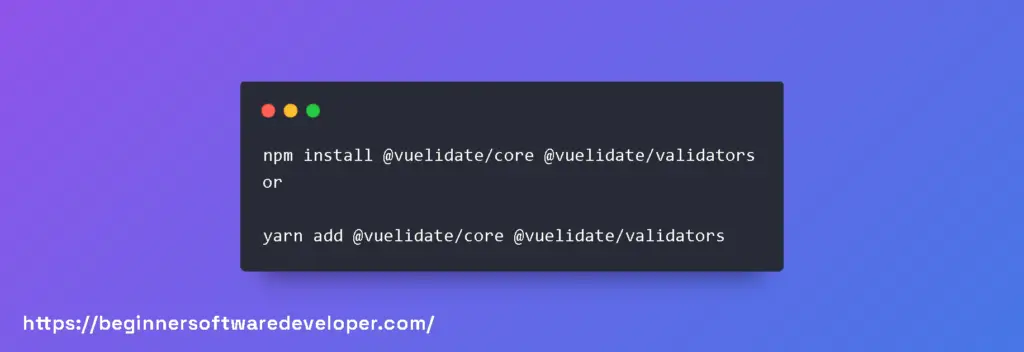
Step 1: Install Vuelidate
Open your terminal and navigate to your project directory. Install Vuelidate by running one of the following commands:

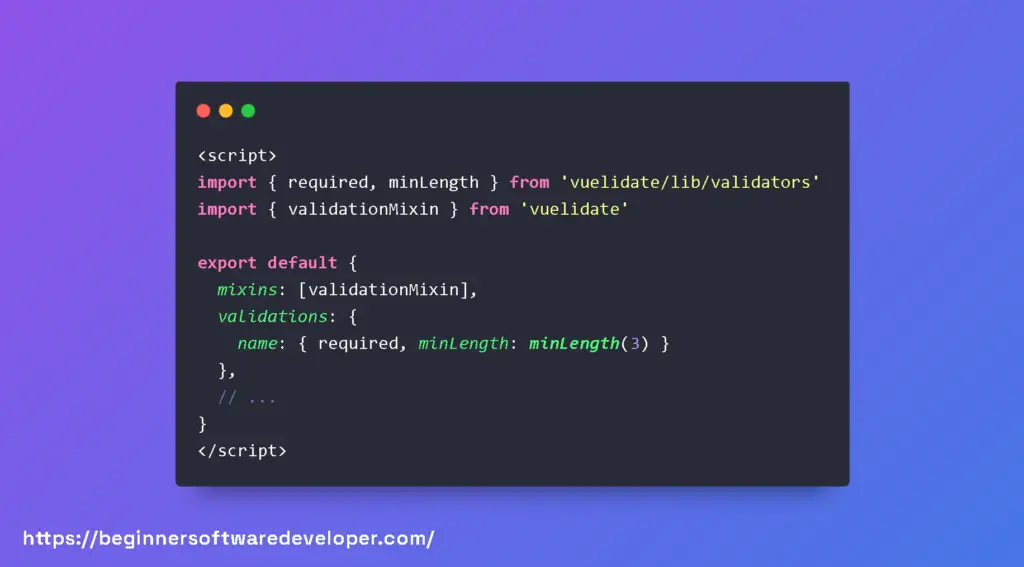
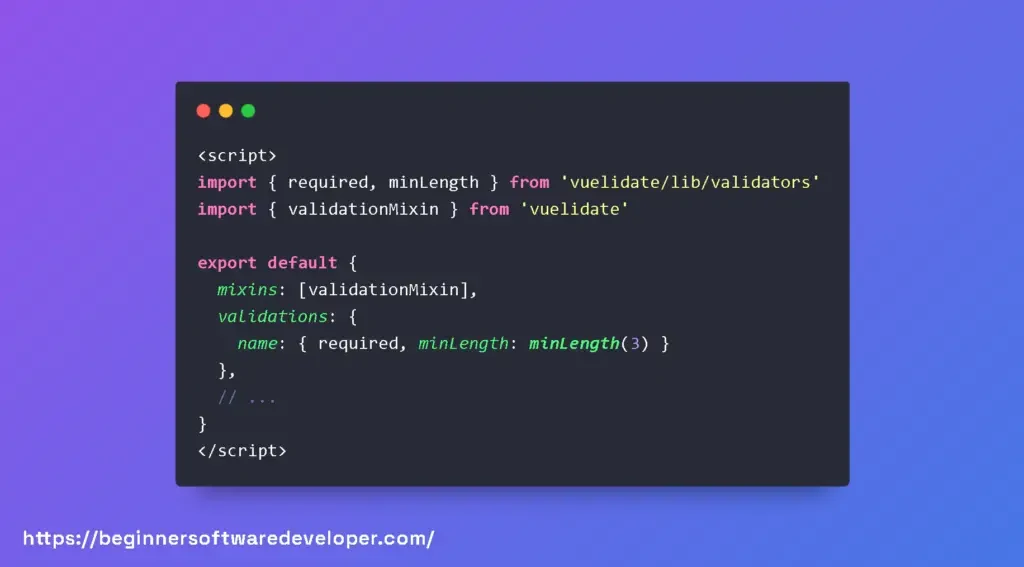
Step 2: Import and Use Vuelidate in Your Component
After installation, you need to import Vuelidate and the validators you intend to use in your Vue component. Here’s an example of how to set it up:

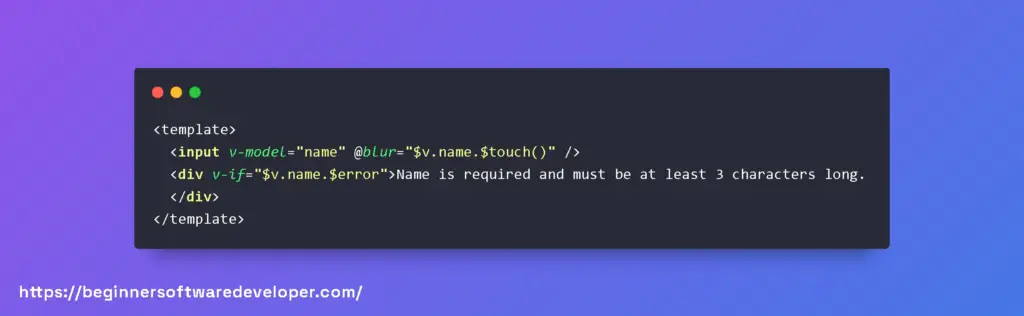
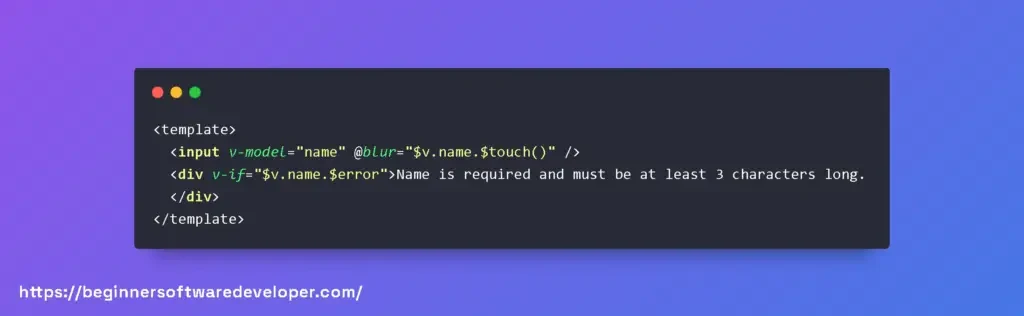
Step 3: Integrate Vuelidate into Your Template
With Vuelidate imported and set up in your script, you can now utilize it in your template to provide real-time validation feedback. Here’s a simple example:


By following these steps, you’ve successfully installed and integrated Vuelidate into your Vue.js project. You can now take advantage of its powerful validation features to create robust and user-friendly forms.
Real World Examples In Vue With Vuelidate
Examples of Vuelidate in Action
To illustrate the power and versatility of Vuelidate, let’s explore some practical examples where it can be effectively applied. These scenarios highlight how Vuelidate can handle common to complex form validation requirements with ease.
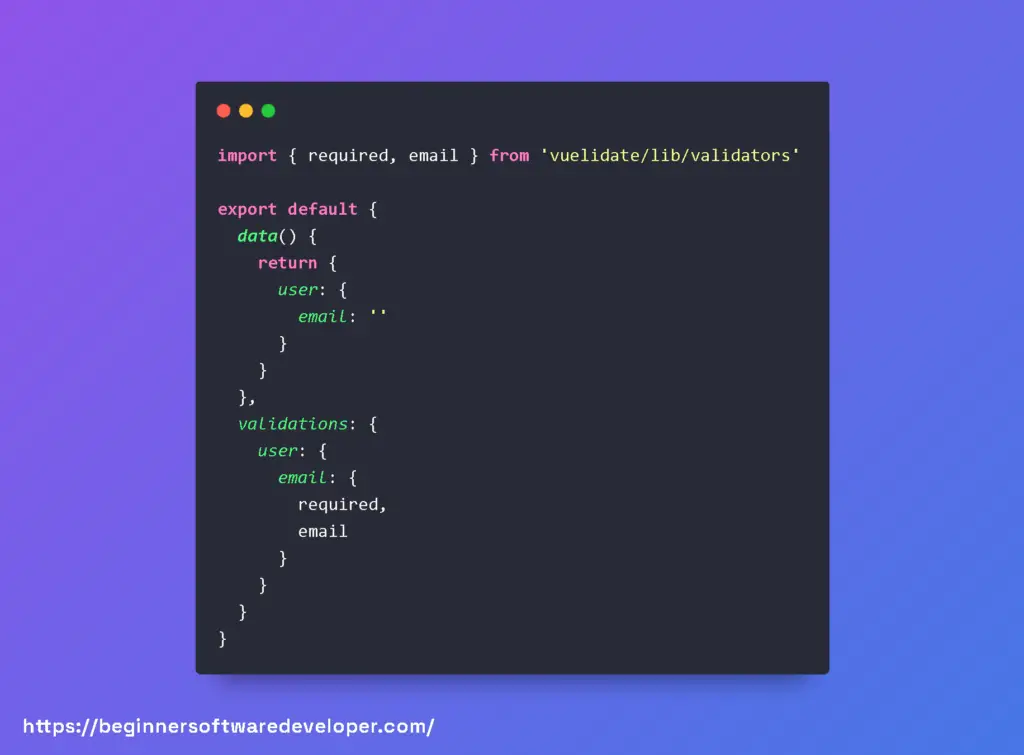
- Basic Email Validation: Ensuring that a user provides a valid email address is a common requirement. Vuelidate’s built-in validators can be used to check the format of the email.

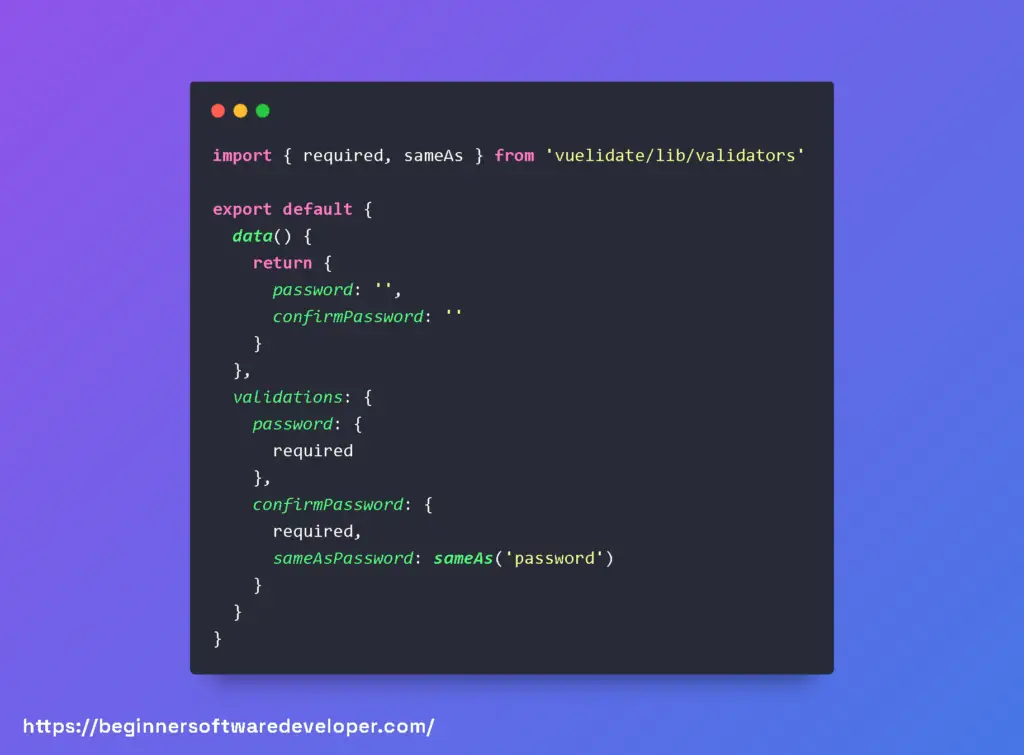
- Password Confirmation: When users create an account, it’s important to verify that they’ve entered their password correctly. Vuelidate allows you to create custom validation to compare fields.

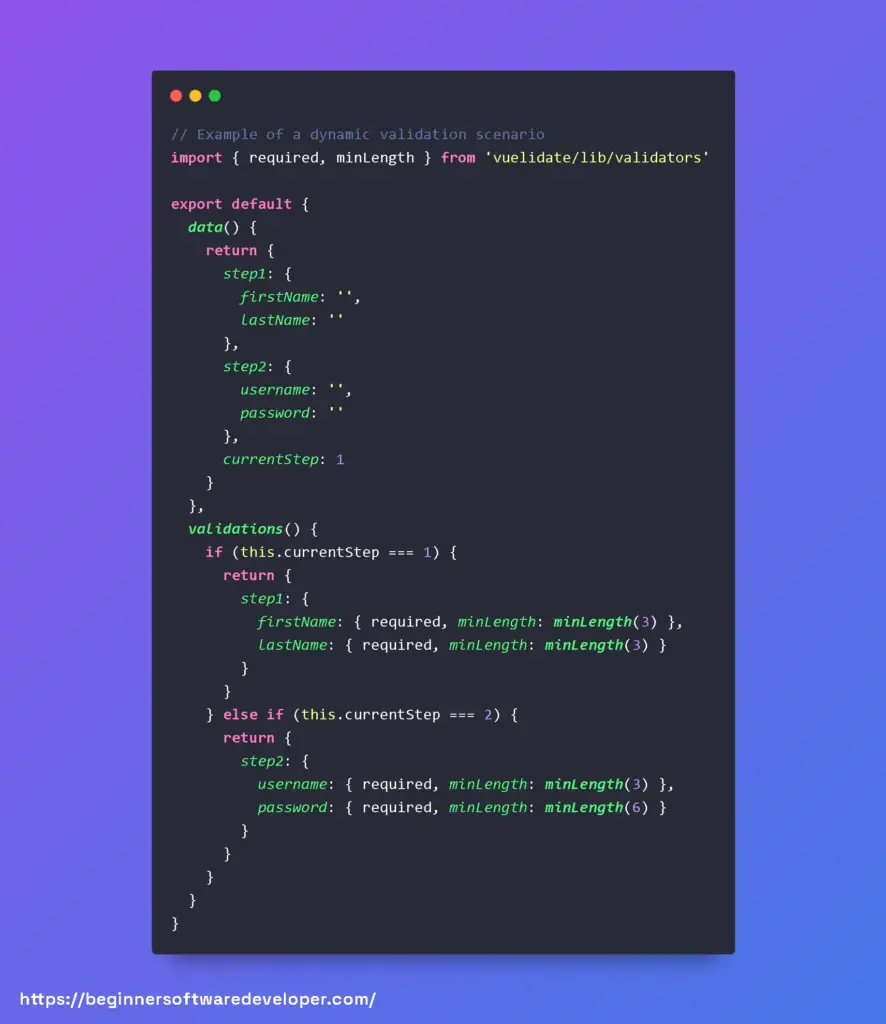
- Complex Form Scenarios: For more complex forms, such as a multi-step registration process, Vuelidate’s dynamic validation schema can adapt to different validation contexts, ensuring that each step of the form is properly validated before proceeding.

Understanding the Vuelidate API for Form Validation in Vue.js
Vuelidate is a lightweight, flexible, and model-based validation library for Vue.js applications. It provides a simple and consistent API to validate form fields and user input, ensuring that the data meets specific requirements before it’s processed or sent to a server.
By integrating Vuelidate into your Vue.js projects, you can improve form handling, enhance user experience, and ensure data integrity.
The Vuelidate API revolves around the $v object, which is automatically injected into your Vue component when you use Vuelidate.
This object contains the state of validations for each field, including whether the field is dirty, touched, valid, or invalid. It also provides access to built-in validators and allows for custom validation rules.
Here’s a brief overview of the Vuelidate API and how to use it in your Vue.js applications:
- Initialization: To start using Vuelidate, you need to import it and the validators you want to use, and then call Vuelidate in the Vue component.
- Accessing Validation State: The $v object provides access to the validation state of each form field. You can check if a field is valid, has been touched, or is dirty.
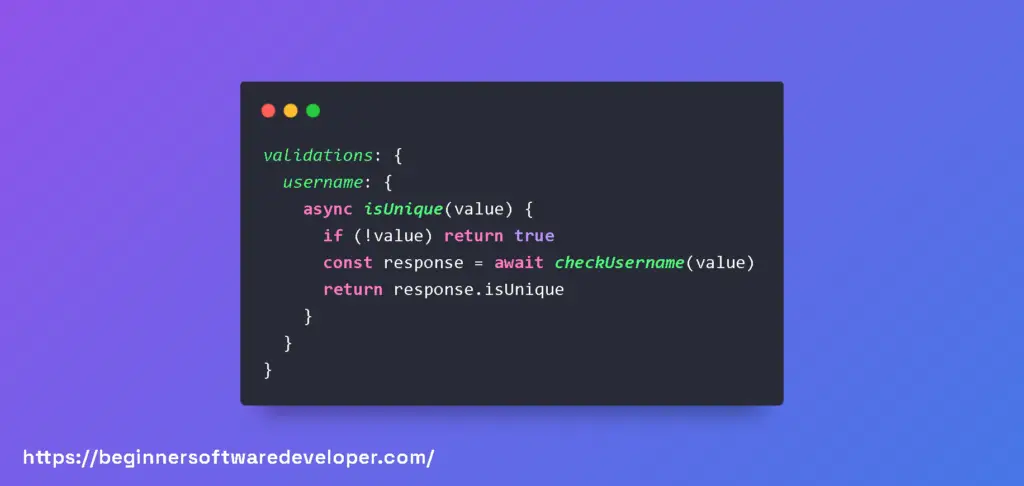
- Asynchronous Validation: Vuelidate also supports asynchronous validators, which can be useful for server-side validation checks like checking for unique usernames.

- Custom Validators: You can define custom validators if the built-in ones don’t meet your requirements. Custom validators are functions that return a boolean value.

By leveraging the Vuelidate API, developers can create robust, user-friendly forms that validate user input effectively and efficiently.
The API’s flexibility allows for both simple and complex validation scenarios, making it a go-to choice for Vue.js developers looking to implement form validation.
Vuelidate $each
Vuelidate $each: The $each property in Vuelidate is used when you need to validate an array of values. It allows you to define validation rules that apply to each item in the array individually.
This is particularly useful when working with dynamic lists or forms with repeatable fields.
To use $each, you can define an array in your validation schema and specify the validation rules for each element in the array.
Vuelidate will then validate each item independently, ensuring that they all meet the specified requirements.
Here’s an example of using $each in Vuelidate to validate an array of email addresses:
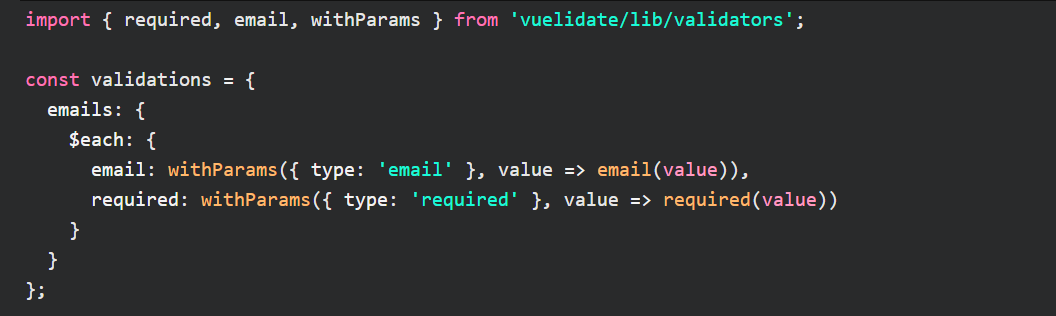
In this example, the emails field is an array, and we use $each to define validation rules for each email address in the array.
The email rule checks if the value is a valid email format, and the required rule ensures that each email field is not empty.
Vuelidate Array
Vuelidate Array: Vuelidate provides support for validating arrays by allowing you to define validation rules that apply to the entire array itself.
This is useful when you need to ensure that the array as a whole meets certain criteria, such as having a minimum number of elements or satisfying a specific condition.
To validate an array in Vuelidate, you can use the array syntax in your validation schema and specify the desired validation rules.
Vuelidate will then validate the array based on the defined rules and provide error messages if the array is not valid.
Here’s an example of using Vuelidate to validate an array of numbers:
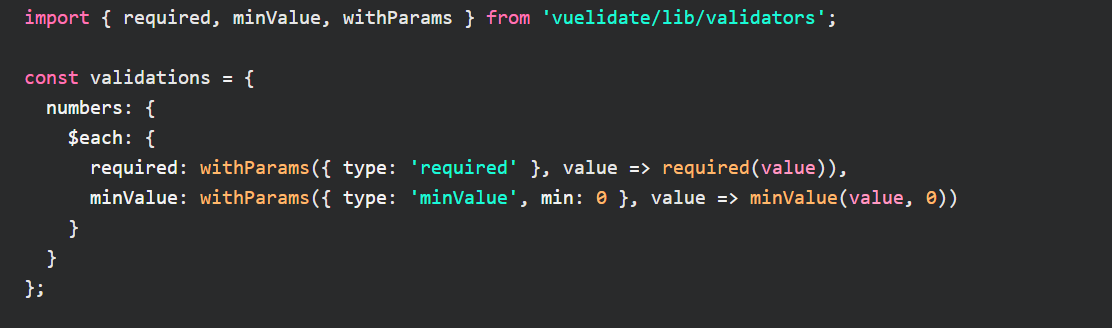
In this example, the numbers field is an array, and we use Vuelidate’s array syntax to define the validation rules.
The required rule ensures that each element in the array is not empty, and the minValue rule checks if each number is greater than or equal to zero.
Check out my article about What Are Vue Lifecycle Hooks?
Vuelidate Radio
Vuelidate Radio: Vuelidate provides validation support for radio buttons, allowing you to validate whether a selection has been made.
This is useful when you have a group of radio buttons and want to ensure that at least one option is chosen.
To validate radio buttons in Vuelidate, you can use the required validator. It checks if the value of the radio group is defined, indicating that a selection has been made.
If the value is not defined, Vuelidate considers the radio group as invalid and displays an error message.
Here’s an example of using Vuelidate to validate a radio group:

In this example, selectedOption represents the value of the selected radio button. The required validator ensures that a selection has been made by checking if the selectedOption is defined.
Vuelidate Required If
Vuelidate Required If: Vuelidate allows you to define conditional validation rules using the requiredIf validator.
This validator enables you to specify that a field is required only if a certain condition is met.
This is useful when you want to make a field mandatory based on the value of another field or a specific condition.
To use the requiredIf validator in Vuelidate, you need to define a function that returns a boolean value representing the condition.
If the condition evaluates to true, the field is considered required, and if it evaluates to false, the field is optional.
Here’s an example of using the requiredIf validator in Vuelidate:

In this example, the age field is required if the value is greater than 18. The requiredIf validator takes a function that checks if the value is greater than 18 and returns true or false accordingly.
If the condition is true, the field is required, and if it’s false, the field is optional.
Vuelidate Custom Validator
Vuelidate Custom Validator: Vuelidate allows you to create custom validators to meet specific validation requirements that are not covered by the built-in validators.
Custom validators give you the flexibility to define your own validation logic and apply it to your form fields.
To create a custom validator in Vuelidate, you need to define a function that takes the value to be validated and returns either true if the value is valid or a string representing an error message if the value is invalid.
You can then use this custom validator in your validation schema.
Here’s an example of creating a custom validator in Vuelidate:
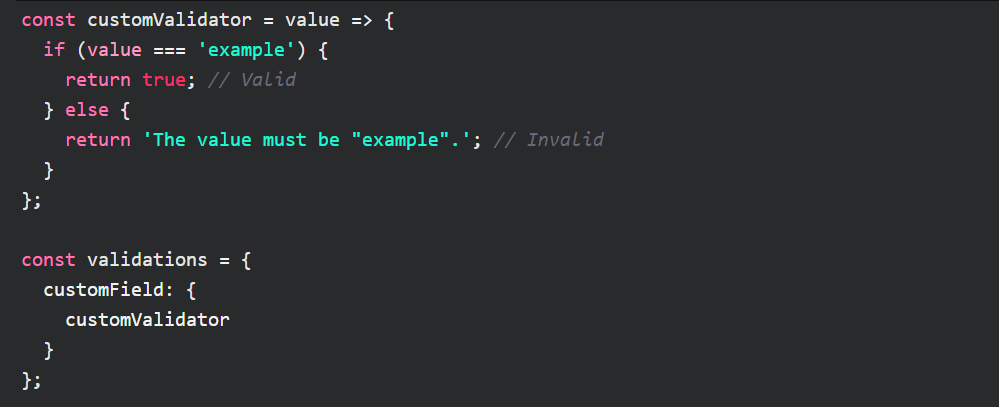
In this example, customValidator is a function that checks if the value is equal to ‘example’. If it is, the function returns true, indicating that the value is valid.
Otherwise, it returns the error message ‘The value must be “example”‘. The customField in the validation schema applies this custom validator to the corresponding field.
Vuelidate Vue 3
Vuelidate Vue 3: Vuelidate is also compatible with Vue 3, the latest version of the Vue.js framework.
It provides support for Vue 3’s script setup and composition API, allowing you to leverage the enhanced features and performance improvements introduced in Vue 3.
Vuelidate Vue 3 Script Setup
Vuelidate Vue 3 Script Setup: In Vue 3, the script setup syntax simplifies the component setup and offers improved reactivity and better performance.
Vuelidate seamlessly integrates with the script setup feature, allowing you to define validation rules using Vuelidate in a concise and efficient manner.
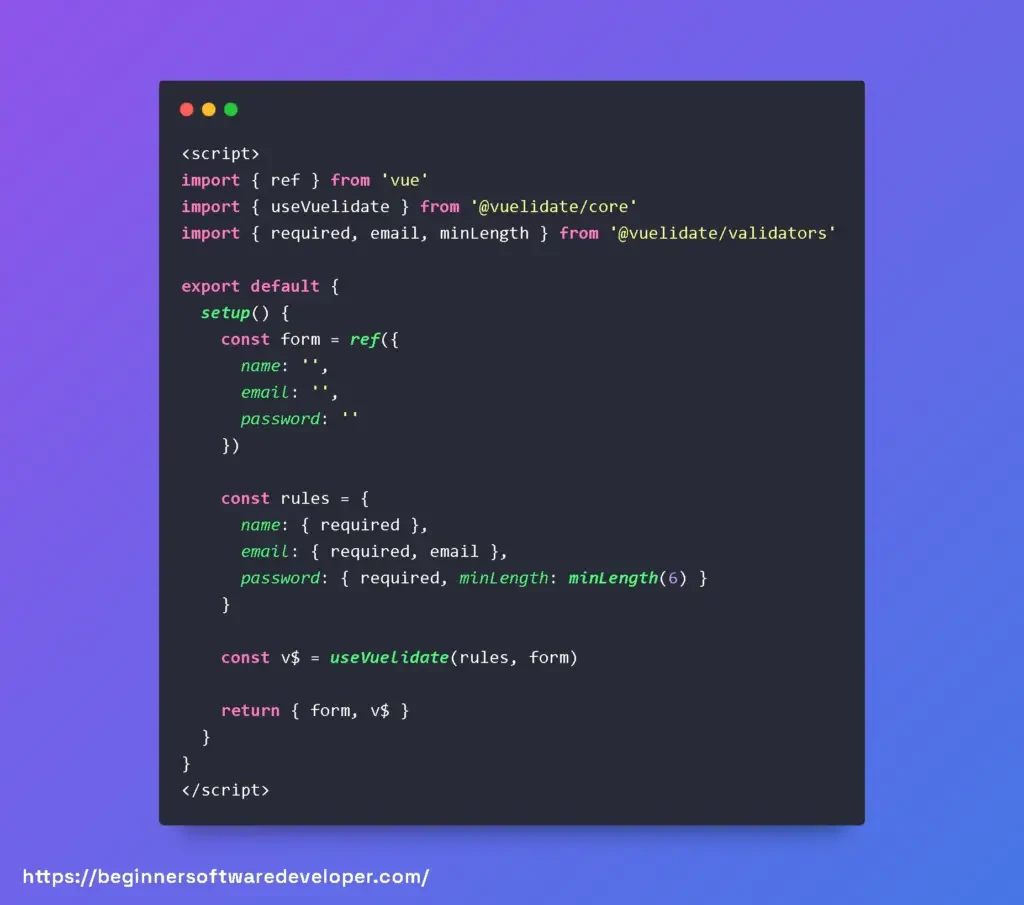
Here’s an example of using Vuelidate with Vue 3’s script setup:
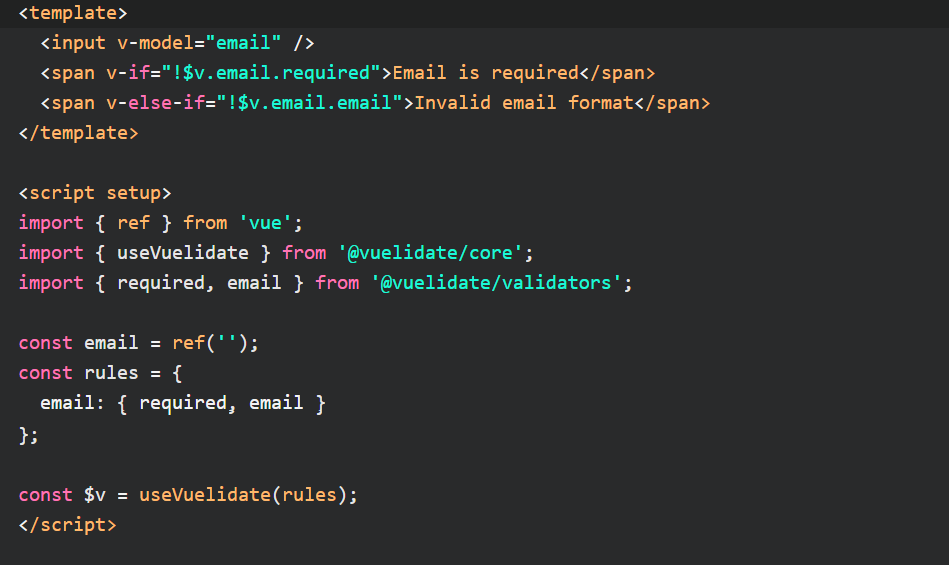
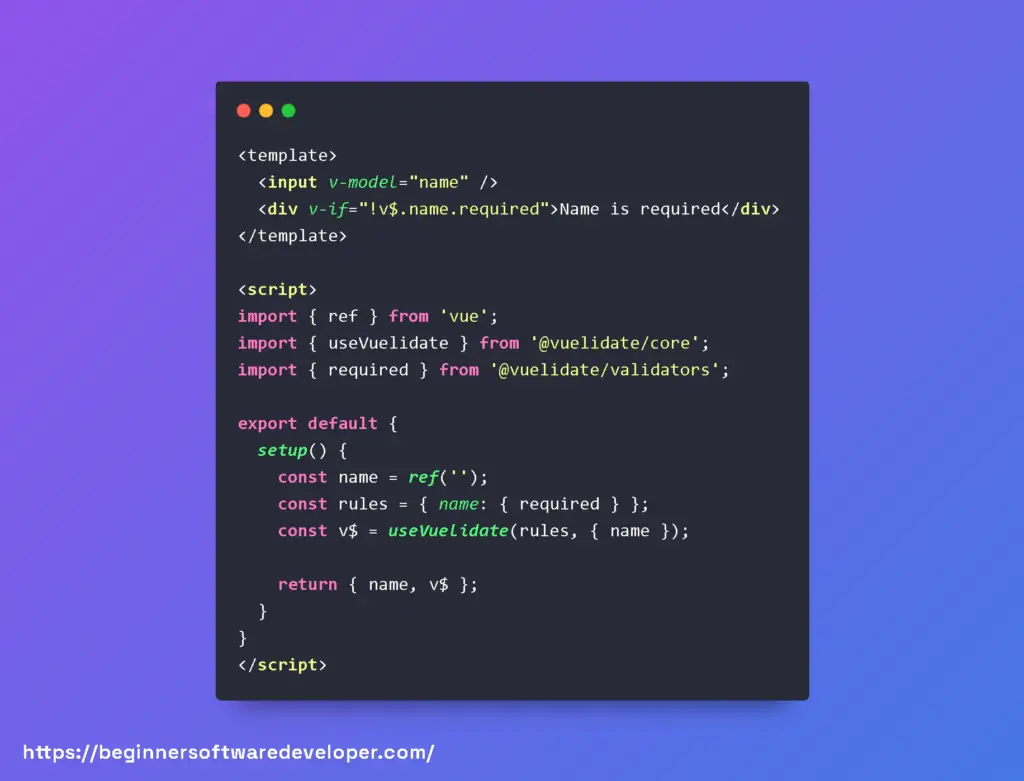
In this example, we use the script setup syntax to define a component that includes an email input field.
The useVuelidate function from @vuelidate/core is used to initialize Vuelidate with the specified validation rules.
The required and email validators from @vuelidate/validators are used to define the validation rules for the email field.
The $v object holds the validation results, which can be accessed in the template to conditionally display error messages.
Don´t forget to check out my article about Learn About Options API vs Composition API
Integrating Vuelidate with Vue’s Composition API for Enhanced Form Validation
With the introduction of the Composition API in Vue 3, developers have a new way to compose their component’s logic. Understanding how to use Vuelidate with the Composition API is essential for developers looking to leverage Vue’s latest features for form validation.
The traditional use of Vuelidate involves the Options API, where validations are defined inside a validations object in the component. However, with the Composition API, the approach is slightly different, offering more composability and reusability of validation logic.
Below are code examples showcasing the difference between using Vuelidate with the Options API and the Composition API.
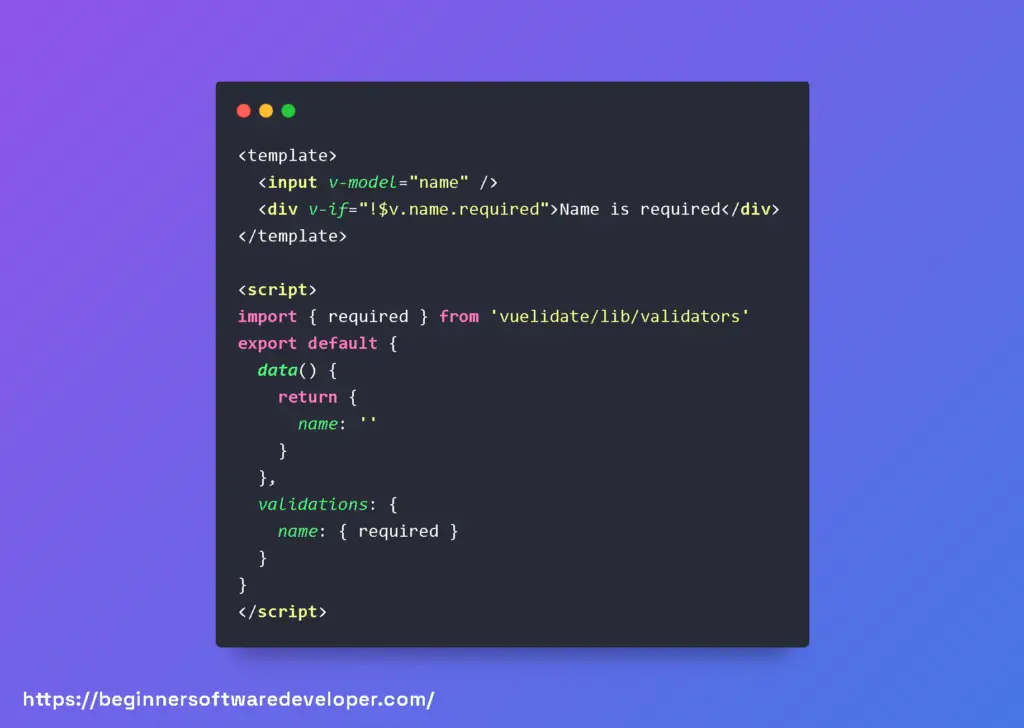
Options API with Vuelidate
Composition API with Vuelidate
As seen in the examples, the Composition API version uses the setup function to define reactive state and validation rules.
The useVuelidate function is then used to create a validation object v$, which is returned from the setup function and used in the template for displaying validation messages.
The Composition API provides a more modular approach to defining validations, allowing developers to easily extract and reuse validation logic across components.
This makes managing complex forms and validations more maintainable and scalable in larger Vue applications.
Vuelidate Vue 3 Composition API
Vuelidate Vue 3 Composition API: Vue 3 introduces the composition API as an alternative to the options API, providing more flexibility and reusability in component logic.
Vuelidate fully supports Vue 3’s composition API, allowing you to define validation logic using Vuelidate in a modular and composable manner.
Here’s an example of using Vuelidate with Vue 3’s composition API:

In this example, the component’s logic is defined using the setup function. The useVuelidate function from @vuelidate/core is used to initialize Vuelidate with the specified validation rules.
The required and email validators from @vuelidate/validators are used to define the validation rules for the email field.
The $v object holds the validation results, and both email and $v are returned from the setup function for use in the template.
Vuelidate Vue 3 Regex
Vuelidate Vue 3 Regex: Vuelidate in Vue 3 provides support for regular expression-based validation using the regex validator.
This validator allows you to define custom validation rules based on regular expressions to validate the format or pattern of the input.
Here’s an example of using Vuelidate with Vue 3 to validate a field using a regular expression:
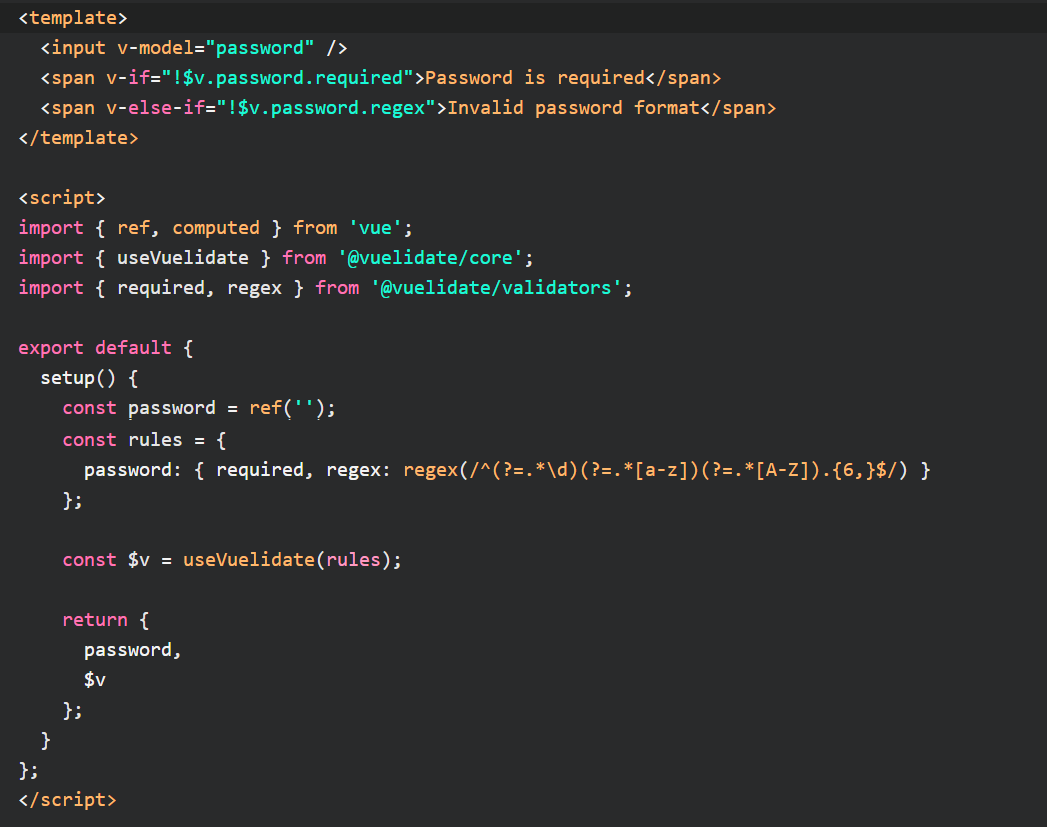
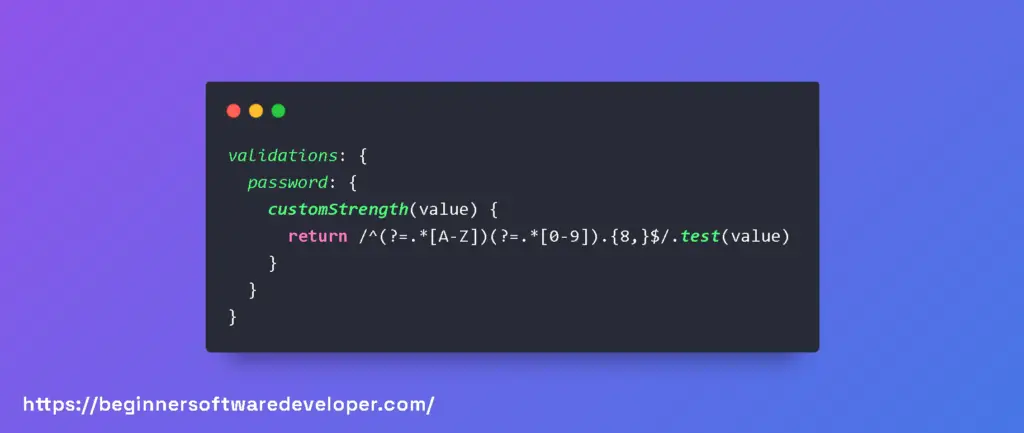
In this example, the regex validator is used to define a custom validation rule for the password field.
The regular expression /^(?=.*\d)(?=.*[a-z])(?=.*[A-Z]).{6,}$/ ensures that the password contains at least one digit, one lowercase letter, one uppercase letter, and is at least 6 characters long.
Don´t forget to check out my article about Create Vue Transition With Vue Transitions Examples
Vuelidate Vue 3 Typescript
Vuelidate Vue 3 Typescript: Vuelidate in Vue 3 supports TypeScript, providing type safety and enhanced developer experience.
By leveraging TypeScript, you can benefit from static type checking, autocompletion, and improved code readability when using Vuelidate in your Vue 3 applications.
Here’s an example of using Vuelidate with Vue 3 and TypeScript:
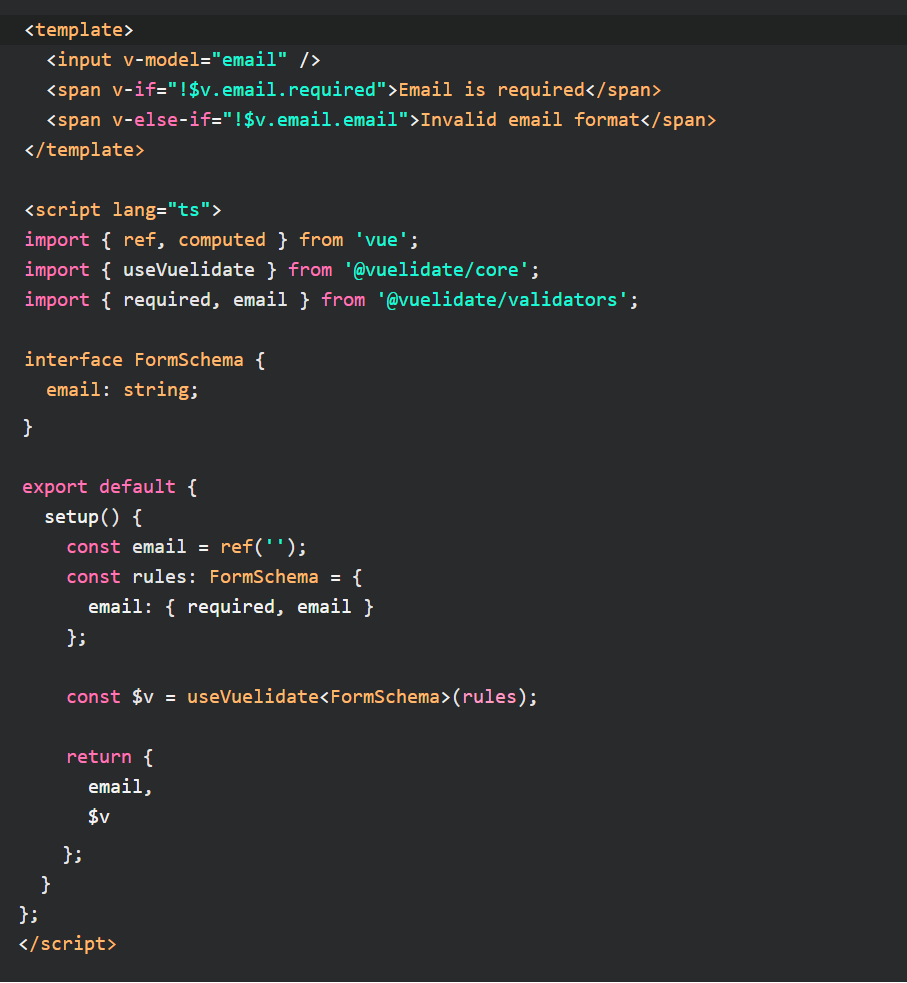
In this example, an interface FormSchema is defined to represent the structure of the form’s data and validation rules.
The useVuelidate function is invoked with the FormSchema type parameter to ensure type safety and enable proper type inference for the validation rules.
By using TypeScript with Vuelidate in Vue 3, you can benefit from compile-time type checking and improved code maintainability, helping to catch errors early and provide a better development experience.
What Is The Current Version Of Vuelidate?
According to the GitHub repository of Vuelidate, the current version of Vuelidate core is 2.0.1 and the current version of Vuelidate validators is 2.0.0-alpha.31 as of March 26, 2023.
You can install them using `npm install @vuelidate/core @vuelidate/validators` or `yarn add @vuelidate/core @vuelidate/validators`. Vuelidate supports both Vue 3.0 and Vue 2.x.
If you are using the npm package of Vuelidate, the latest version is 0.7.7, which was published two years ago.
This version is outdated and does not support Vue 3.0, so it is recommended to use the newer versions from GitHub.
Related Articles
- What Is Vue Reactive? (Vue Reactivity Examples)
- What Is Vuesax With Vuesax Examples
- Unit Testing Vue Jest With Jest Vue Examples
- What Is Vue Js Composable? Vue Composables Examples
- How Is Vue 3 Ref Working
Hopefully, you now have a better understanding of how you can use Vuelidate.
Understanding how you can use Vuelidate will help you to define validation rules for your form fields, such as required fields, minimum and maximum lengths, numeric values, and more.