
If you’re new to Vue.js or just want to enhance your knowledge of Vue js header, you’ve come to the right place.
In this article, I will share my insights from working as a Vue.js software developer for over 5 years. We’ll explore various examples of Vue js header that will help you understand how to leverage this powerful feature in your web development projects.
No products found.
If you want to learn more about Master Vue Methods With Vue Methods Examples
Vue js Header
Vue js Header refers to a component or section that appears at the top of a web page or application.
It typically contains important information, branding elements, navigation menus.
What Is Vue js Header?
What Is Vue js Header? In Vue.js, a header refers to a component or section that appears at the top of a web page or application.
It typically contains important information, branding elements, navigation menus, and other UI elements that are consistent across multiple pages or views within the application.
The header component in Vue.js allows developers to create reusable and modular code for building consistent headers in their applications.
Headers in Vue.js can be implemented using Vue’s component-based architecture, which promotes code reusability and separation of concerns.
By creating a header component, developers can easily include it in multiple pages or views, ensuring consistency in the application’s appearance and behavior.
The Vue.js header component can be customized to fit the specific design requirements of an application.
It may include elements such as a logo or branding, a navigation menu with links to different sections or pages, search functionality, user profile information, or any other relevant UI elements that are commonly found in headers.
Mastering Vue.js Headers: Custom Components and Best Practices
Introduction to Vue.js Headers
When working with Vue.js, you’ll quickly find that headers are a fundamental part of any web application.
They often hold crucial navigation elements and branding, which is why it’s important to understand how to create and manage them effectively.
In this section, we’ll explore how to enrich your Vue.js applications with custom header components.
Creating Dynamic Vue.js Header Components
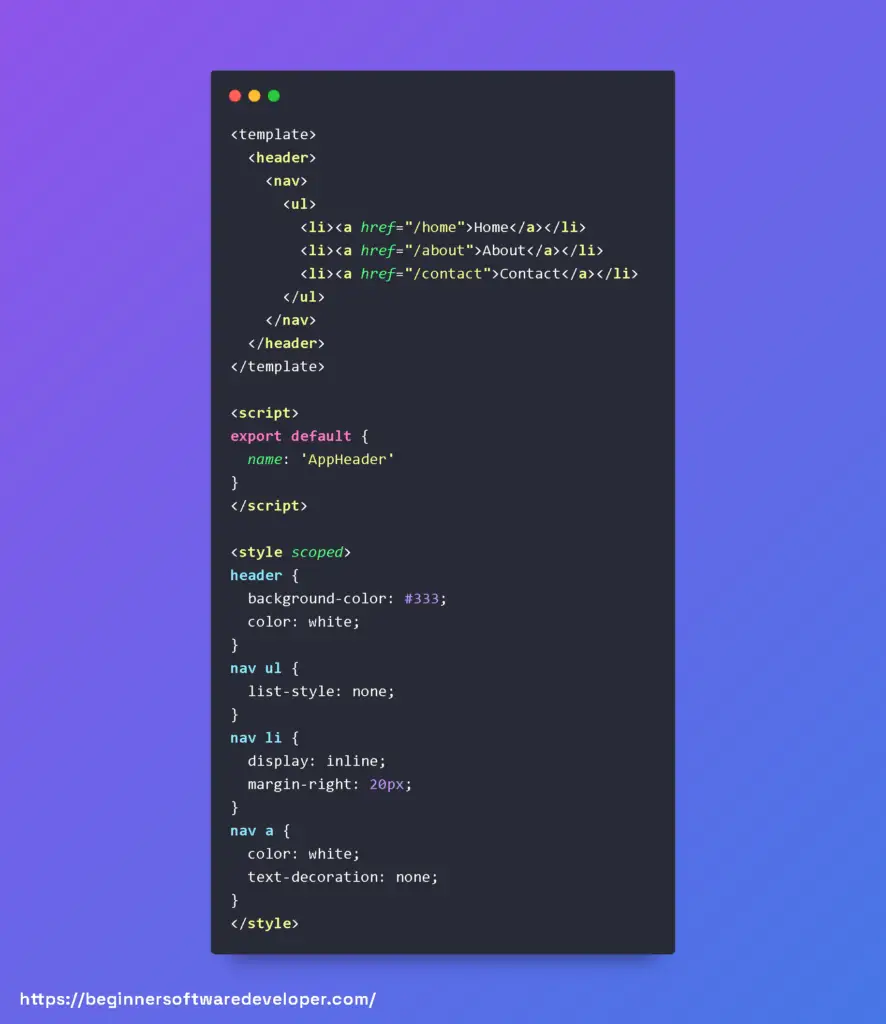
The power of Vue.js lies in its component-based architecture, making it a breeze to create reusable header components. Below is a practical example of how to create a simple header component with Vue.js:

Tips for Effective Implementation of Vue.js Headers
When implementing Vue.js headers, consider the following best practices to ensure a smooth user experience:
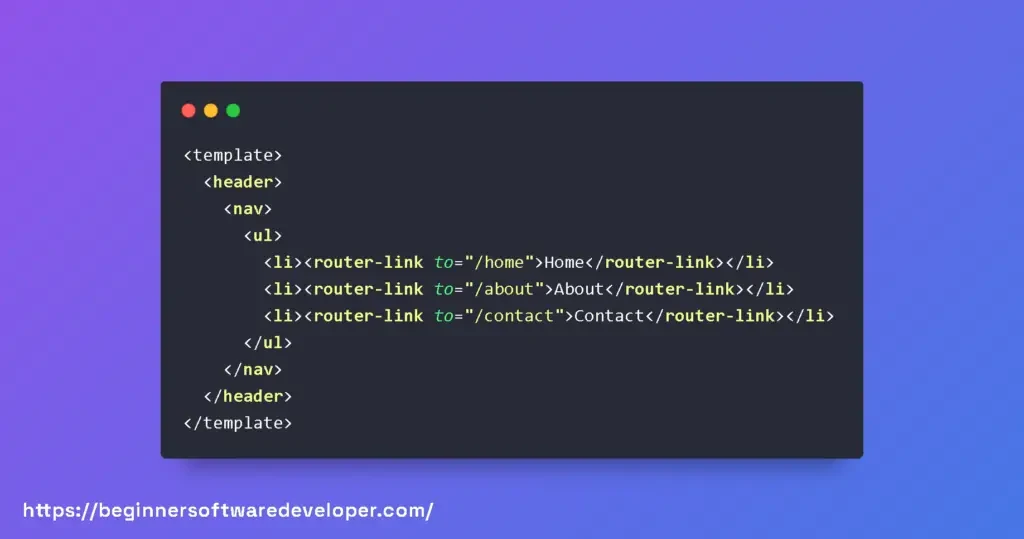
Tip 1: Use <router-link> instead of <a> tags for navigation within your Vue.js application to enable seamless and performant client-side transitions.
Tip 2: Think about the responsiveness of your header. Employ CSS frameworks like Bootstrap or utility classes provided by Tailwind CSS to make your header look great on any device.

Customizing Header Components in Vue.js
Customization is key when it comes to headers as they often require unique branding elements. Provide slots for logos or any specific user information to make your header highly versatile:
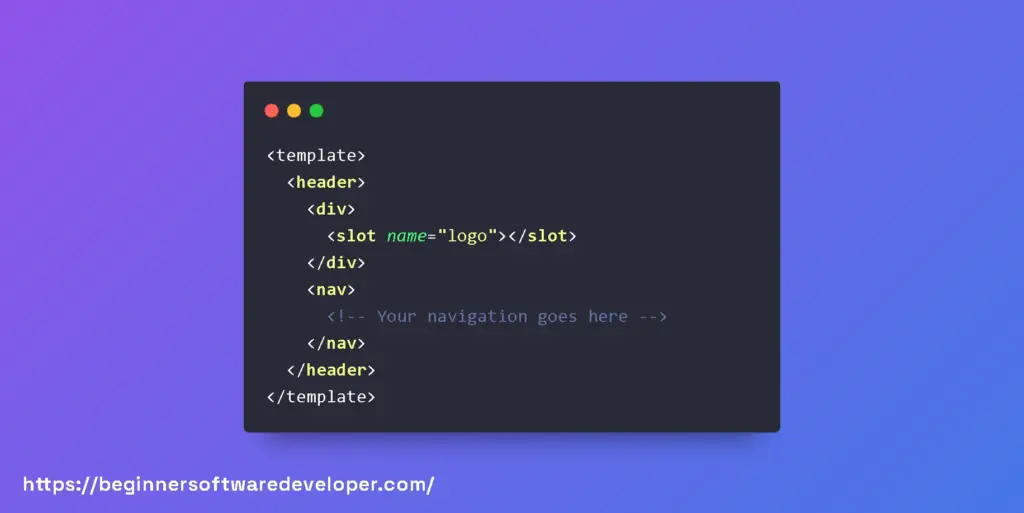

To use this component with a logo, you would insert content into the named slot like this:

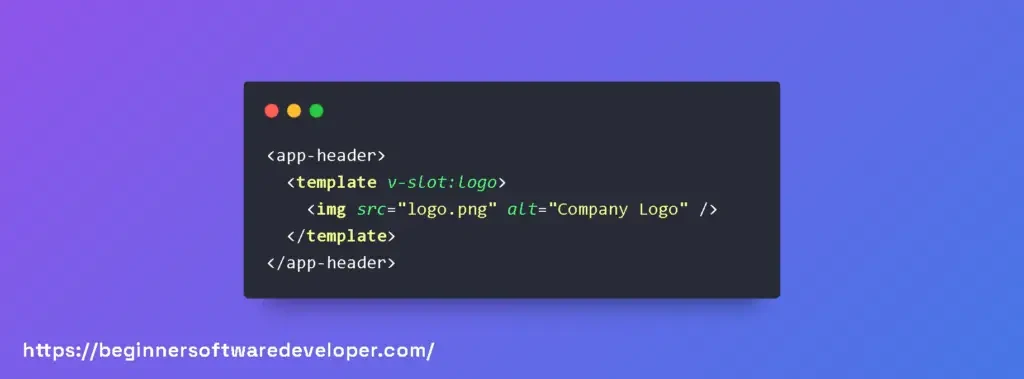
By utilizing slots, you can create a very flexible header component that can accommodate various layouts and content without needing to alter the core logic of the component.
Vue js Header Component Example
Vue js Header Component Example: To demonstrate how a Vue.js header component works, let’s consider a simple example.
Suppose we have an e-commerce website that requires a consistent header across all its pages.
The header will contain the website’s logo, a navigation menu, and a shopping cart icon displaying the number of items in the cart.
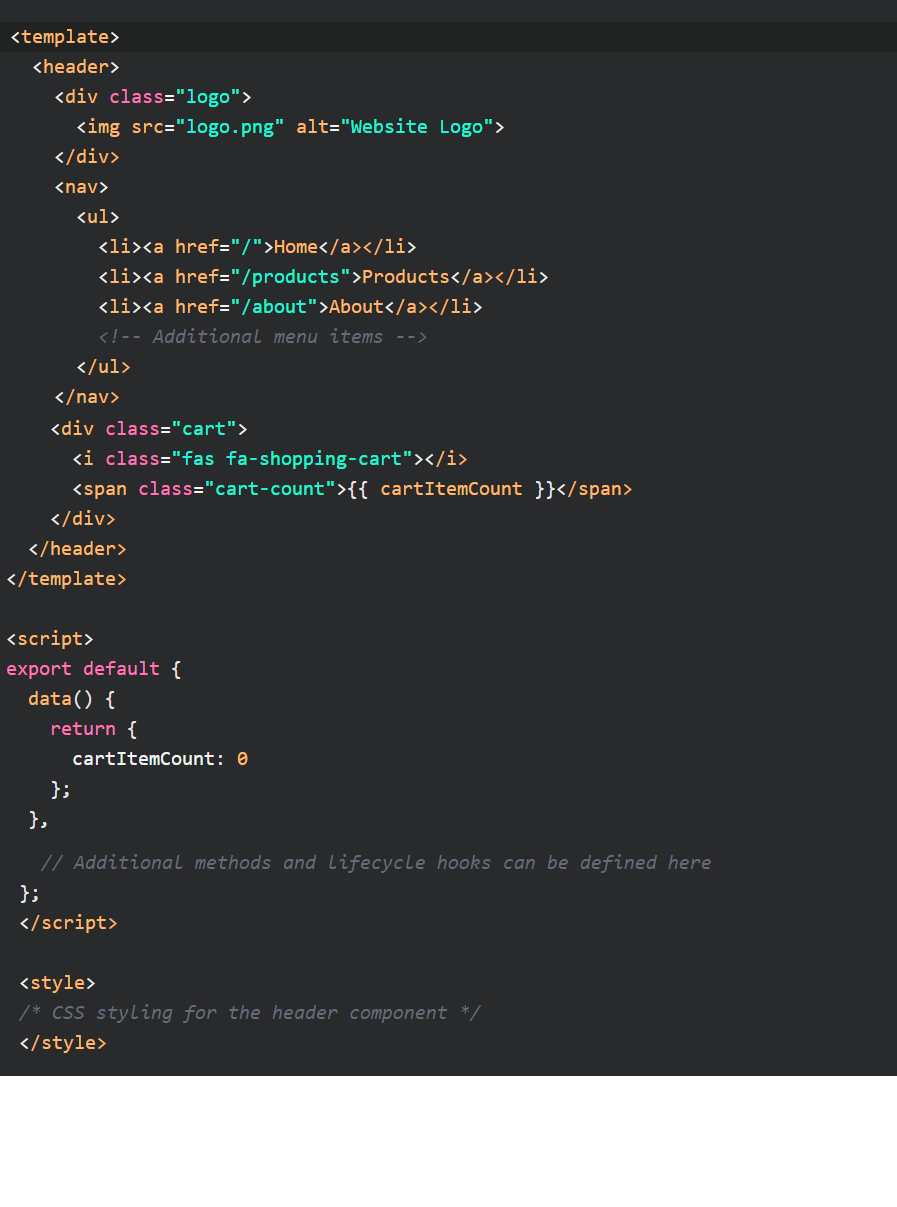
First, we would create a Vue.js component called Header.vue. Inside this component, we can define the HTML structure and logic for the header.
The template section of the component would contain the necessary HTML markup for the logo, navigation menu, and shopping cart icon.
The script section would define the component’s behavior, including methods and data properties.
Check out my article about Implement vue-recaptcha-v3 With Vue Recaptcha Examples
Vue js Header Footer Component: While the previous example focused on the header component, it’s worth mentioning that in many applications, a footer component is also included to provide additional information, copyright notices, and links.
In Vue.js, a header-footer component pair can be created to encapsulate both sections and ensure consistent display and behavior.
The Vue.js header-footer component would have a similar structure to the header component, with the footer section added at the bottom. Here’s a simplified example:

By combining the header and footer components within a single parent component, we can ensure that both sections are consistently displayed and maintained across the application.
Vue js Sticky Header
Vue js Sticky Header: A sticky header in Vue.js refers to a header component that remains fixed at the top of the viewport while the user scrolls through the page.
This behavior is often desirable as it keeps the header visible at all times, providing easy access to important navigation elements or actions.
To create a sticky header in Vue.js, we can utilize CSS positioning and JavaScript event listeners. Here’s an example of implementing a sticky header using Vue.js:

In this example, the isSticky data property is used to track whether the header should be sticky or not.
The handleScroll method is bound to the scroll event of the window, and it updates the isSticky property based on the scroll position.
The header’s CSS class is dynamically updated based on the isSticky value, which applies the necessary styles to make it stick to the top.
By implementing a sticky header in Vue.js, we can enhance the user experience by providing persistent access to important header elements, even when scrolling through lengthy content.
Don´t forget to check out my article about How To Use Filters Vue 3
Vue js Responsive Header
Vue js Responsive Header: Creating a responsive header in Vue.js involves designing the header component in a way that adapts to different screen sizes and resolutions.
This ensures that the header elements are appropriately displayed and accessible, regardless of the device being used to access the application.
To make a header responsive, we can utilize CSS media queries and Vue.js’s dynamic class binding.
By applying different styles and modifying the layout based on the screen width, we can create a responsive header component. Here’s a simplified example:

In this example, the isResponsive data property is used to determine whether the header should adapt to smaller screen sizes.
The handleResize method is bound to the resize event of the window, and it updates the isResponsive property based on the window’s inner width.
The header’s CSS class is dynamically updated based on the isResponsive value, which applies specific styles for smaller screens using media queries.
By implementing a responsive header in Vue.js, we can ensure that the header components adjust gracefully to different screen sizes, improving the overall user experience and accessibility of the application.
Vue js Authorization Header
Vue js Authorization Header: In some cases, applications require an authorization header to be included in requests sent to an API server.
The authorization header typically contains authentication credentials, such as an access token, which allows the server to verify the user’s identity and grant appropriate permissions.
To include an authorization header in Vue.js, we can leverage Axios, a popular HTTP client library.
Here’s an example of how to configure and use Axios with an authorization header in a Vue.js application:
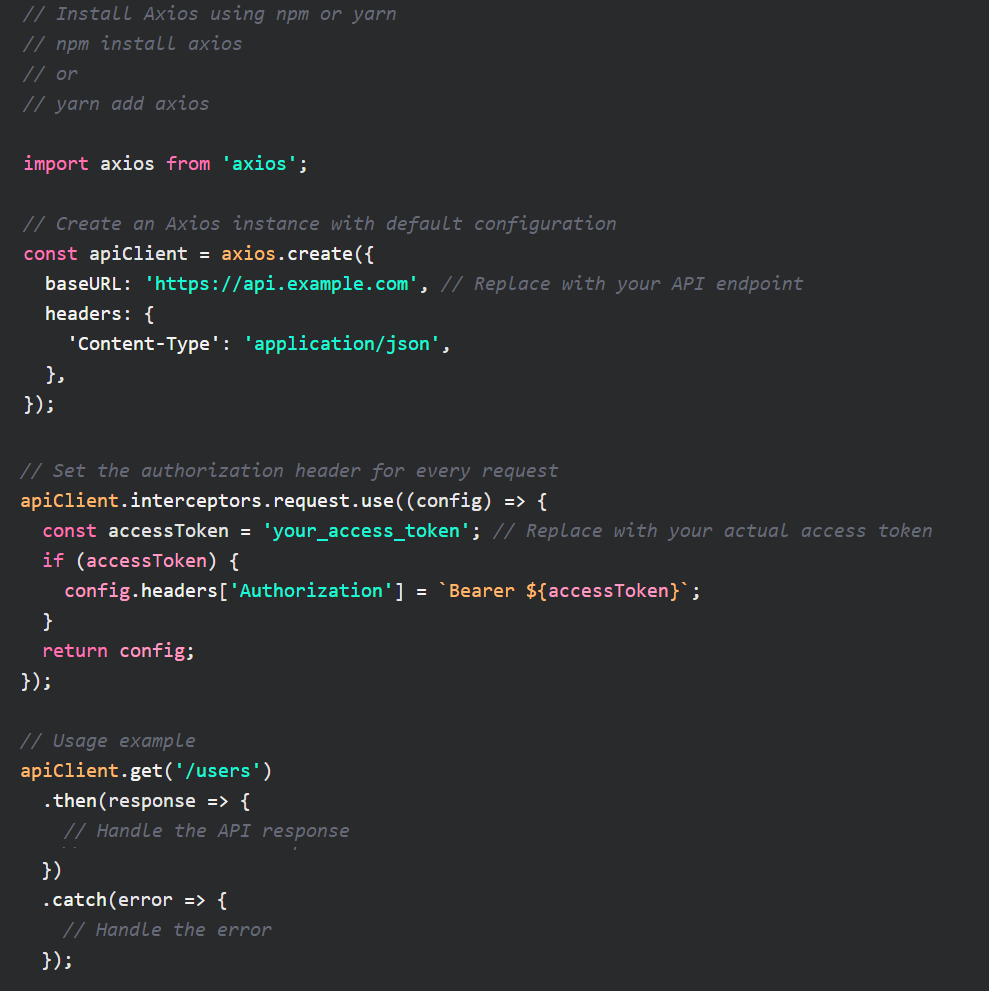
In this example, we create an Axios instance named apiClient with the base URL of the API server and a default header for JSON content.
We then use Axios interceptors to modify the request configuration before sending it.
In the interceptor, we check for the existence of an access token and, if available, add it to the authorization header using the Bearer token authentication scheme.
By configuring Axios with an authorization header in this manner, we can ensure that every request sent from the Vue.js application includes the necessary authentication credentials, allowing the API server to authenticate and authorize the user’s actions.
Remember to replace ‘your_access_token’ and ‘https://api.example.com’ with the actual access token and API endpoint relevant to your application.
Enrich Your Web App UI with Vue.js Headers
If you’re looking to spruce up your web applications using Vue.js, focusing on the header component can have a significant impact on the user experience.
Next we’ll dive into practical examples and best practices for customizing Vue.js headers that will enhance the look and feel of your applications.
Maximizing User Experience with Custom Vue.js Headers
Headers in Vue.js are not just mere static elements; they can be dynamic, interactive, and responsive to user actions. To demonstrate, let’s consider a basic example of a Vue.js header component:

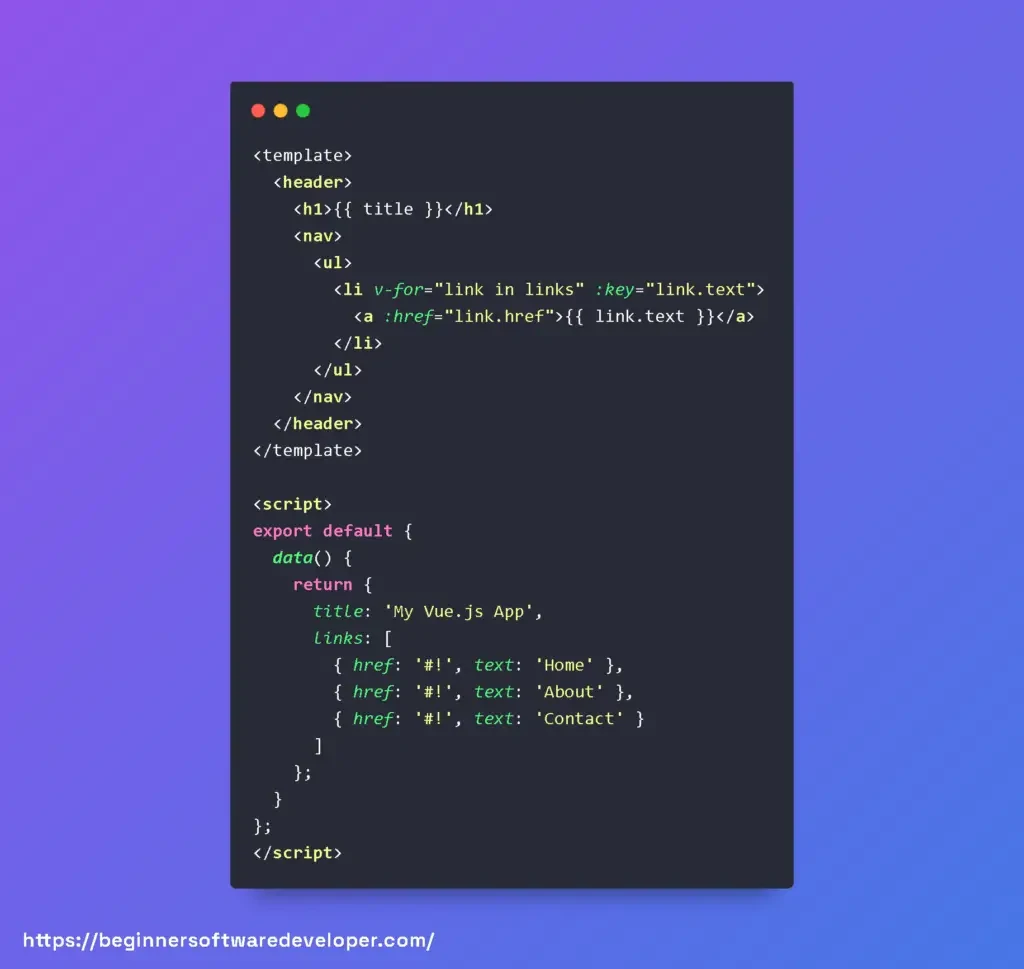
With this simple snippet, you have a header that offers navigation and adapts easily to changes in your data properties.
Now, let’s explore some best practices for further enhancing Vue.js headers:
- Keep It Responsive: Your header should look good on all devices. Consider using CSS frameworks like Bootstrap or Tailwind CSS for quick layout designs, or write your own media queries if you prefer more control.
- Interactive Elements: Incorporate dropdowns or sliders in your header to provide a more engaging user interaction. Vue’s reactivity system makes it straightforward to toggle visibility of these elements.
- Global Accessibility: Make sure that your header is accessible by following WAI-ARIA standards. Include proper roles and attributes to ensure compatibility with screen readers.
Let’s expand our previous example to include a responsive navbar with dropdown elements.

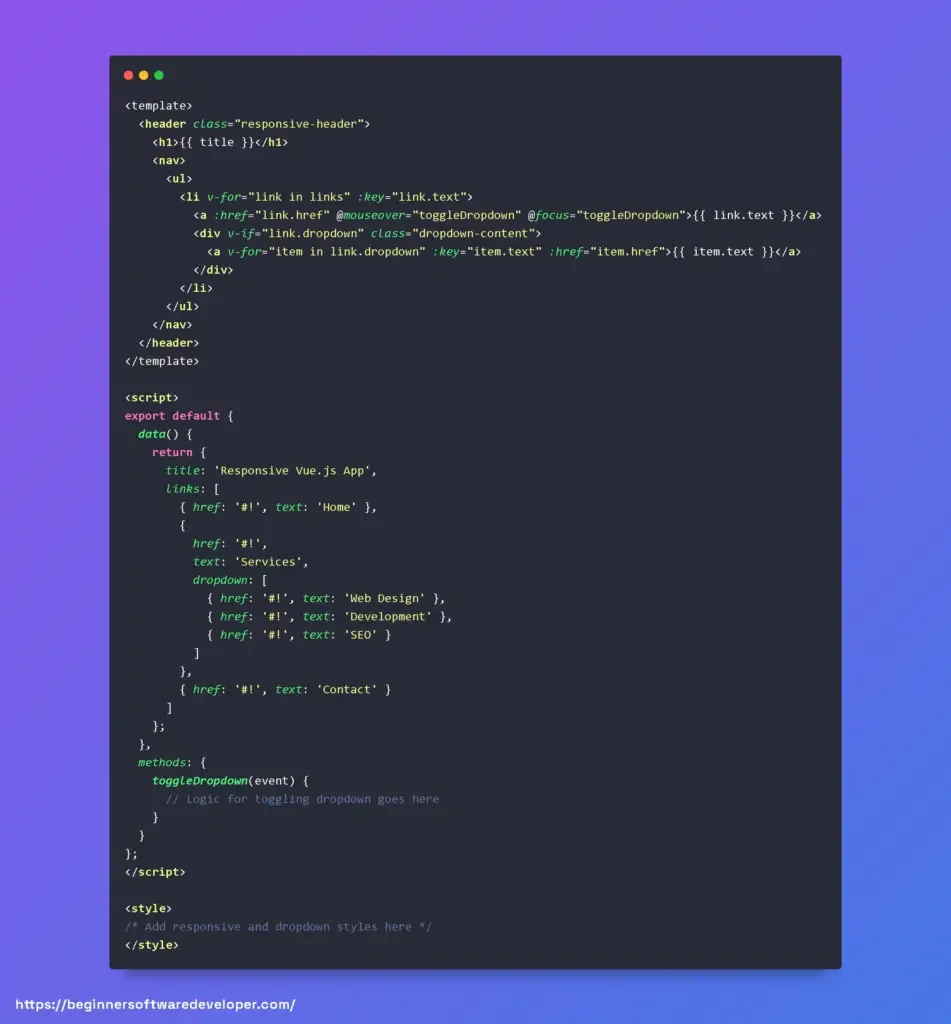
Remember, the key is to ensure the header serves its functional purpose while enhancing the overall feel of your app. Now go ahead and create a Vue.js header that captivates and navigates!
Vue Header
Vue Header Component Example
Vue Header Component Example: The header component plays a crucial role in creating a visually appealing and functional user interface.
The header is typically located at the top of a web page and contains important navigation elements, branding, and other relevant information.
It serves as a consistent element across multiple pages, providing users with easy access to different sections of a website or application.
To illustrate how a Vue header component can be implemented, let’s consider an example.
Imagine you are building a simple e-commerce website that requires a header component to display the logo, navigation menu, and a shopping cart icon.
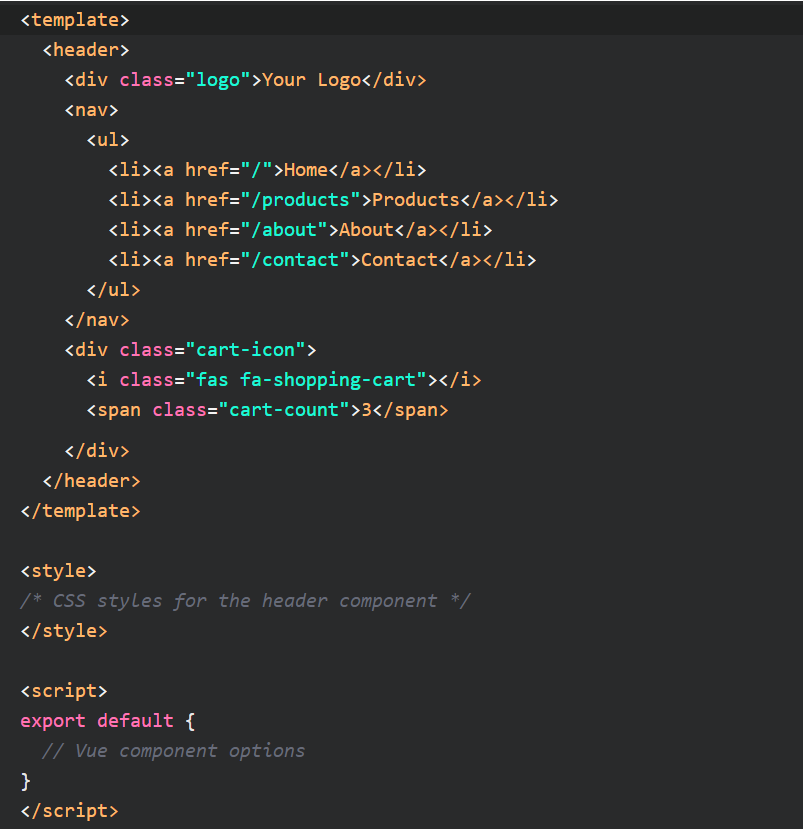
In this example, we define a Vue header component within the <template> tags.
The component consists of a <header> element containing a logo, a navigation menu represented by an unordered list (<ul>), and a shopping cart icon with a cart count.
To style the header, you can add CSS styles within the <style> tags. Additionally, you can define the component’s behavior and other options within the <script> tags.
Don´t forget to check out my article about Learn To Vue Project Structure The Correct Way
Vue Header Bar
Vue Header Bar: Now, let’s explore an example of a Vue header bar, which is a variation of the header component.
The header bar typically has a fixed position at the top of the viewport, remaining visible even when the user scrolls down the page.
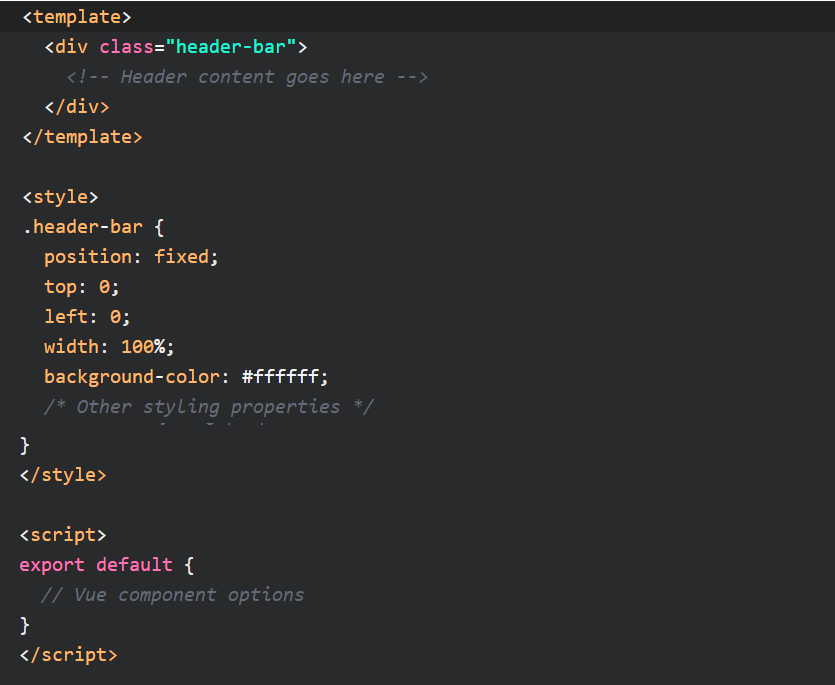
In this example, we create a Vue component called header-bar within a <template>.
The component is styled with CSS to achieve a fixed position at the top of the page using the position: fixed; property.
You can customize the background color, width, and other styling properties to fit your design.
Vue Header Params
Vue Header Params: Now, let’s explore an example of using parameters (props) in a Vue header component.
Parameters allow you to pass data from a parent component to a child component, enabling dynamic customization of the header based on different contexts.

In this example, we define a siteName prop in the Vue header component.
The siteName prop is of type String and is marked as required: true, meaning it must be provided when using the component.
When using the component, you can pass the siteName prop with a value from the parent component:
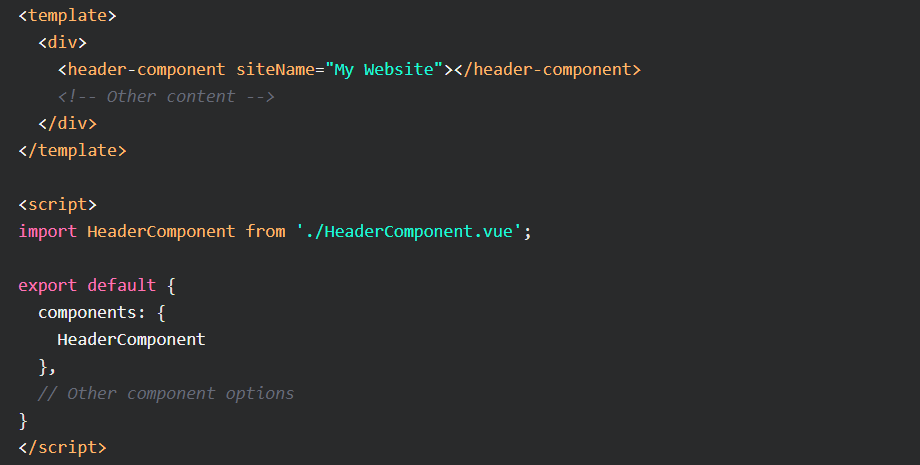
In this example, we import the HeaderComponent and use it within a parent component’s template.
We pass the siteName prop with the value “My Website”. The header component will then display the provided site name dynamically.
By utilizing parameters, you can create more flexible and reusable Vue header components that can be easily customized based on specific requirements.
vue-fixed-header
vue-fixed-header Example
vue-fixed-header Example: Vue-Fixed-Header is a popular library that simplifies the process of creating fixed headers in Vue.js applications.
It provides ready-to-use components and directives to achieve a fixed header behavior easily.
To demonstrate how Vue-Fixed-Header can be used, let’s consider an example where we want to create a fixed header that remains at the top of the page even when scrolling.
First, install the vue-fixed-header package using npm or yarn:

Next, let’s see how the fixed header can be implemented:

In this example, we import the vue-fixed-header library and register the VueFixedHeader component in our parent component.
We then wrap the desired header content within the <vue-fixed-header> tags. The library takes care of making the header fixed and handles the necessary calculations for positioning.
You can customize the appearance of the fixed header by adding CSS styles or modifying the default styles provided by the library.
With Vue-Fixed-Header, you can effortlessly create fixed headers that enhance the user experience and improve the navigation of your Vue.js application.
How To Create A Header In Vue js?
To create a header in Vue.js, you can follow these steps:
- Set up a Vue.js project: Start by setting up a Vue.js project using Vue CLI or another preferred method. This will provide you with a basic project structure and the necessary dependencies.
- Create a header component: Inside your Vue.js project, create a new Vue component specifically for the header. This component will define the structure and behavior of your header.
- Define the header content: Within the header component, define the content you want to include in the header, such as a logo, navigation menu, or any other relevant elements. You can use HTML and Vue template syntax to structure the header content.
- Style the header: Add CSS styles to the header component to customize its appearance. You can use inline styles, CSS classes, or even a separate CSS file to define the styles for your header.
- Include the header component: Once your header component is ready, you can include it in other components or pages of your Vue.js application where you want the header to appear. This can be achieved by using the component’s tag or importing it into other components.
By following these steps, you can create a header in Vue.js that meets your design requirements and provides a consistent and intuitive user interface.
To add a header and footer in Vue.js, you can follow these steps:
- Create separate Vue components: Start by creating two separate Vue components, one for the header and another for the footer. These components will handle the structure and content of the header and footer sections.
- Define the header and footer content: Within the header and footer components, define the content you want to include in each section. This can include logos, navigation menus, copyright information, or any other elements specific to your application.
- Style the header and footer: Apply CSS styles to the header and footer components to customize their appearance. You can define the styles inline, use CSS classes, or utilize a separate CSS file for better organization.
- Include the header and footer components: In the Vue components or pages where you want the header and footer to appear, import the header and footer components and include them within the respective sections. This can be achieved by using the component’s tag or importing it into other components.
- Structure the layout: Arrange the header, content, and footer components within a layout component or the root component of your application. This will provide a consistent structure across different pages and ensure the header and footer appear on all pages.
By following these steps, you can easily add a header and footer to your Vue.js application.
This approach promotes reusability and maintainability, allowing you to make changes to the header and footer components independently without affecting the rest of your application’s structure.
Related Articles
- How To Add A Vue Dynamic Class To CSS Dynamically In Vue.js?
- Vue Import Component Into Another Component
- Learn To Use Vuelidate With Vuelidate Examples
- How To Implement In Vue js Google Login?
- How To Use Google Map Vuejs? Google maps examples
Hopefully, you now have a better understanding of how you can use Vue Js Header.
Understanding how you can use Vue Js Header is gonna help you build out navigation and header menu for your Vue js application.