
As your Vue.js application grows in complexity, keeping track of state and ensuring consistency becomes paramount. This is where Vuex $store object come into play.
The $store object acts as a centralized repository for all your application’s state, making it accessible from any component.
In this article, we will shed light on the concept of the $store object in Vuex and provide you with real-world examples that illustrate how it can simplify state management and streamline your Vue.js applications.
No products found.
If you want to learn more about How To Use Vue Props With Vue Prop Examples
Vuex $store
Vuex $store serves as a centralized storage for the state of an application and provides a set of rules to ensure predictable state mutations.
What Is The Vuex Store?
What Is The Vuex Store? The Vuex Store is a state management pattern and library for Vue.js applications.
It serves as a centralized storage for the state of an application and provides a set of rules to ensure predictable state mutations.
In simple terms, the Vuex Store acts as a single source of truth for your application’s data, which can be accessed and modified from different components.
Where Does Vuex Store Data?
Where Does Vuex Store Data? The data in the Vuex $store is stored in a JavaScript object called the “state.”
This object holds the application’s data and serves as the single source of truth. All components that need access to this data can retrieve it from the store.
Unlike local component data, which is limited to a specific component’s scope, the Vuex $store state is globally accessible within your Vue.js application.
This means that any component can access and modify the state without the need for passing data through props or event emitters.
The state in the Vuex Store is reactive, meaning that when a component retrieves a value from the state and it changes later on, the component will automatically update to reflect the new value.
This reactivity ensures that your application remains in sync with the data stored in the Vuex $store.
Vuex store
Vuex Store Install
Vuex Store Install: To use the Vuex Store in a Vue.js application, you need to install it first.
Vuex can be easily added to your project using npm or yarn, the popular package managers for JavaScript projects.
Here’s an example of how to install Vuex using npm:

Once installed, you can import Vuex into your project and initialize it. Typically, this is done in the main entry point of your application, such as the main.js file:
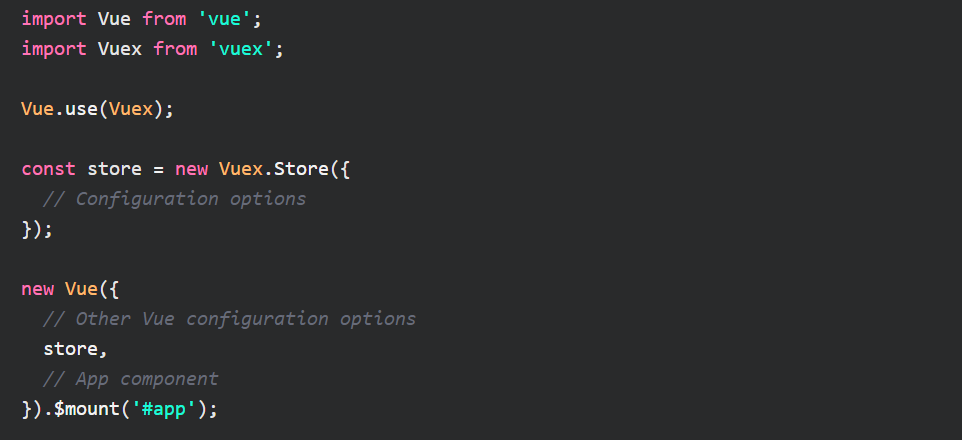
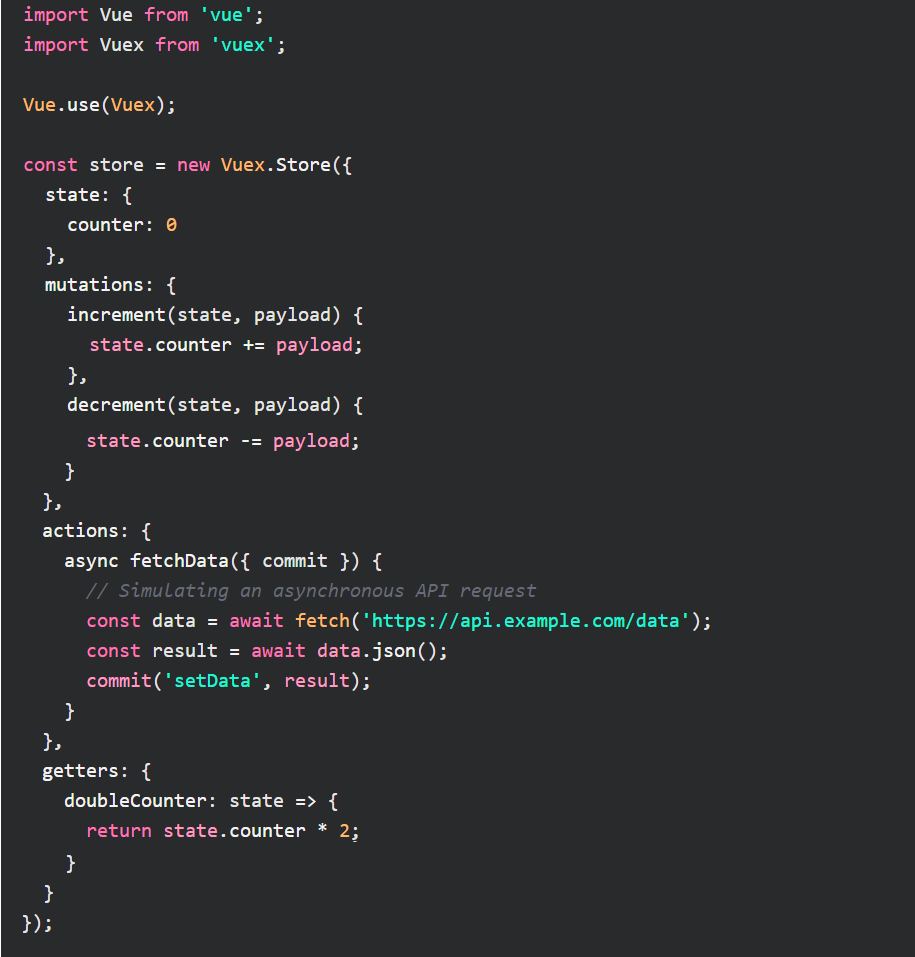
In the code above, we import Vuex, enable it as a plugin for Vue, and create a new Vuex Store instance.
The new Vuex.Store({}) syntax allows you to provide configuration options to customize the behavior of the store.
Finally, we pass the store instance to the root Vue instance, making it available to all components in the application.
Now, your Vue.js application is set up to use the Vuex Store for state management.
Check out my article about Learn Migrating Vue 2 To Vue 3 With Vue Migration Examples.
Vuex Store Example
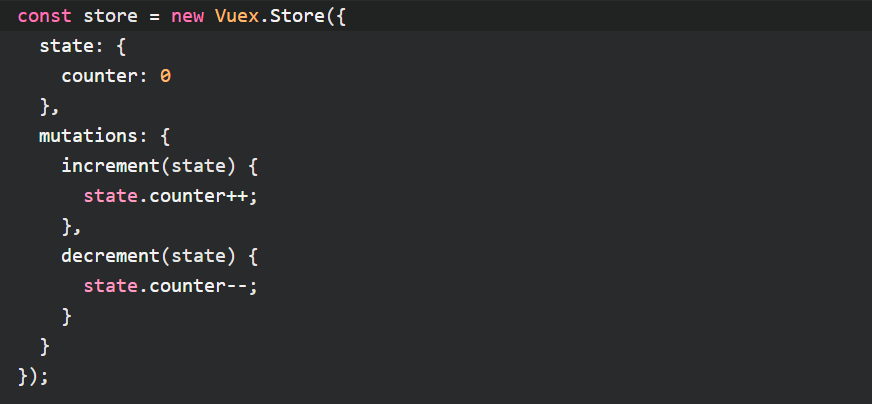
Vuex Store Example: Here’s a simple example to illustrate how to use the Vuex Store in a Vue.js application. Let’s assume we have a counter that can be incremented and decremented:
First, we define the initial state in the Vuex Store:
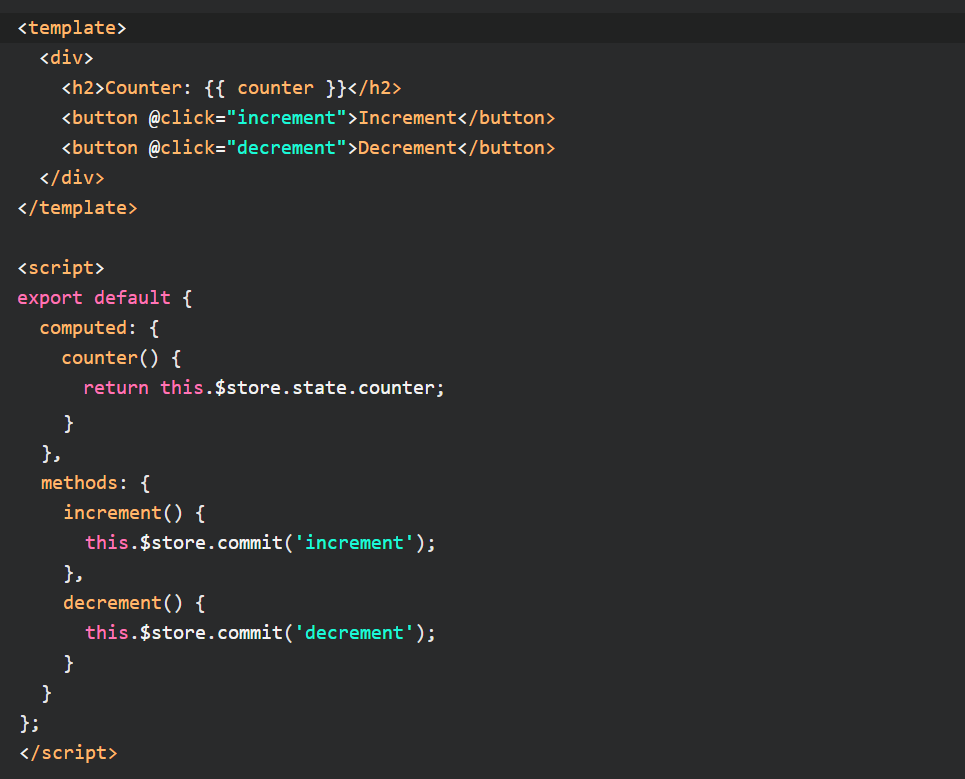
Next, we create two components, CounterDisplay and CounterButtons, to display the counter value and provide buttons to increment and decrement it:
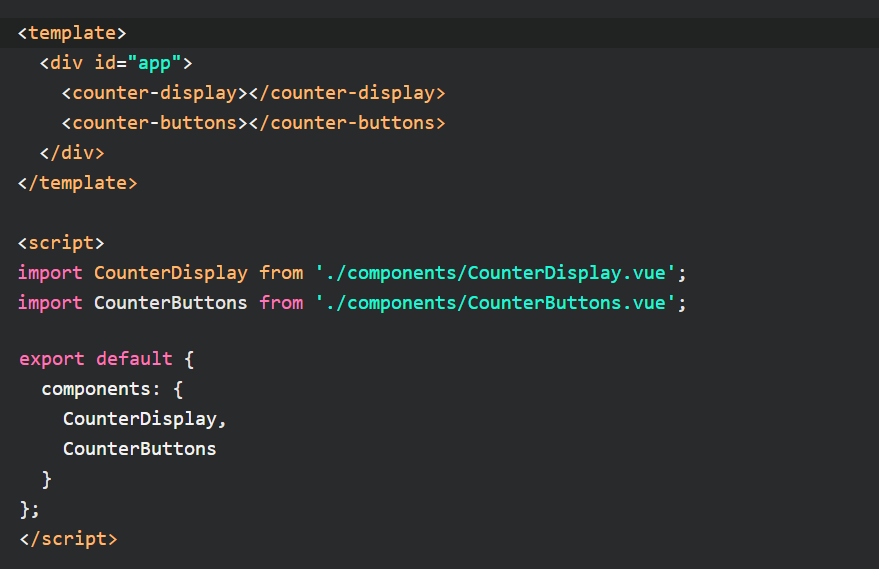
Finally, we use these components in our main app component:
In the example above, we define the initial counter value in the Vuex Store’s state. The mutations section contains the functions to modify the state.
The CounterDisplay component reads the counter value from the store’s state using a computed property and displays it.
The CounterButtons component contains buttons that call the mutation functions to increment or decrement the counter when clicked.
Vuex Store Modules
Vuex Store Modules: In larger applications, the Vuex Store can become complex and hard to manage if all the state and mutations are stored in a single object.
Vuex solves this problem by allowing you to split your store into modules.
Each module can have its own state, mutations, actions, and getters, which makes it easier to organize and maintain your application’s state.
Here’s an example of how to use modules in the Vuex Store:
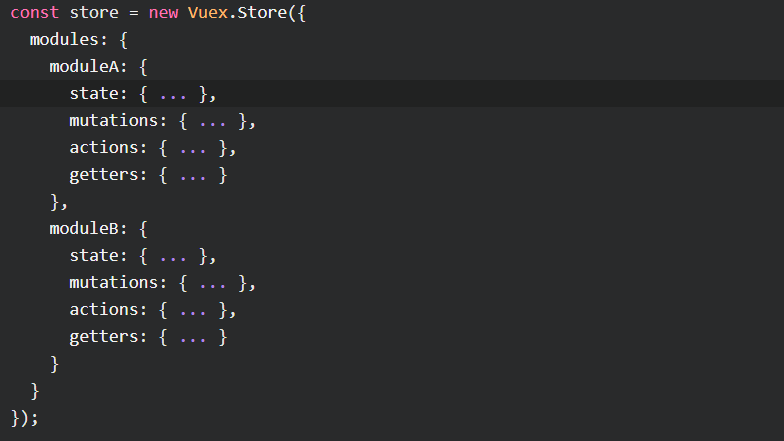
In the code above, we define two modules, moduleA and moduleB, each with their own state, mutations, actions, and getters.
You can nest modules within other modules to create a hierarchical structure that matches your application’s needs.
Vuex Store Private Methods
Vuex Store Private Methods: Mutations and actions are typically declared as public methods that can be called from components.
However, there might be cases where you want to define private methods within your store that should only be accessed internally.
Vuex provides a convention to mark these methods as “private” using an underscore _ prefix.
Here’s an example of a Vuex Store with private methods:
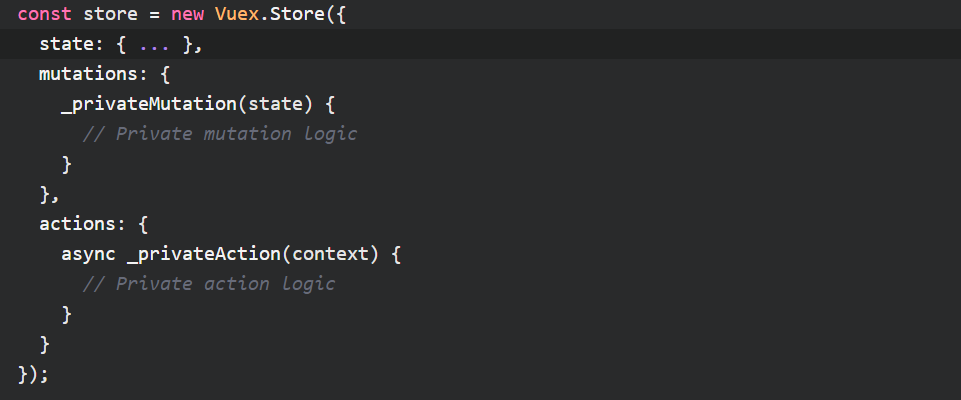
In the code above, we prefix the names of the private mutation and action with an underscore _.
This naming convention signals to other developers that these methods are intended for internal use within the store and should not be called directly from components.
While JavaScript does not enforce true privacy, using the underscore convention helps to indicate the intended usage of these methods and discourages direct access from outside the store.
Vuex Store Best Practices
Vuex Store Best Practices: When working with Vuex, it’s important to follow some best practices to ensure a clean and maintainable state management implementation.
Here are a few guidelines to consider:
Centralize your state: Store all your application’s data in the Vuex Store’s state object.
This provides a single source of truth and makes it easier to track and manage your application’s data flow.
Use mutations for synchronous updates: Mutations should be used to modify the state synchronously.
They should be pure functions that take the state as the first argument and the payload (data) as the second argument.
Mutations should never directly trigger side effects or asynchronous operations.
Use actions for asynchronous and complex logic: Actions are responsible for handling asynchronous operations, such as API requests, and for orchestrating complex logic.
Actions can commit mutations to update the state and can be called from components using dispatch.
Keep your store modular: If your application grows, split your store into modules to organize related state, mutations, actions, and getters.
This helps maintain a clear structure and avoids a monolithic store.
Use getters to derive computed values: Getters are useful for computing derived state based on the store’s state.
They provide a convenient way to access computed values without modifying the state directly. Getters can also accept parameters to perform dynamic computations.
Avoid direct state mutations in components: Components should not directly modify the state. Instead, they should dispatch actions or commit mutations to update the state.
This ensures that the state mutations are tracked and controlled within the Vuex Store.
Use tools like Vuex Devtools: Vuex Devtools is a browser extension that provides a graphical interface to inspect and debug your Vuex Store.
It helps track state changes, actions, and mutations, making it easier to understand and debug your application’s state management.
Don´t forget to check out my article about A Guide To Vue Events With Vue Event Examples
Vuex Store Getters With Parameters
Vuex Store Getters With Parameters: Getters is a function that allows you to derive computed values based on the store’s state.
They provide a way to retrieve and transform data from the store without directly modifying it.
Vuex getters can also accept parameters, allowing you to perform dynamic computations based on specific criteria.
Here’s an example of a Vuex Store getter with parameters:
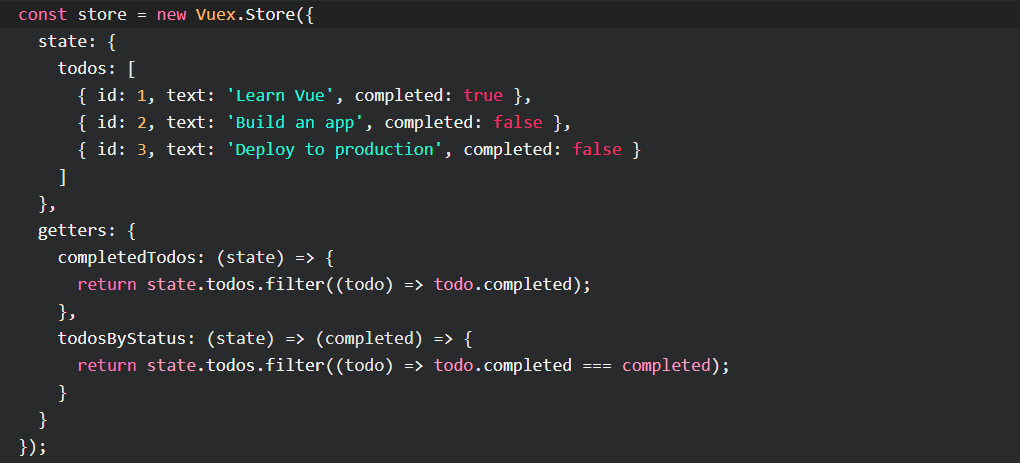
In the code above, we define two getters: completedTodos and todosByStatus. The completedTodos getter returns an array of all the completed todos from the store’s state.
The todosByStatus getter accepts a parameter completed and returns an array of todos based on their completion status.
By passing true or false to the getter, we can retrieve either the completed or incomplete todos from the store.
To access these getters from a component, we can use the $store.getters object.
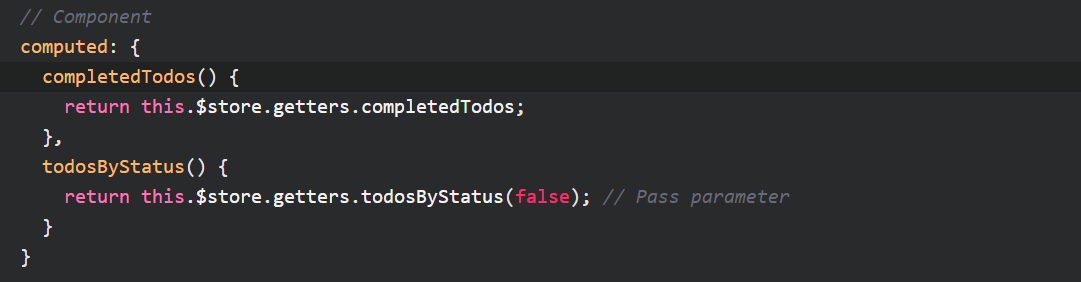
In the example above, the completedTodos computed property retrieves the computed value from the completedTodos getter, while the todosByStatus computed property calls the todosByStatus getter and passes false as the parameter.
Vuex Store Sessionstorage
Vuex Store Sessionstorage: By default, the data in the Vuex Store is stored in memory and is only available for the duration of the user’s session.
If the user refreshes the page or closes the browser, the store’s state will be reset.
However, you can persist the Vuex Store’s state across page refreshes by integrating it with session storage.
Session storage is a web browser API that allows you to store data for a specific session. When the user closes the browser, the session storage data is cleared.
To use session storage with Vuex, you can leverage plugins such as vuex-persistedstate. This plugin automatically saves and retrieves the Vuex Store’s state to and from session storage.
Here’s an example of using vuex-persistedstate to store the Vuex Store’s state in session storage:
Install vuex-persistedstate using npm or yarn:

Import and use the plugin in your Vuex Store configuration:

By adding createPersistedState() as a plugin, the Vuex Store’s state will automatically be stored in session storage.
Whenever the page is refreshed or reopened, the state will be retrieved from session storage and applied to the store.
Vuex Store Object
Vuex Store Object: The Vuex Store object provides various properties and methods that you can use to interact with the store and its data. Here are some examples:
$store.state: This property allows you to access the store’s state object. You can retrieve and modify the state using this property.
For example, this.$store.state.todos will give you access to the todos state.
$store.getters: This property provides access to the store’s getters. You can use it to retrieve computed values based on the state.
For example, this.$store.getters.completedTodos will give you the completed todos computed by the completedTodos getter.
$store.commit: This method is used to commit mutations and modify the store’s state. You pass the mutation name as the first argument and an optional payload as the second argument.
For example, this.$store.commit(‘increment’, 5) will call the increment mutation with a payload of 5.
$store.dispatch: This method is used to dispatch actions to perform asynchronous operations or complex logic.
You pass the action name as the first argument and an optional payload as the second argument. For example, this.$store.dispatch(‘fetchData’) will dispatch the fetchData action.
$store.subscribe: This method allows you to subscribe to store mutations. You can provide a callback function that will be called whenever a mutation is committed.
This can be useful for performing side effects or updating external components based on state changes.
Here is an example on how to $store.getters:
After creating the store, it can be used in Vue components by accessing the $store object:
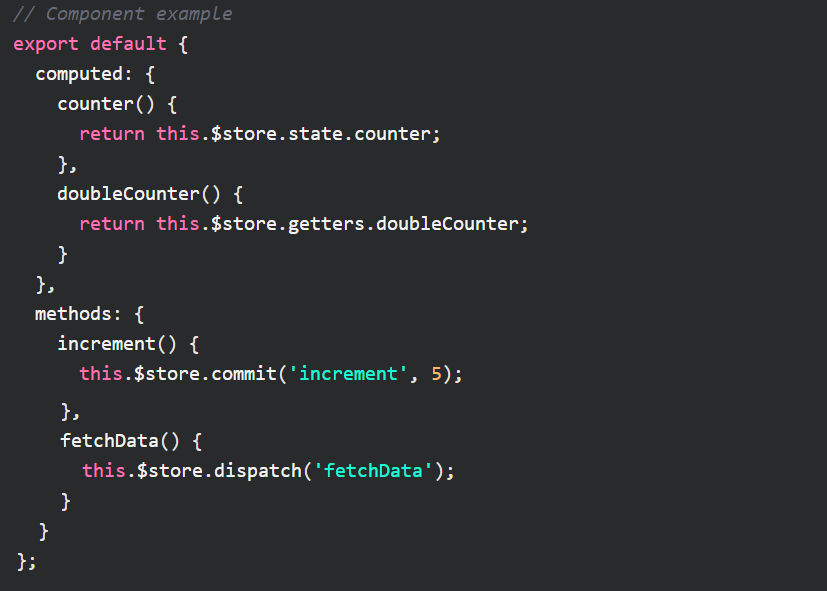
By utilizing the store object’s properties and methods, components can interact with the store, retrieve data from the state, compute derived values using getters, and trigger state modifications through mutations and actions.
Don´t forget to check out my article about What Is Vue Js Composable? Vue Composables Examples
Vuex Stores
Multiple Vuex Stores
Multiple Vuex Stores: In some cases, you may find the need to have multiple Vuex stores in your Vue.js application.
This can be useful when you want to isolate and organize specific sets of state, actions, mutations, and getters.
Having multiple stores can help you manage complex applications with different modules or domains.
To create multiple Vuex stores, you can use the createStore method provided by Vuex. Here’s an example:
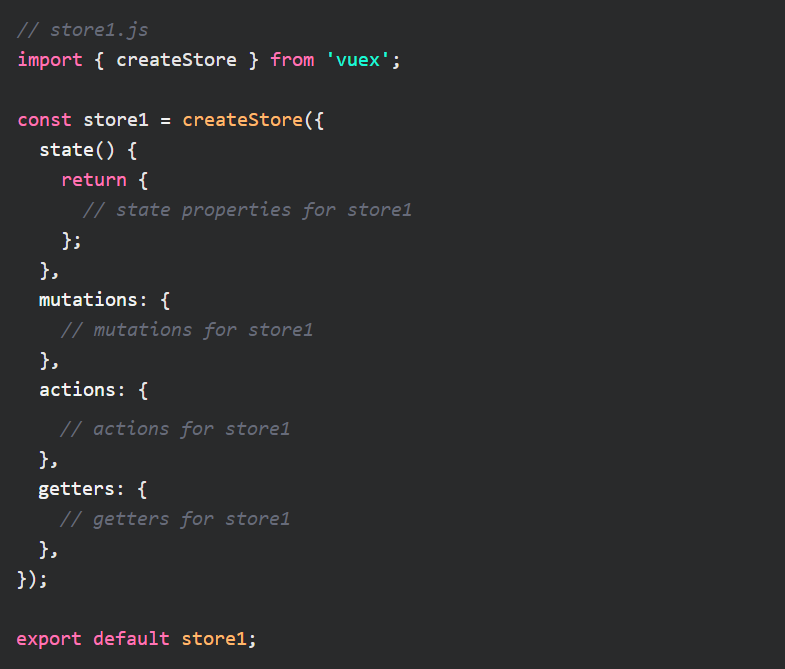
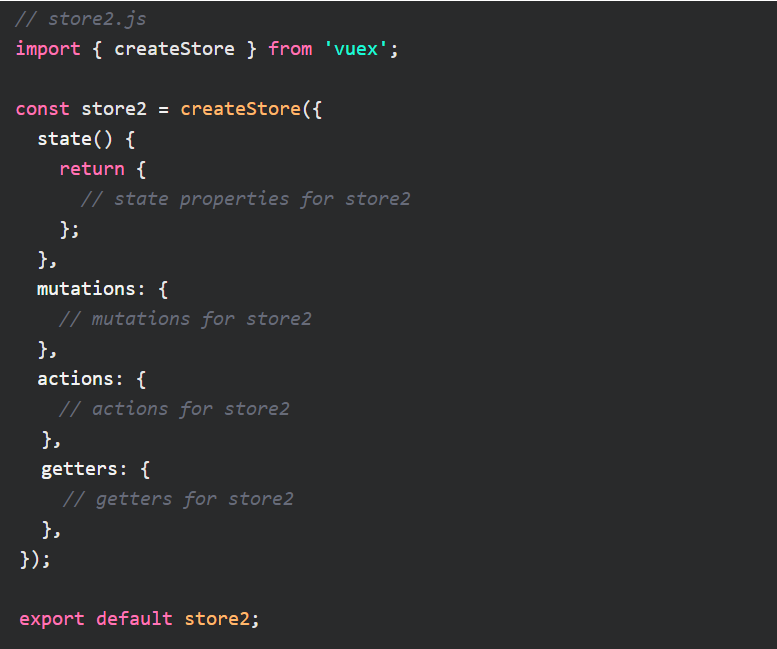
Once you have defined multiple stores, you can use them in your Vue application by passing them to the createApp function during initialization:
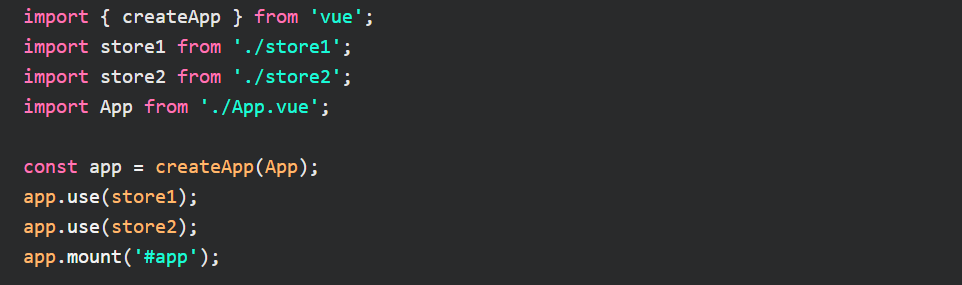
Now, each store can be accessed by its corresponding components using the $store property, just like you would with a single store.
For example, to access the state property of store1 in a component:

Vuex Merge Stores
Vuex Merge Stores: While having multiple Vuex stores can be useful in certain scenarios, there may be cases where you need to merge the state from multiple stores into a single store.
Vuex provides a way to achieve this by using the store.registerModule() method.
Let’s imagine you have an application with multiple feature modules, each having its own Vuex store.
To merge the stores, you can create a new Vuex store and register the individual module stores into it. Here’s an example:
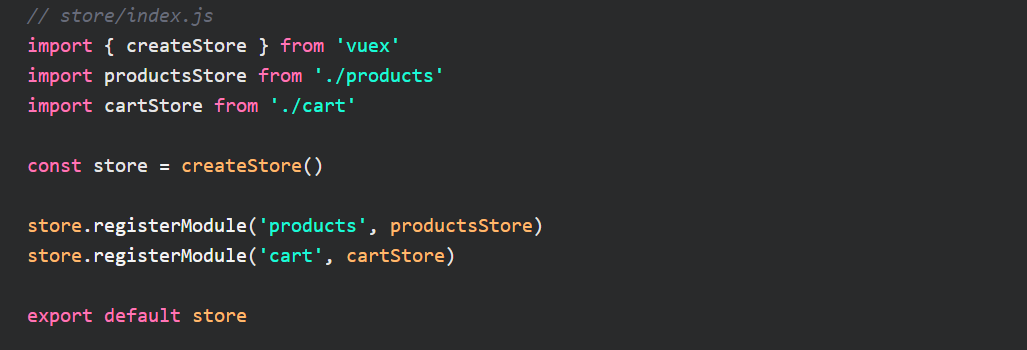
In this example, we import the productsStore and cartStore from separate files. Then, using the registerModule() method, we merge these stores into a new Vuex store named store.
The first argument passed to registerModule() is the namespace for the module, which allows you to access the module’s state, mutations, actions, and getters using that namespace.
By merging the stores, you can access the state and other Vuex functionalities from a single store, providing a unified interface to your application’s state.
Vuex Nested Stores
Vuex Nested Stores: In addition to multiple and merged stores, Vuex also supports the concept of nested stores.
Nested stores allow you to create a hierarchical structure for managing your application’s state. This can be particularly useful when you have complex modules with their own submodules.
To demonstrate this, let’s consider an application with a “User” module that contains nested submodules for “Profile” and “Settings.”
Each submodule has its own state, mutations, actions, and getters. Here’s an example:
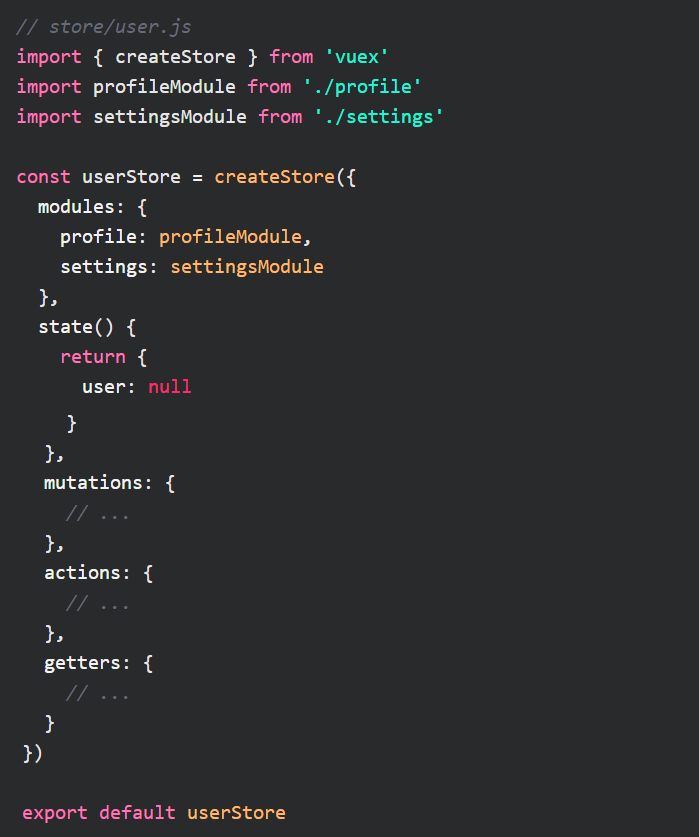
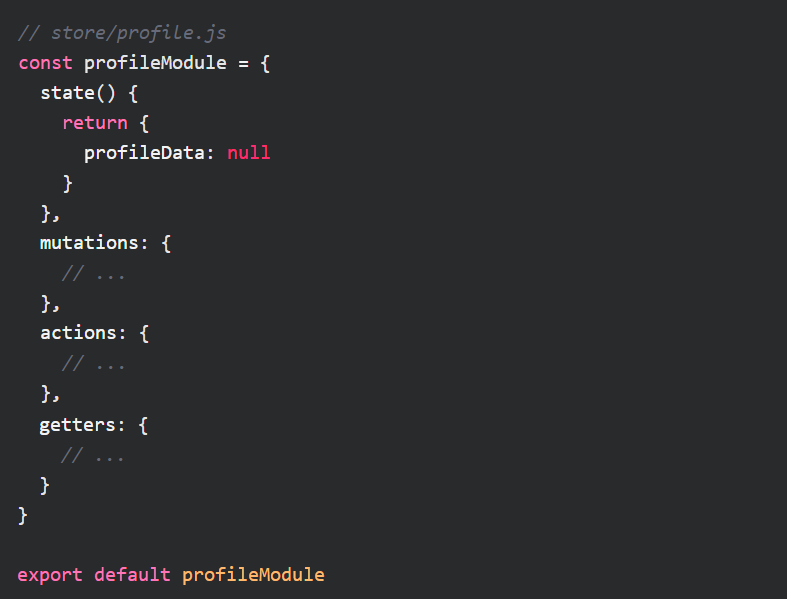
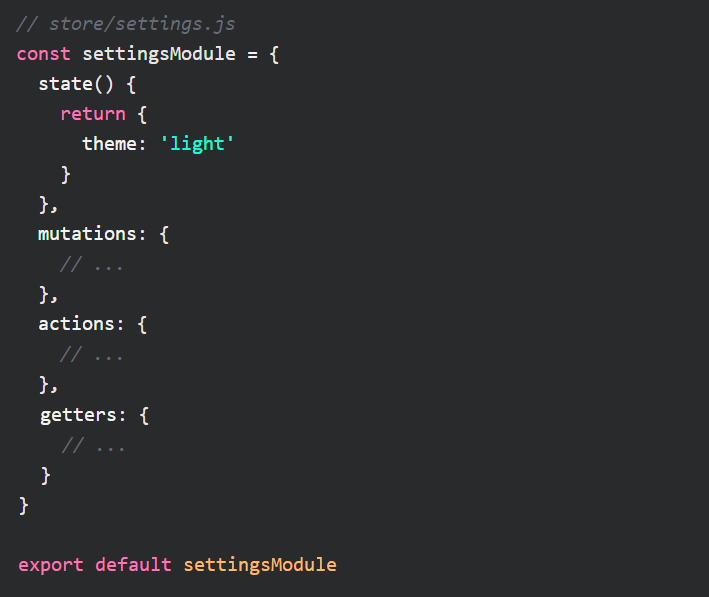
In this example, we have a userStore with two nested modules: profile and settings. Each module has its own state and other Vuex functionalities.
By structuring the stores in this manner, you can organize and manage the state in a hierarchical manner, reflecting the structure of your application.
How To Get State Value In Vuex?
Accessing the state value is straightforward and follows a simple syntax.
The state in Vuex is a reactive object, meaning that any changes to its properties will automatically trigger updates in components that are using the state.
To get the value of a state property in Vuex, you can use the $store.state object followed by the name of the property. Here’s an example:

In the above code, count is the name of the state property. By accessing $store.state.count, you can retrieve its current value.
It’s important to note that while you can directly access the state value, it is generally recommended to use getters to retrieve state values in Vuex.
Getters provide a layer of abstraction and can perform additional computations or transformations on the state before returning the value.
To define a getter in Vuex, you can use the getters property in the store configuration. Here’s an example:

In the above code, we define a getter called getCount that simply returns the value of the count state property.
To access the getter in a component, you can use the $store.getters object followed by the name of the getter. Here’s an example:

By using getters, you can encapsulate any necessary logic related to retrieving state values and ensure consistency across your application.
How Do I Use Store In Vue 3?
The process of using a store remains similar to previous versions. However, there are some changes to the syntax due to the introduction of the Composition API.
Let’s explore how to use a store in Vue 3.
Install Vuex:
First, make sure you have Vuex installed in your Vue 3 project. You can install it using a package manager like npm or yarn:

Create a Store:
Next, create your Vuex store. In Vue 3, you can use the createStore function provided by Vuex. Here’s an example:

In this example, we define the store with its state, mutations, actions, and getters.
Provide the Store:
To use the store in your Vue 3 application, you need to provide it to your app. This is typically done in the main entry file (e.g., main.js). Here’s an example:
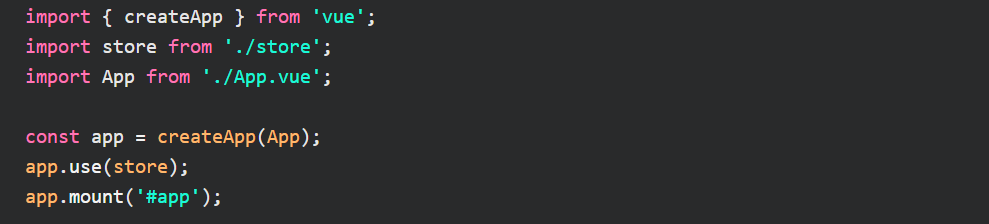
By calling app.use(store), you make the store available to all components in your application.
Accessing Store in Components:
Once you have provided the store, you can access it in your components.
In the setup function of a component, you can use the useStore function from Vuex to access the store instance. Here’s an example:
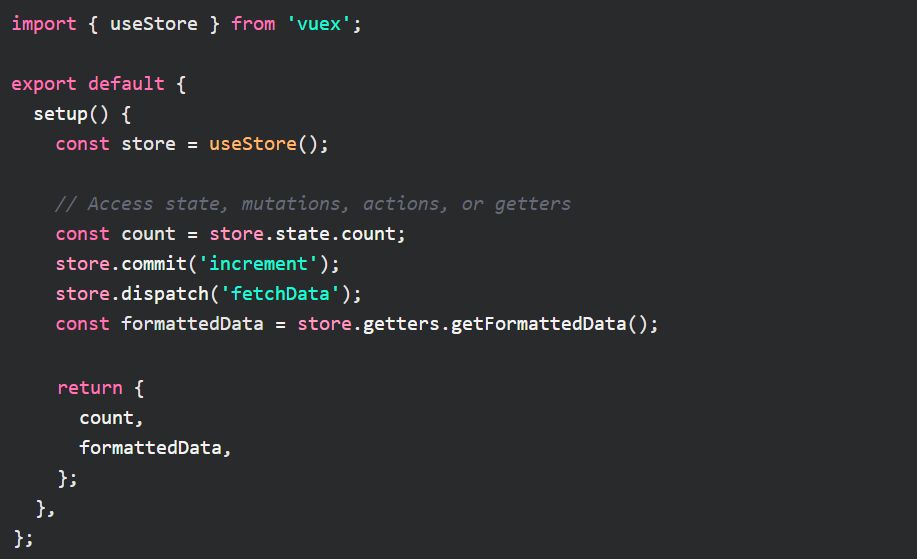
In the above code, we use useStore to access the store instance and then retrieve state values, commit mutations, dispatch actions, or access getters as needed.
Related Articles
- Learn To Use Vue CSS Variables With Vue Examples
- Vue Import Component Into Another Component
- How To Use Vue3 Image Src? Vue 3 Image Path Examples
- How To Implement In Vue js Google Login?
- How To Use Google Map Vuejs? Google maps examples
Hopefully, you now have a better understanding of how you can use Vuex $store.
Understanding how you can use Vuex $store is gonna help you to have a centralized storage for the state of an application and provides a set of rules to ensure predictable state mutations.